Z-Wave Manual
Z-Wave Manual
Hubitat Elevation is a Z-Wave® Plus central static controller which may be included in any Z-Wave network to operate Z-Wave certified devices from other manufacturers in your home.
This document is intended to convey standard Z-Wave operations available on the hub as is necessary for any certified Z-Wave controller. If you are a user looking to troubleshoot a Z-Wave problem on your hub, we suggest other documentation, such as How to Troubleshoot Z-Wave.
The information in this document is applicable to hub models C-7 and newer only.
About Z-Wave® technology
The Z-Wave protocol is a low powered wireless interoperable RF communications technology designed specifically for control, monitoring and status of residential and light commercial Internet of Things (IoT) devices. It supports full mesh networking and may be used with or without a coordinator node (hub). Z-Wave operates in the sub-1 GHz band and is impervious to interference from Wi-Fi and other wireless technologies in the 2.4 GHz range such as Bluetooth® and Zigbee. For a more information about Z-Wave technology, please visit z-wave.com.
Regardless of vendor, all mains-powered nodes within the network will act as repeaters to increase range and reliability of the network as a whole. These non-battery-operated devices are called repeaters or sometimes "routers." Battery-powered Z-Wave devices do not repeat signals and are referred to as end devices.
The Hubitat Elevation hub supports Z-Wave S2 security. When a security-enabled Z-Wave device is added to the Hubitat Elevation network, its communication will utilize 128-bit AES secure encryption.
Supported Command Classes
This device functions as a static controller based on the Z-Wave Controller Library. It controls devices using the following Z-Wave Command Classes.
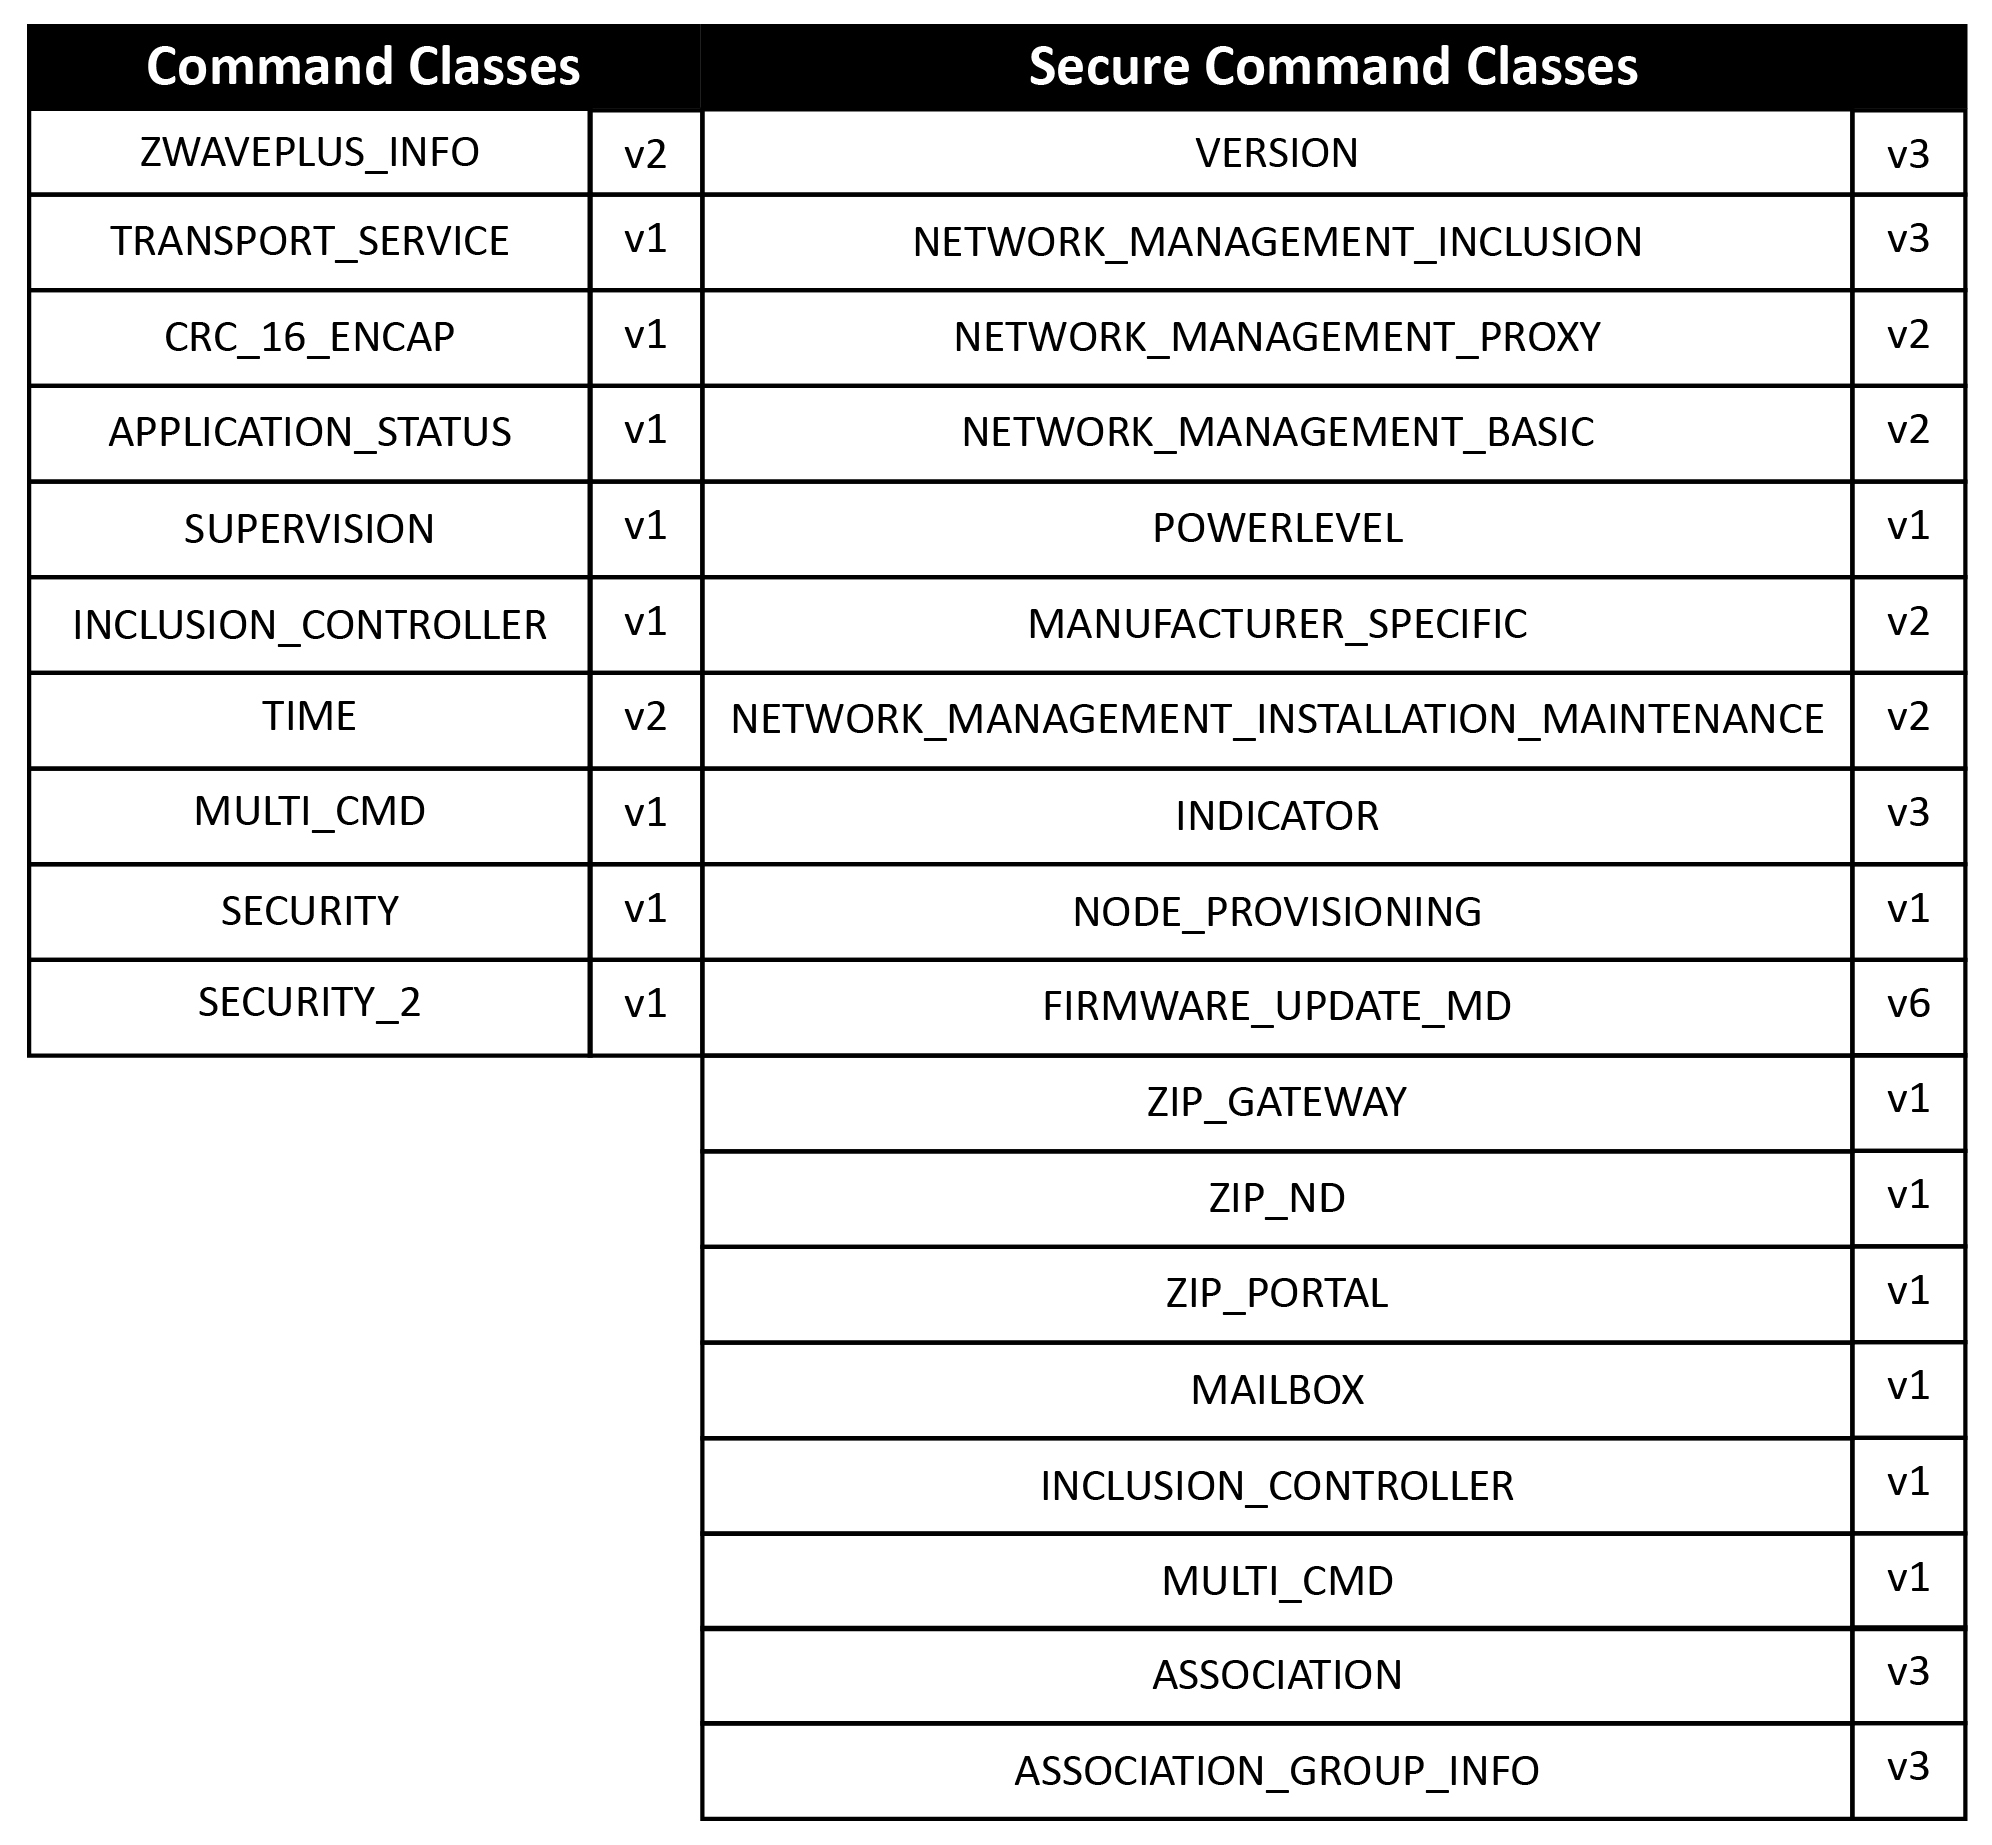
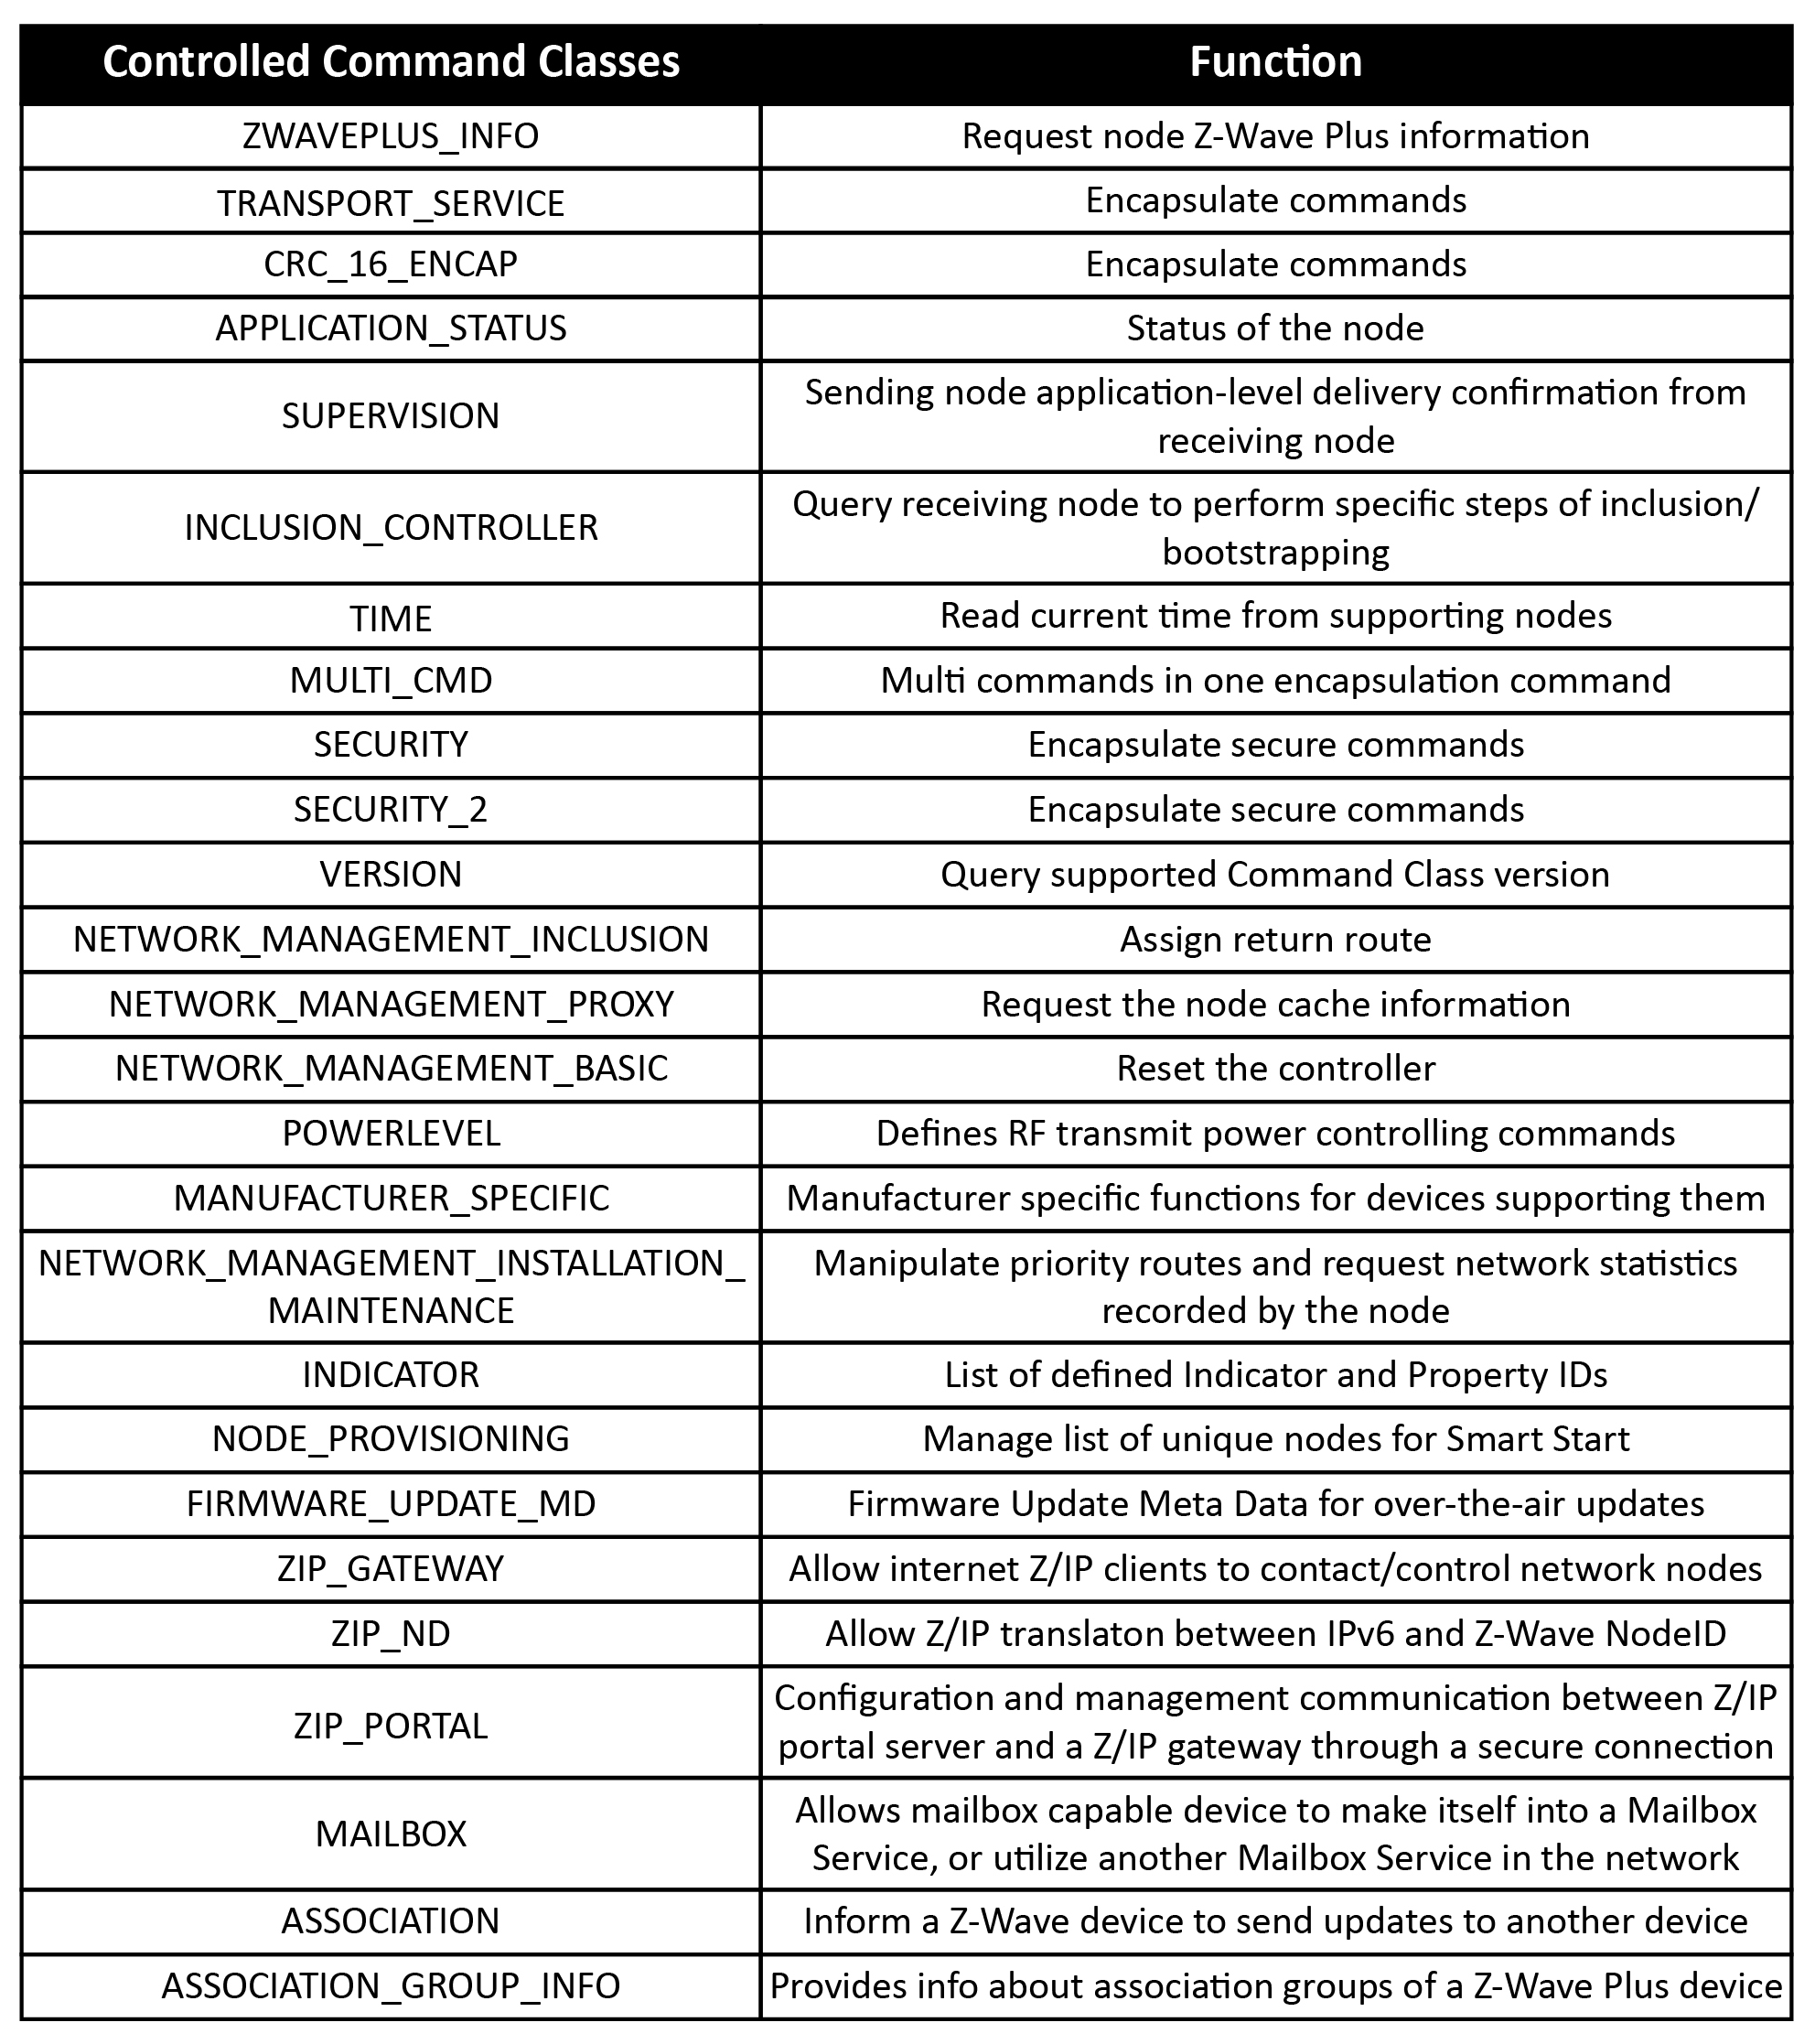
Controlled Command Classes
The table below lists the controlled command classes and their function.
Association Group Information
This static controller supports Association Group 1 (Lifeline) with a maximum of 1 node. This controller will send Command Class DEVICE_RESET_LOCALLY to the Lifeline before performing default factory reset.

Remove a Z-Wave device from the network
Prior to adding devices to the Z-Wave network of your hub, it is required that you first exclude the device from any previous networks it has joined. This may be accomplished by performing a Z-Wave Exclude to remove the device from the Z-Wave network of the controller it formerly joined. However, it is not required that you perform this step using the previous controller. If the previous controller is unavailable or it is not convenient to perform Z-Wave Exclusion using the former controller, a General Exclusion may be performed from the Hubitat Elevation hub.
Z-Wave General Exclusion - Remove devices from a previous hub connection
-
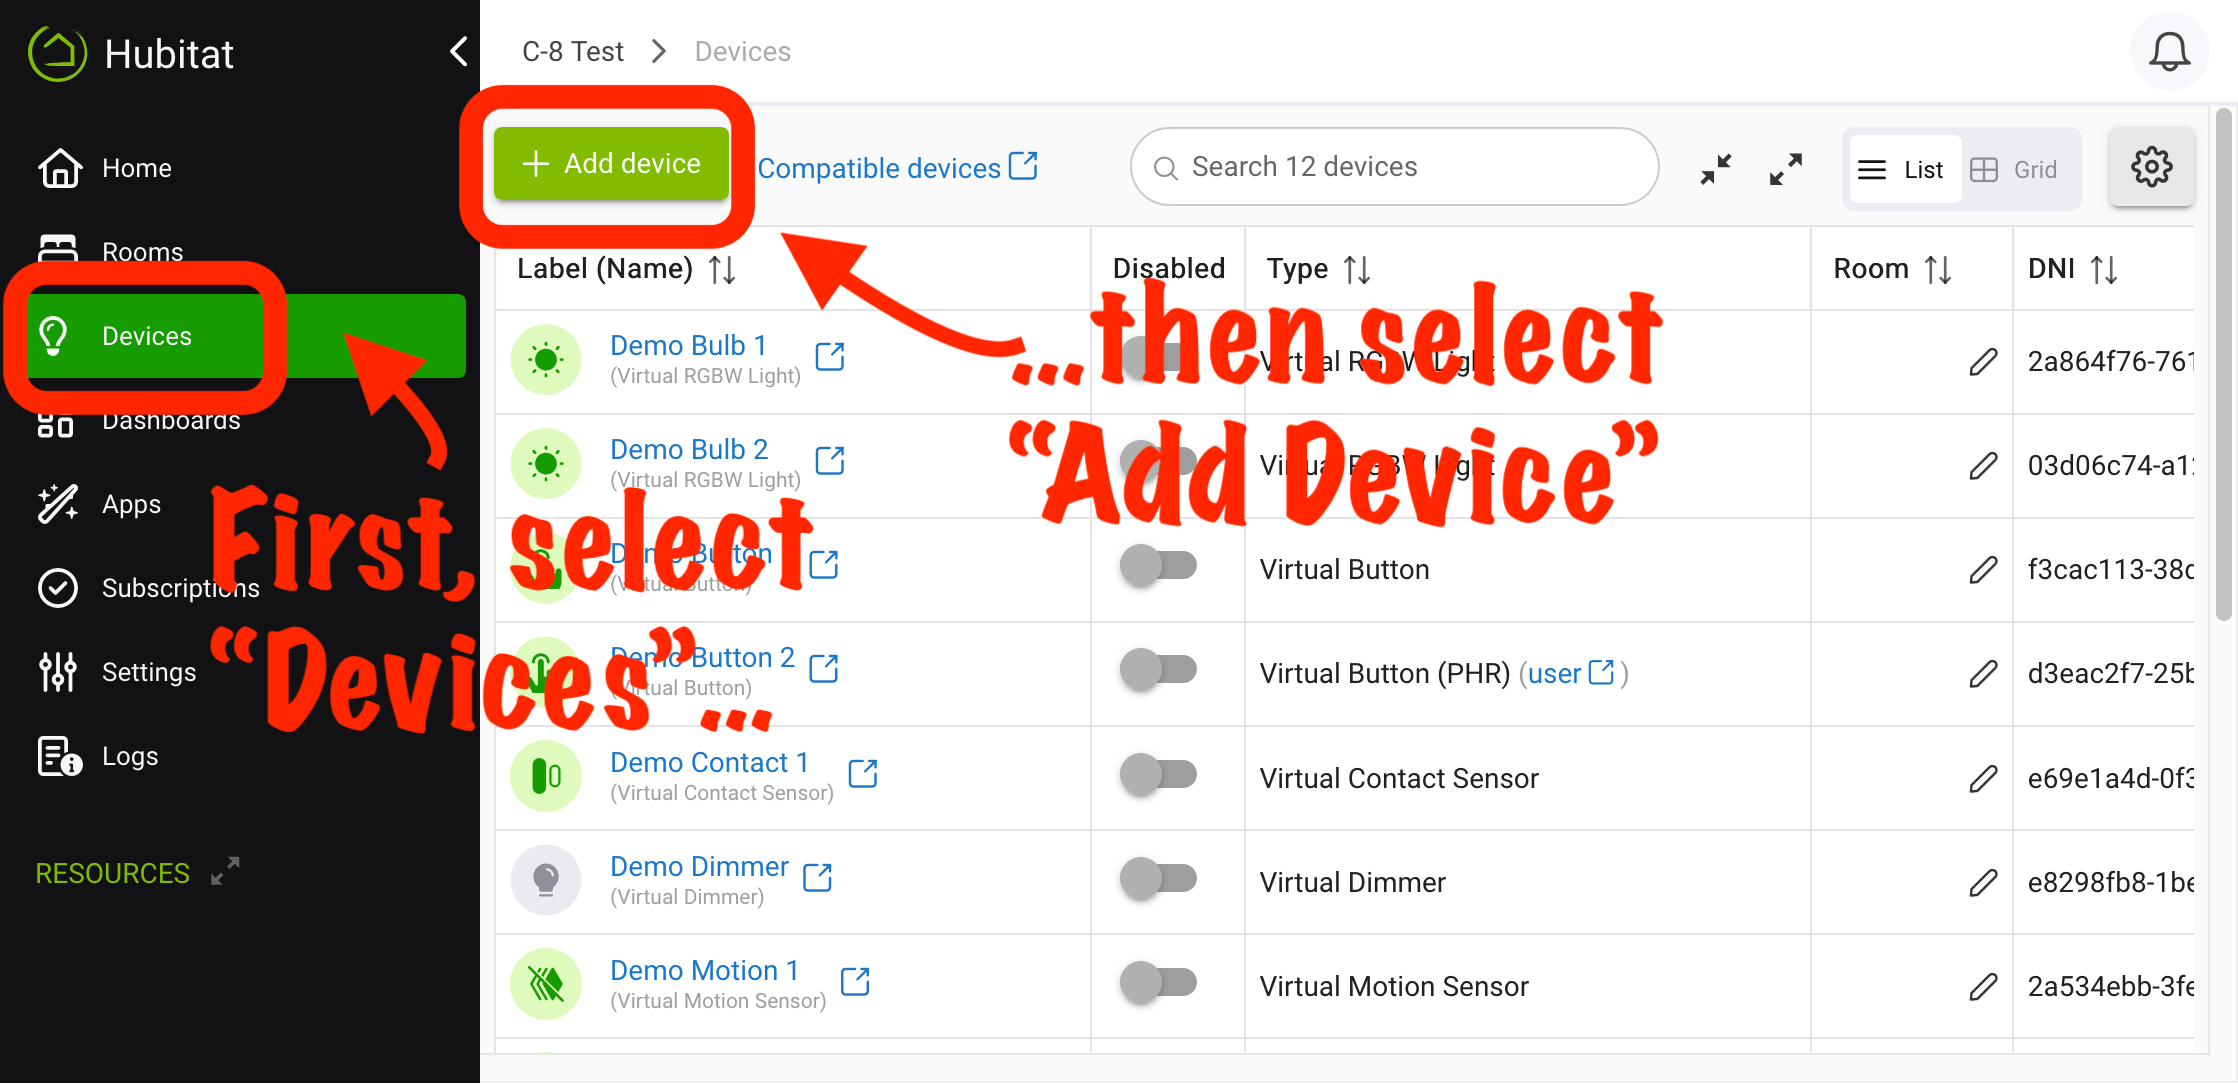
Navigate to the Devices page from the hub home page, then select Add Device:
-
Navigate to Settings > Z-Wave Details.
-
Select Z-Wave Exclude (under Maintenance). Hubitat Elevation will enter Z-Wave Exclude mode for 30 seconds.
-
Place your device into Z-Wave exclusion mode. The device manual should document this procedure for your particular device (often pressing or holding a button and often the same as inclusion). If the device manual is not available, Hubitat also has instructions for many compatible devices on the Compatible Devices List under the "Instructions" column.
-
Upon successful exclusion, the Hubitat Elevation hub will display the message "Unknown Z-Wave device successfully excluded" (or the name of the device if it was added to this hub; in that case, it is preferable to remove the device from its device detail page instead).
Alternatively, a general Z-Wave exclusion can be performed from Devices > Add Device > Start Z-Wave Inclusion (which may be convenient if you are about to add a Z-Wave device and want to make sure it is excluded — and ready to be included — first).
Z-Wave Exclusion - Remove devices from your Hubitat Elevation hub
- Navigate to the Devices page.
- Find your specific Z-Wave device in the list and select it to navigate to its device detail page
- Select the Remove Device button (bottom right of the page). The Hubitat Elevation hub will enter Z-Wave Exclude mode for 30 seconds.
- Place your device into Z-Wave Exclusion mode. Refer to the device manual for instructions. Hubitat also has instructions for many compatible devices on the Compatible Devices List under the "Instructions" column. (This is often the same procedure used to place your device into Z-Wave Inclusion mode in order to join the Z-Wave network.)
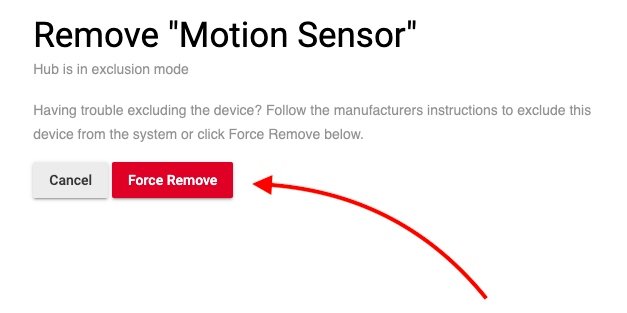
- Upon successful exclusion, you will be automatically redirected back to the Devices page. If the device was not excluded, you will eventually be offered the option to Force Remove. This does not perform a proper exclusion but simply removes the device from the hub's device list. You will need to check Settings > Z-Wave Details later to verify that the node no longer exists, and you will need to reset and/or exclude the device before using it again on this or any hub. (Therefore, a proper exclusion is recommended if possible instead.)
Add a Z-Wave device to the network
Z-Wave Inclusion - Add devices to your Hubitat Elevation hub
-
Select the Devices menu item from the sidebar, then select Add Devices in the upper right:
-
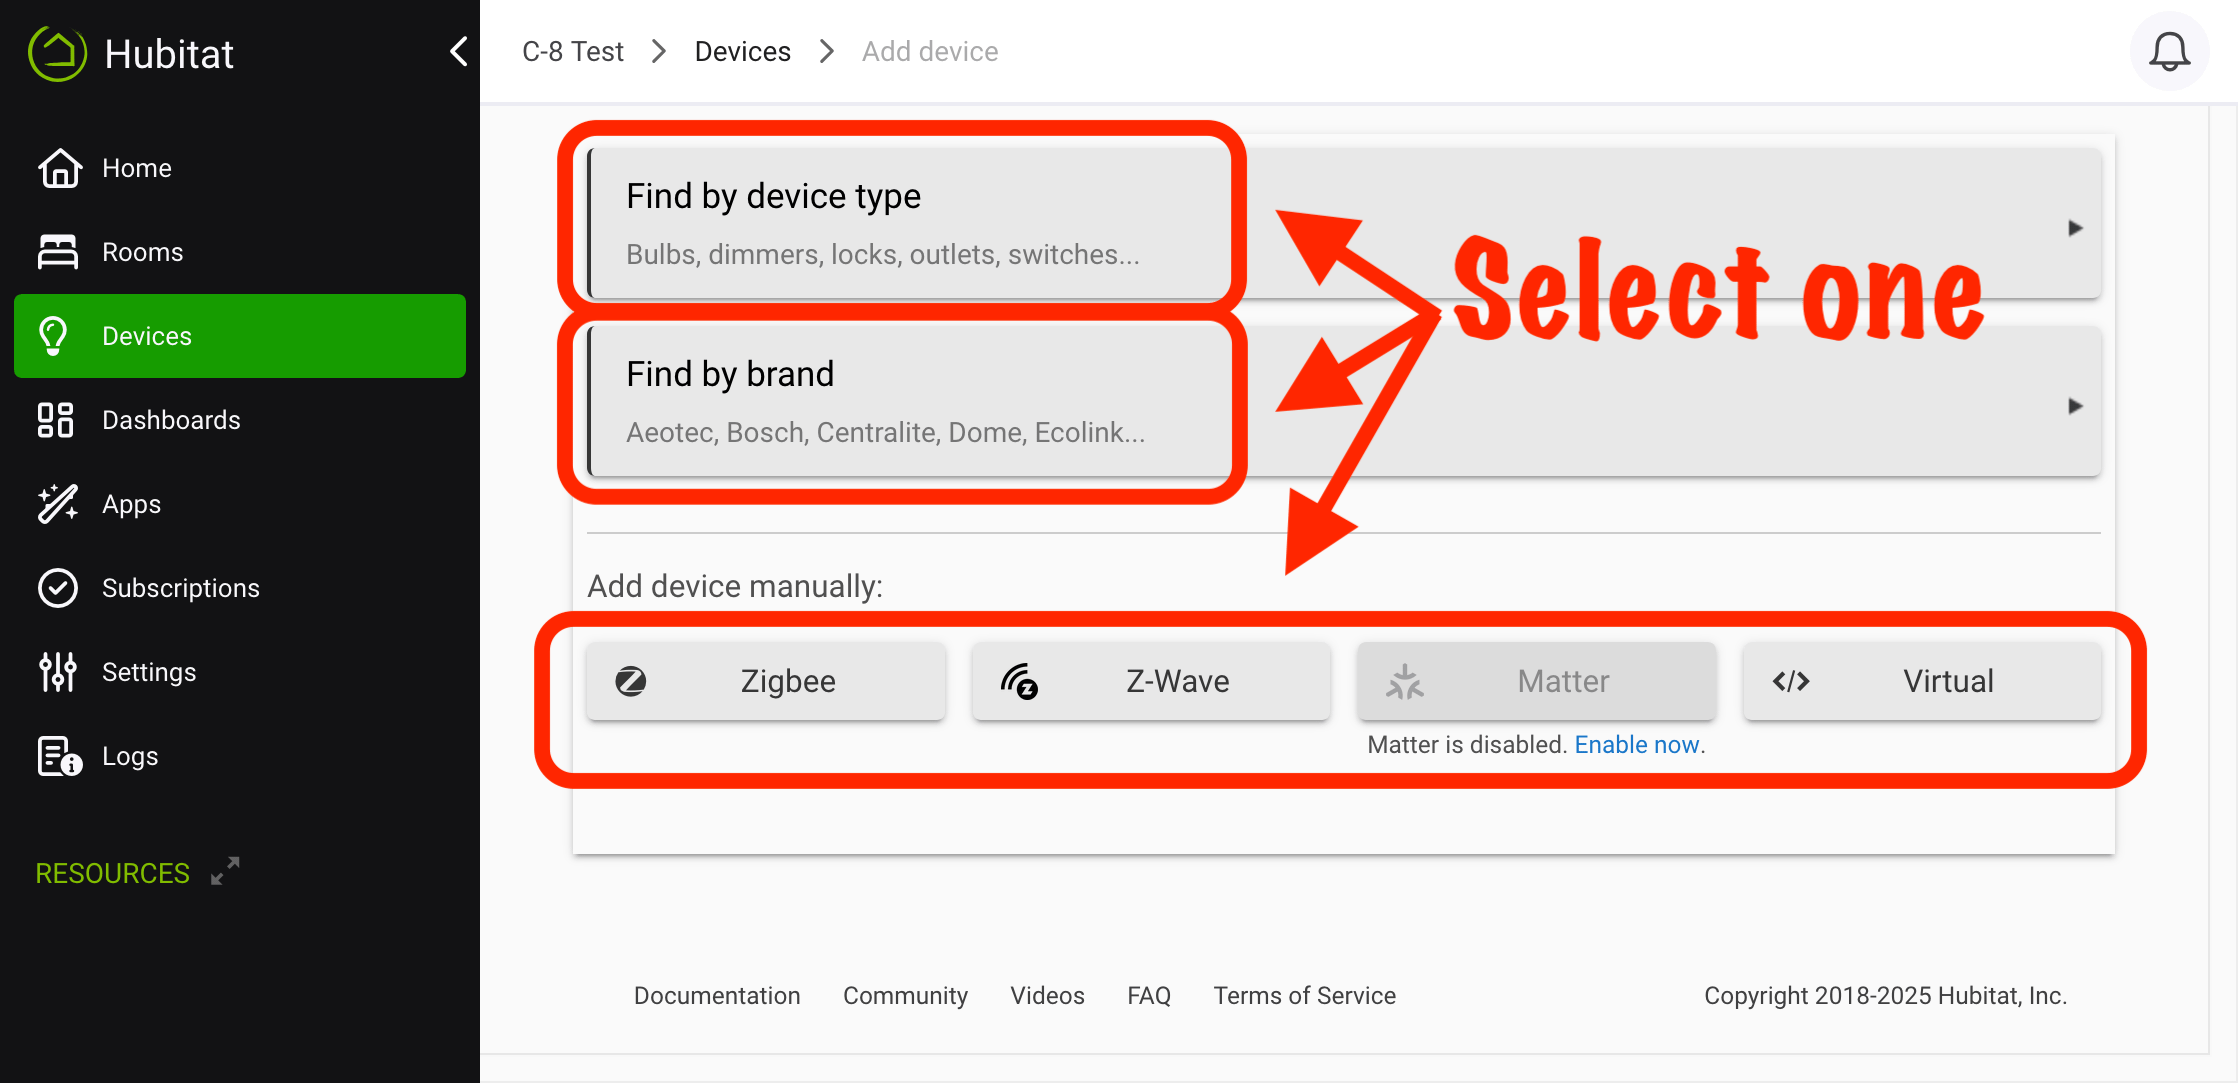
Select Z-Wave under Add Device Manually, or use the Find by device type (to see compatible devices sorted by type, like dimmer or motion sensor) or Find by brand (to see compatible devices sorted by manufacturer/brand) options, then continue following the prompts to find your specific compatible device.
-
Put your device in paring mode (if not virtual), according to the device-specific instructions presented in step 2 or the ones included with your device, and follow the prompts.
-
Non-secure Z-Wave devices will pair without any additional action required. Devices that support Z-Wave S2 security will prompt as described below. (Devices that support security but only the older S0 security will also not prompt, and they may pair either securely or not, depending on what the device requests. It is recommended to avoid S0-only whenever possible.)
-
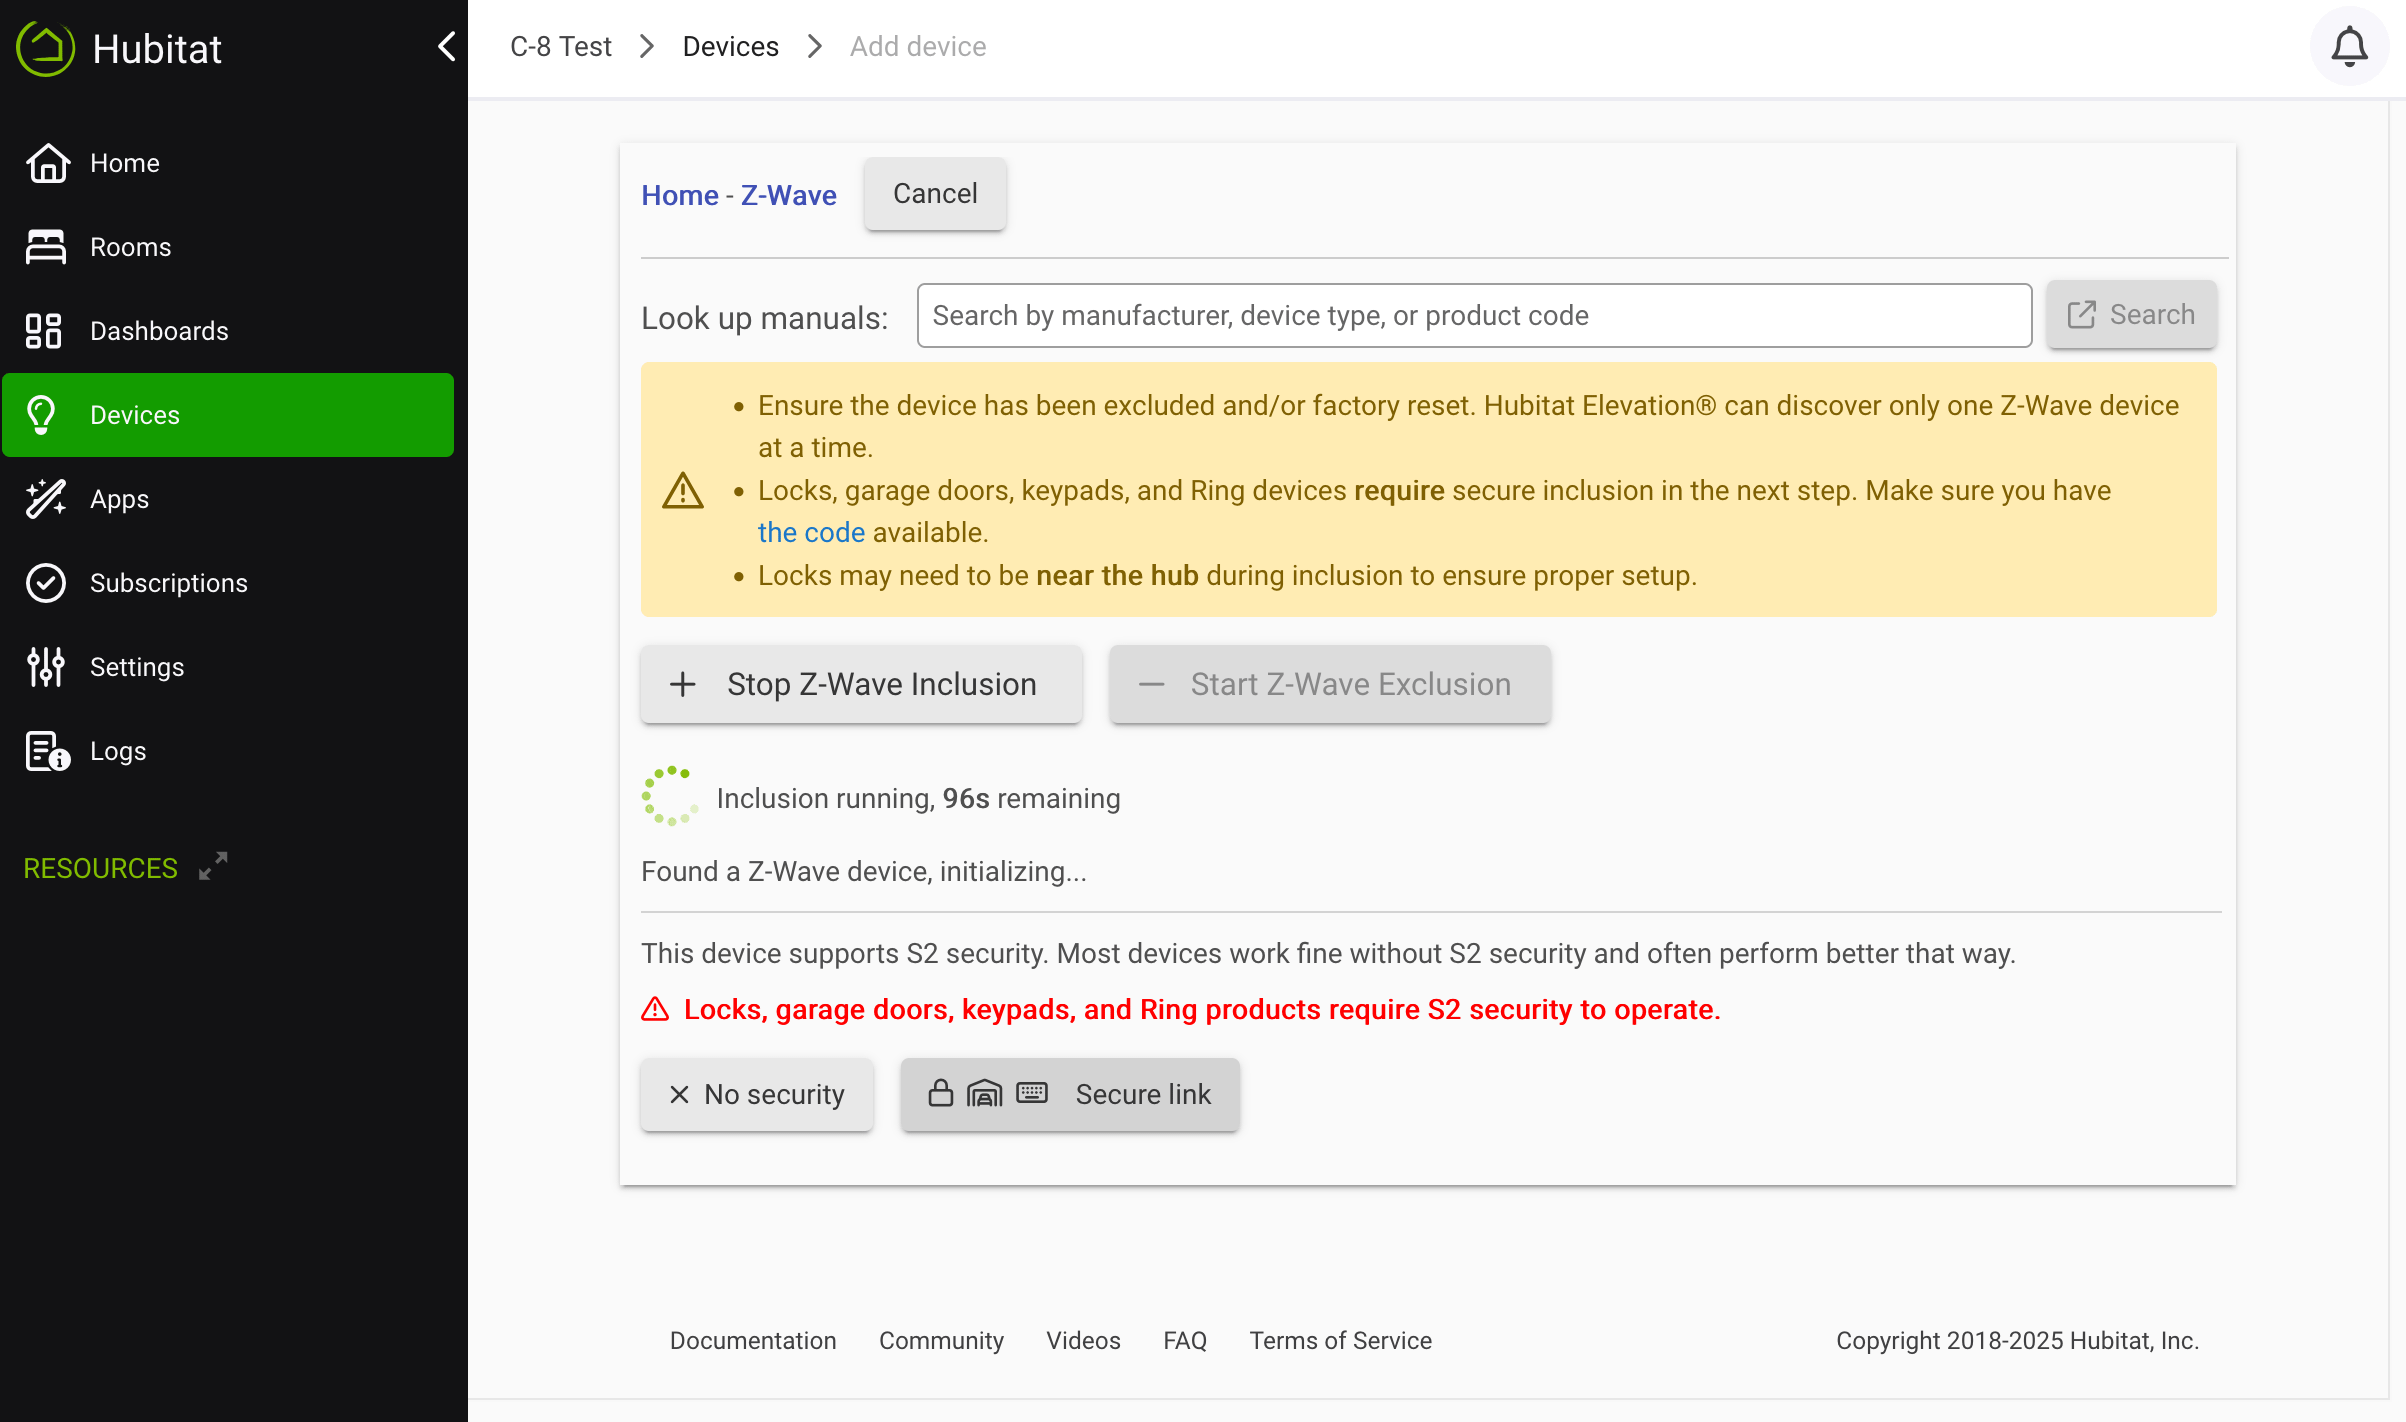
For Z-Wave devices that support S2, you will see a security popup shortly after pairing begins asking if you want to pair with or without security. Choose your desired option:
-
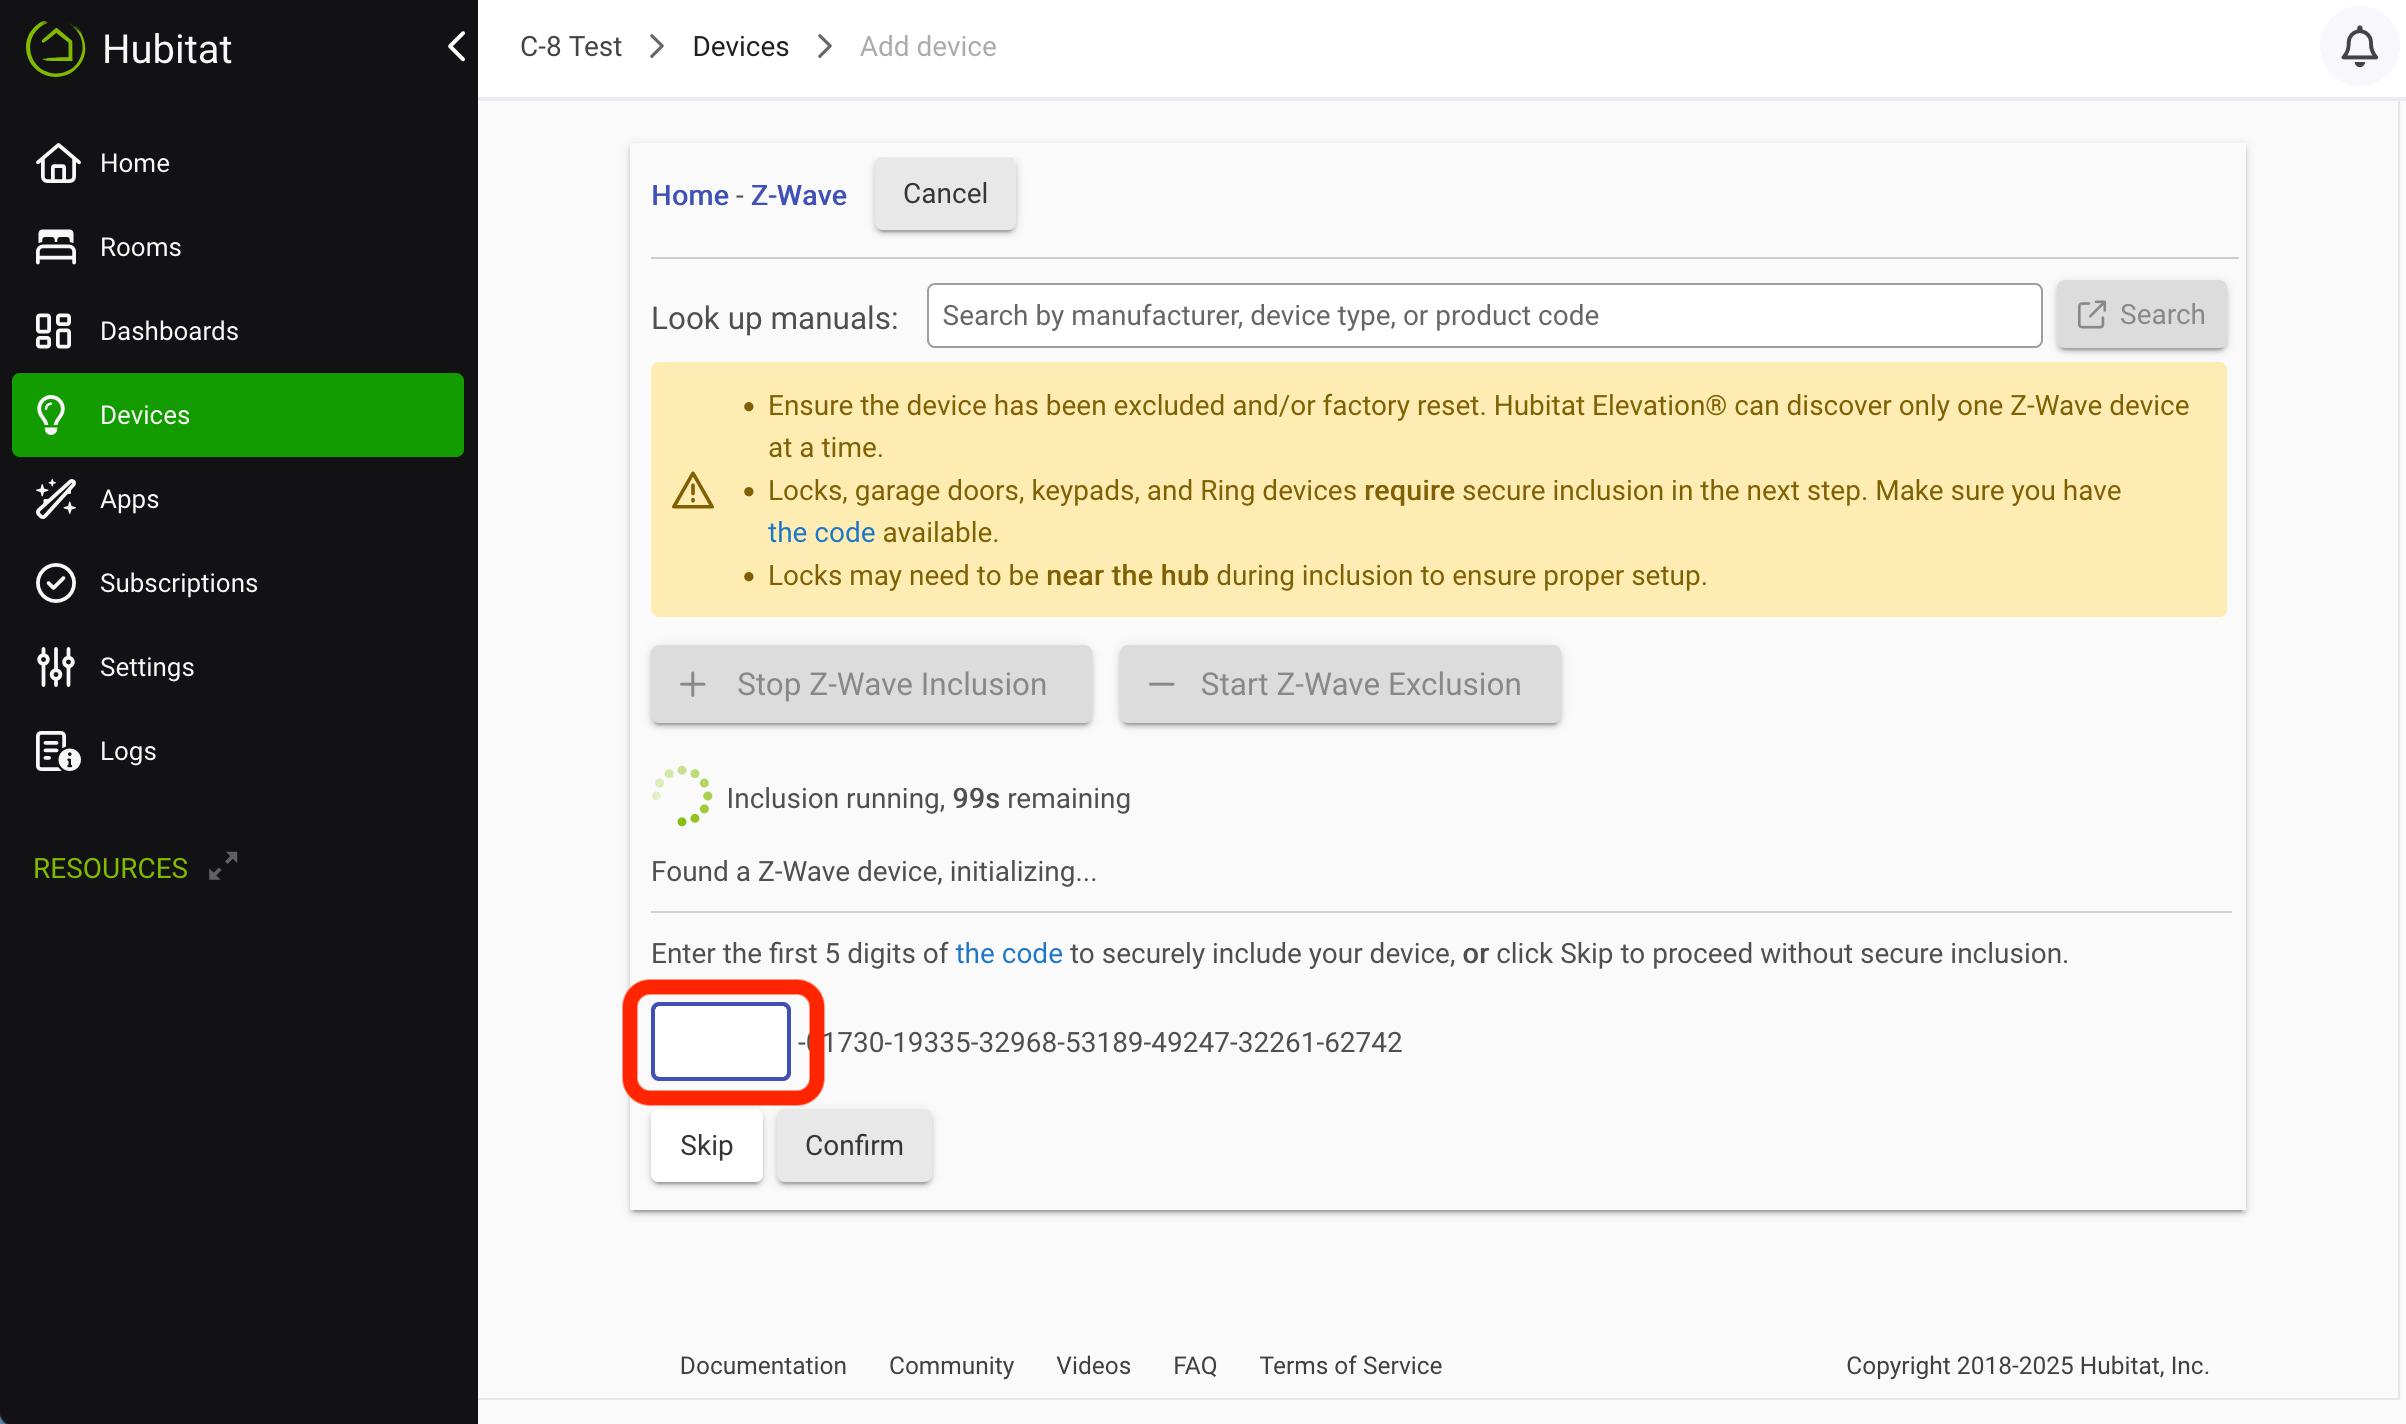
If you choose to continue with security, you will be prompted to either enter part of the device-specific key (DSK) or confirm that the code you see matches the device, depending on the type of S2 used. This code can usually be found on a sticker on the device or in the packaging.
Z-Wave Plus SmartStart devices on the network
Z-Wave SmartStart - Add Z-Wave Plus SmartStart compatible devices to the hub
SmartStart compatible Z-Wave products, regardless of brand or type, can easily be added to the hub, by simply scanning a QR code on the SmartStart compatible device. The devices will be automatically included in the Z-Wave Plus network and the connection is secure encrypted with Z-Wave S2 security framework.
-
Using the Hubitat Elevation mobile app, navigate to the Devices tab, select the + (plus) icon on the toolbar, then select Add SmartStart Devices.
-
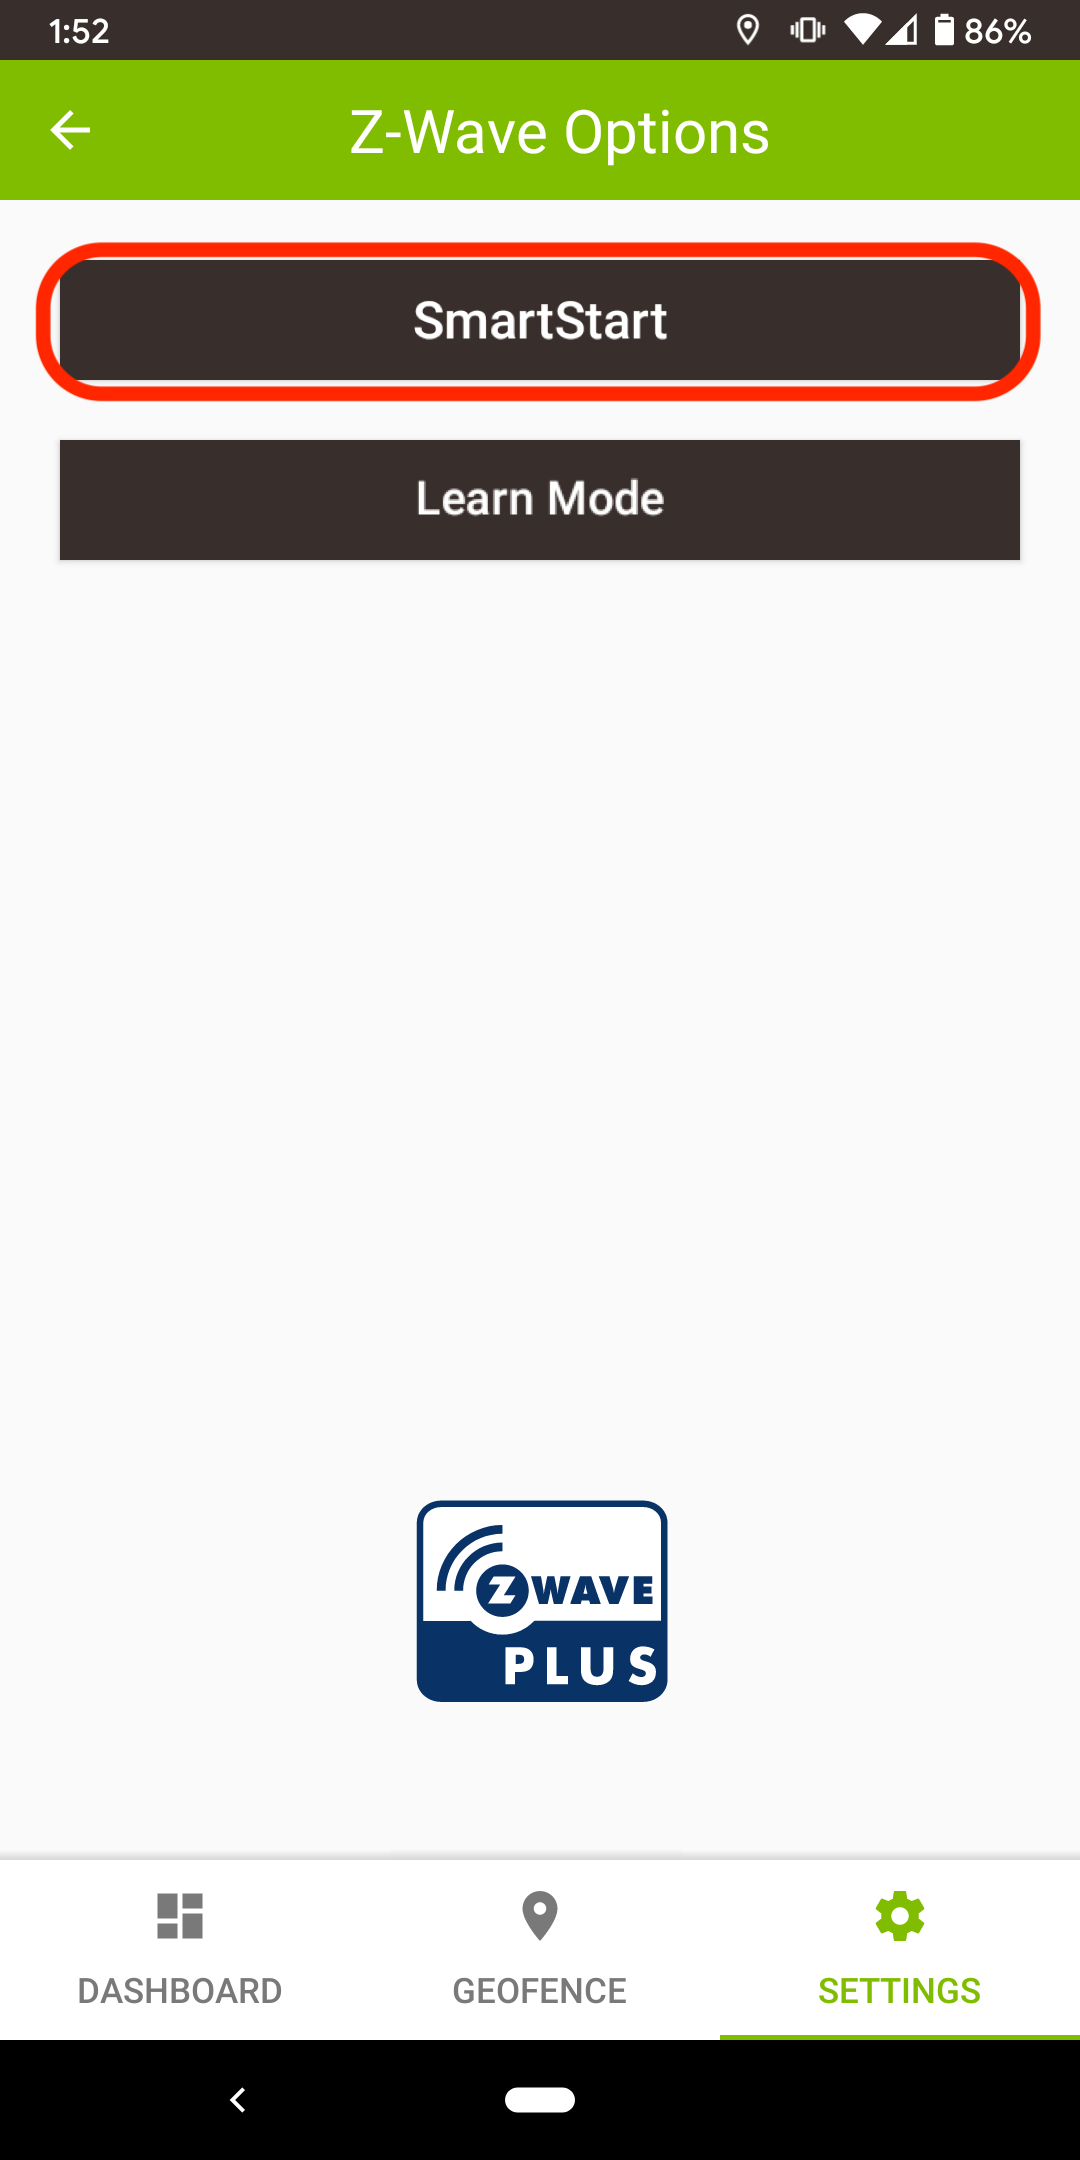
Select the SmartStart button.
-
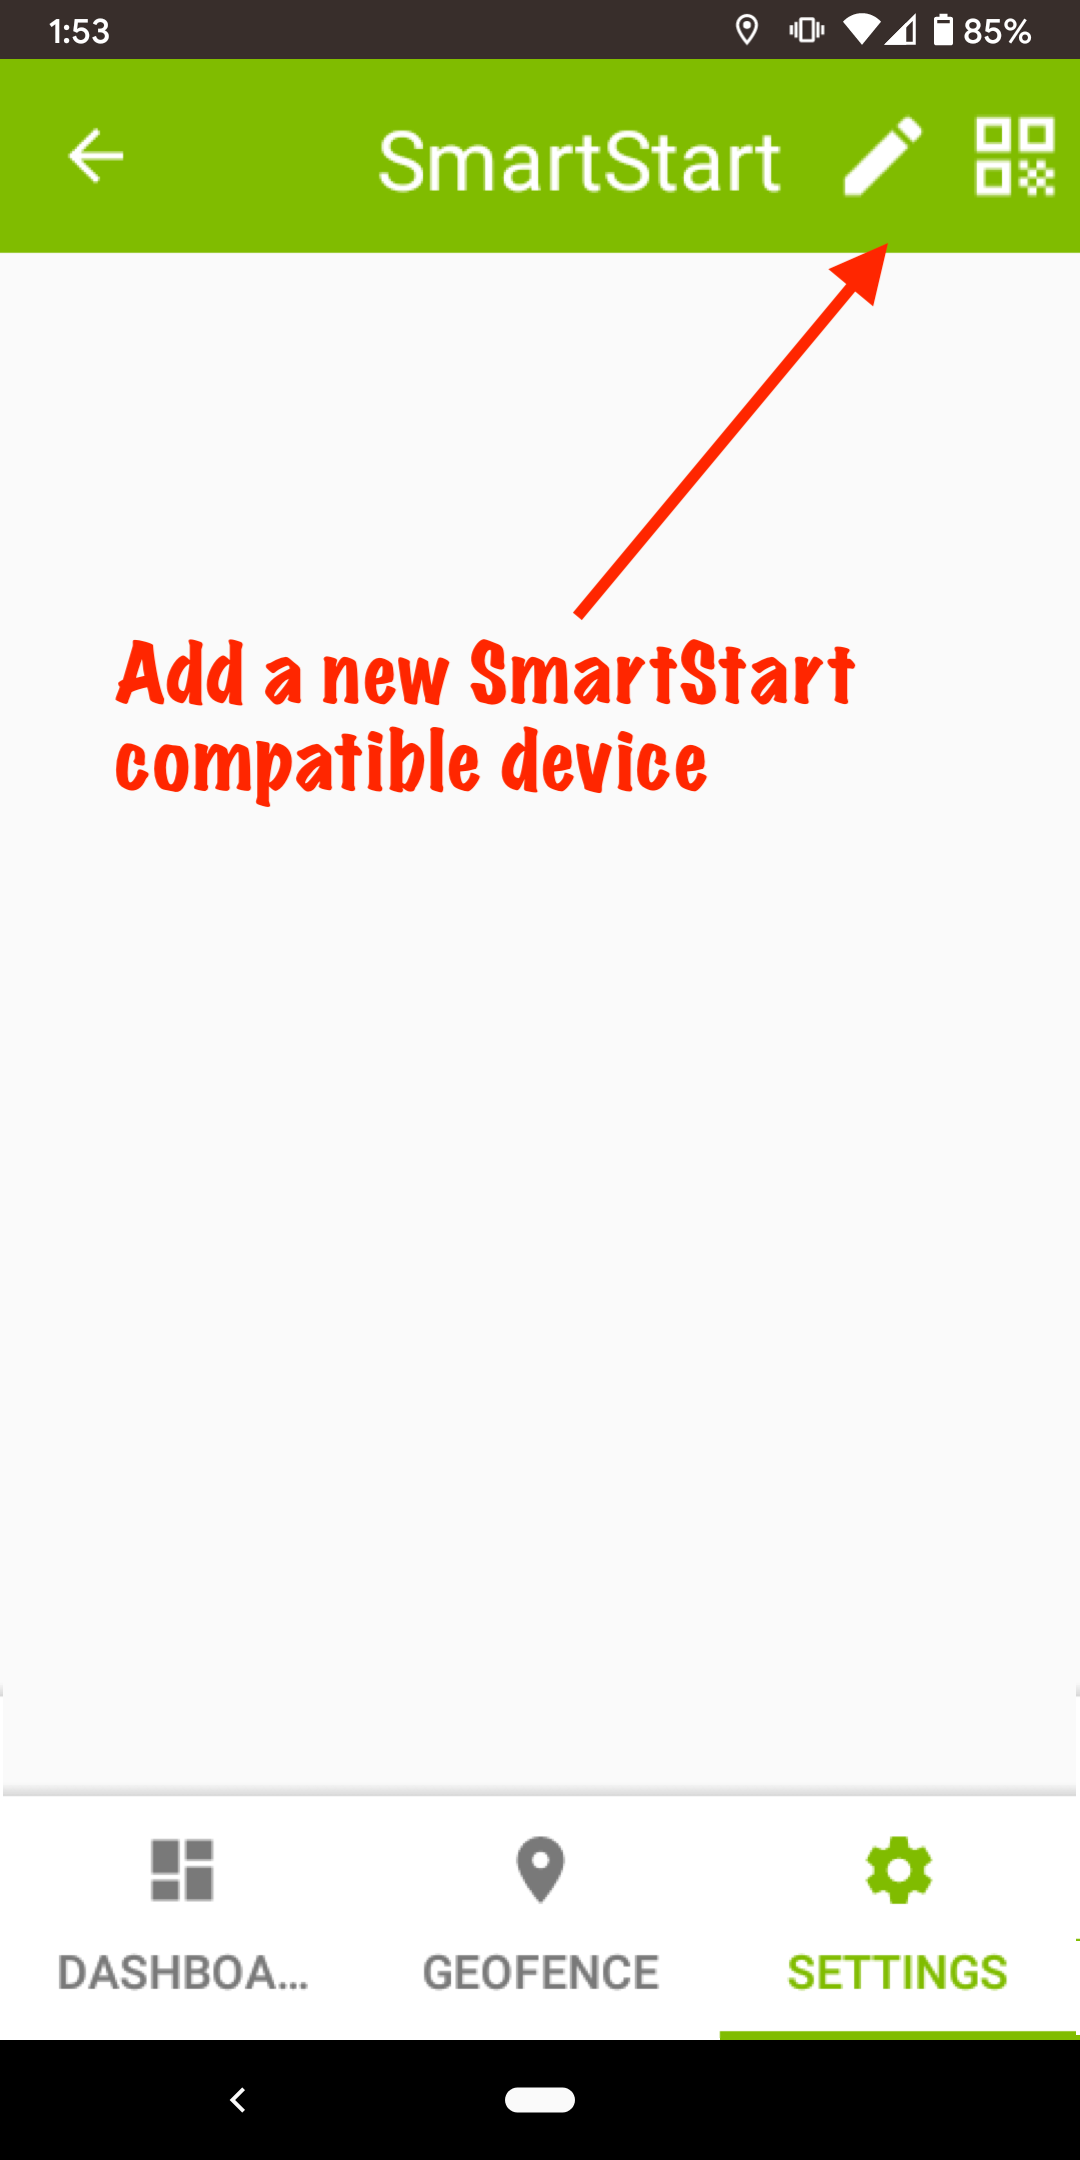
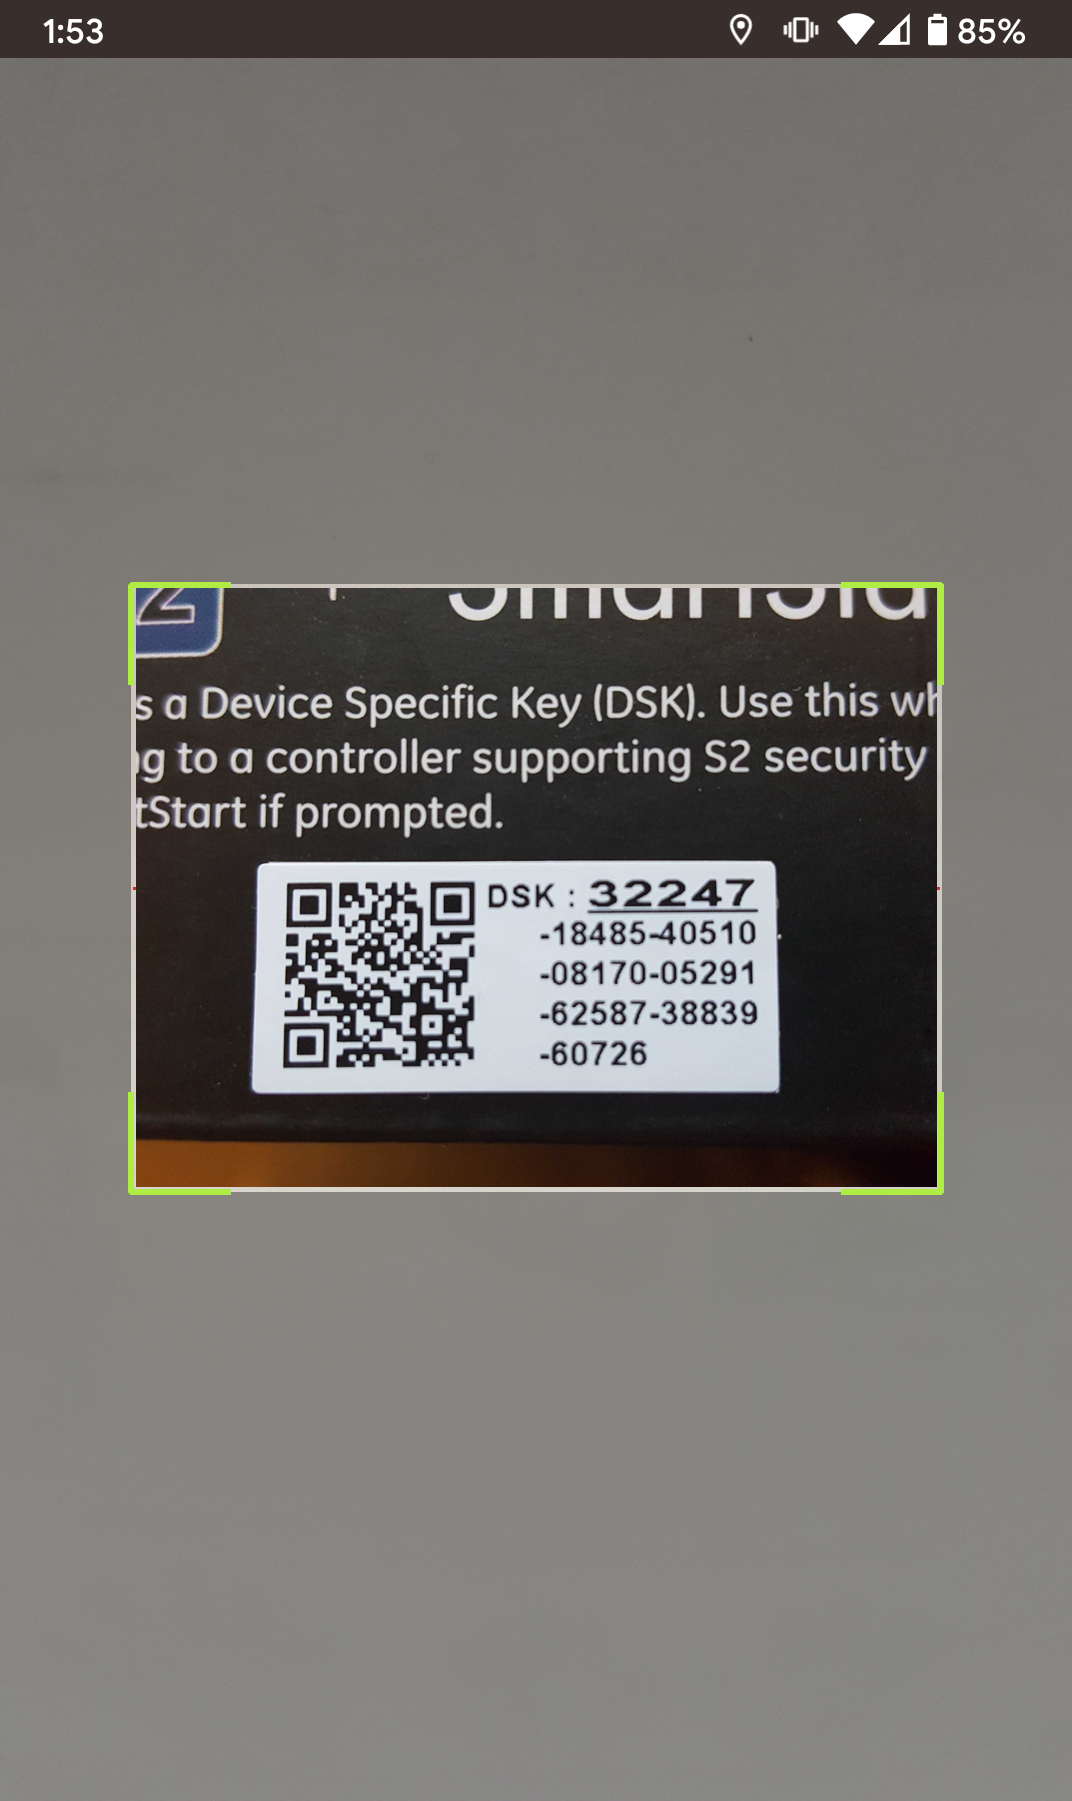
Tap the QR code icon to use your device camera to scan the QR code of the SmartStart compatible device.
- NOTE: If this is the first time you have used the Hubitat Elevation app on your mobile device, you will be prompted to allow access to the mobile device camera.
- NOTE: If this is the first time you have used the Hubitat Elevation app on your mobile device, you will be prompted to allow access to the mobile device camera.
-
Scan the device QR code.
-
Pull the battery tab, or remove and replace the device battery to initiate automatic joining to the Hubitat Elevation hub. Within 10 minutes, the device will be automatically added to the hub.
-
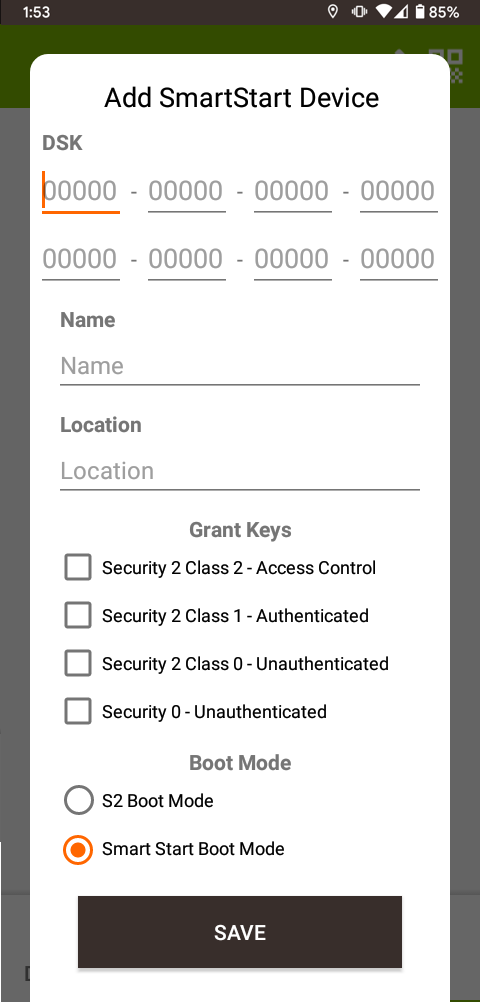
If you are unable to scan the QR code, the Device Security Key (DSK) may be manually input by tapping on the pencil icon.
-
You must enter the entire Device Security Key (DSK) and select which security keys to use.
- NOTE: Ensure you have selected the SmartStart Boot Mode button. For S2 compatible devices without SmartStart, consult the original manufacturer documentation.
- NOTE: Ensure you have selected the SmartStart Boot Mode button. For S2 compatible devices without SmartStart, consult the original manufacturer documentation.
-
Pull the battery tab, or remove and replace the device battery to initiate automatic joining to the Hubitat Elevation hub. Within 10 minutes, the device will be automatically added to the hub.
-
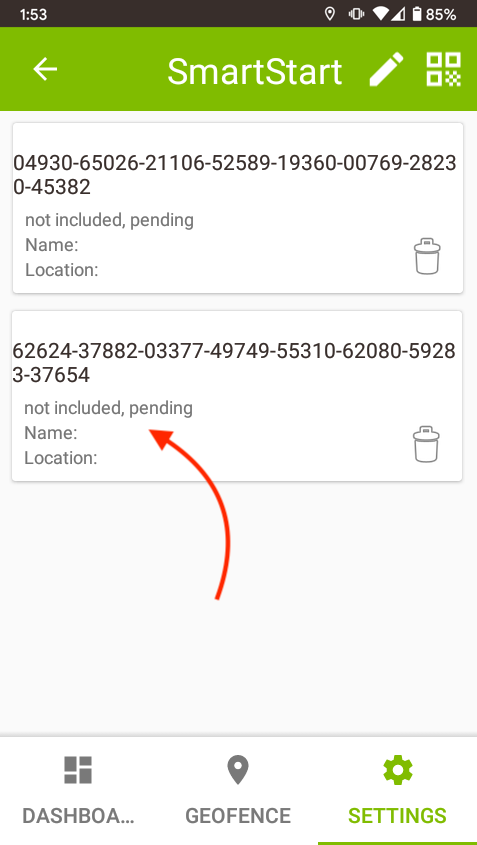
Continue adding additional S2 SmartStart devices. Each device’s unique Device Security Key (DSK) will be stored in the hub, but will not be included in the Z-Wave network until they are powered on. The Hubitat Elevation app will indicate the device status in the Z-Wave network. • Pending - The node will be added when it issues SmartStart Inclusion requests. • Passive - The node is unlikely to issue SmartStart Inclusion requests. • Ignored - SmartStart Inclusion requests are ignored unless changed by controller. The device DSK is cross-referenced against the provisioning list and the device is included if authenticated. Within 10 minutes, the device will be automatically added to the hub.
Z-Wave SmartStart - Removing Z-Wave Plus SmartStart devices from the hub
Removal of a Z-Wave SmartStart device is a two step process. First remove the device from the SmartStart list (so it does not reappear), then remove it following the device manufacturer instructions to exclude it from the Z-Wave network, or perform a factory reset on the device.
To remove a device from the SmartStart list, use the mobile app (any relatively recent version) or the hub interface (platform 2.5.1 or later).
To use the mobile app:
-
Navigate to Devices, select the + button (upper right corner), then select Add SmartStart Devices. (On the old, 1.x app, this was under Tools > Z-Wave Tools.)
-
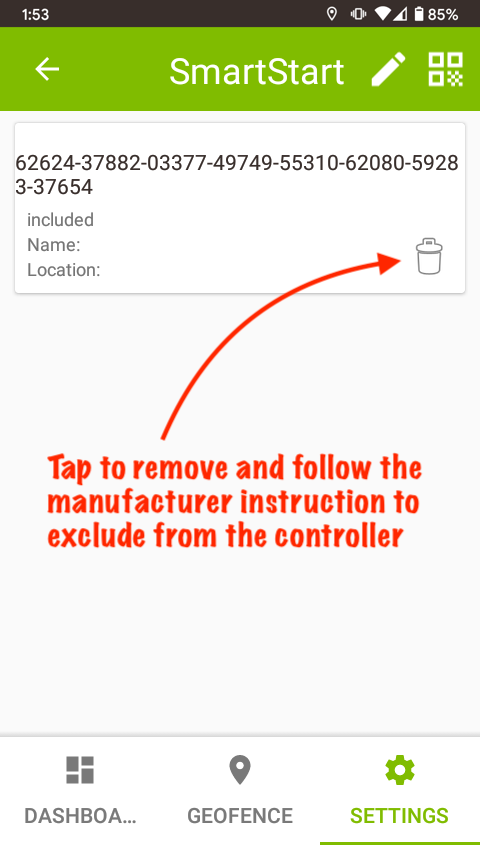
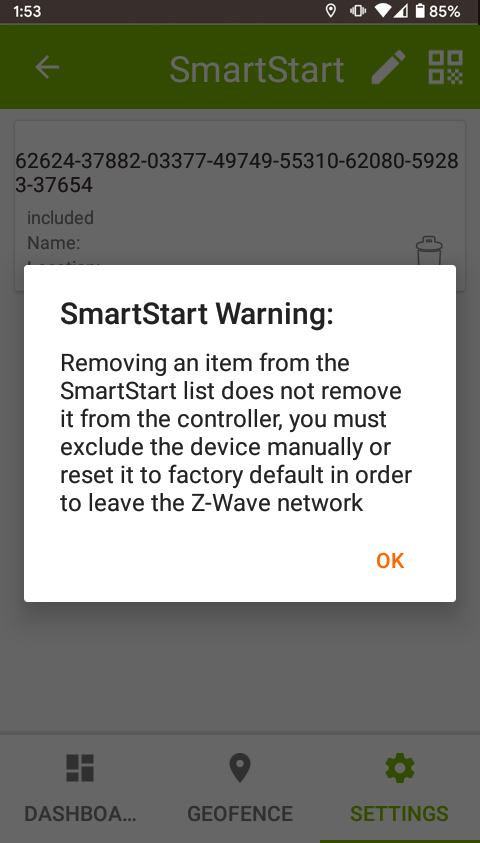
Tap the trash can icon to remove a device from the provisioning list.
To use the hub:
-
Navigate to Devices > Add Device.
-
Select Z-Wave, then select SmartStart.
-
Select the trash can (delete) icon under the Actions column for the device you wish to remove from the list.
No matter how you remove the device: note that removing an item from the SmartStart provisioning list does not remove it from the hub. You must also follow the manufacturer instructions to manually exclude the device or factory reset it, so it will no longer be part of the Z-Wave network. Keeping devices in the provisioning list allows them to be factory reset or excluded, and they will automatically be included in the Z-Wave network again, as long as they have power.
- NOTE: Any device that has been removed from the provisioning list but has not been factory reset or excluded from the Z-Wave networ, will be automatically included again if it has power, showing again as "Included" on the provisioning list if th is happens.
Z-Wave SmartStart - Managing devices in the SmartStart Provisioning List
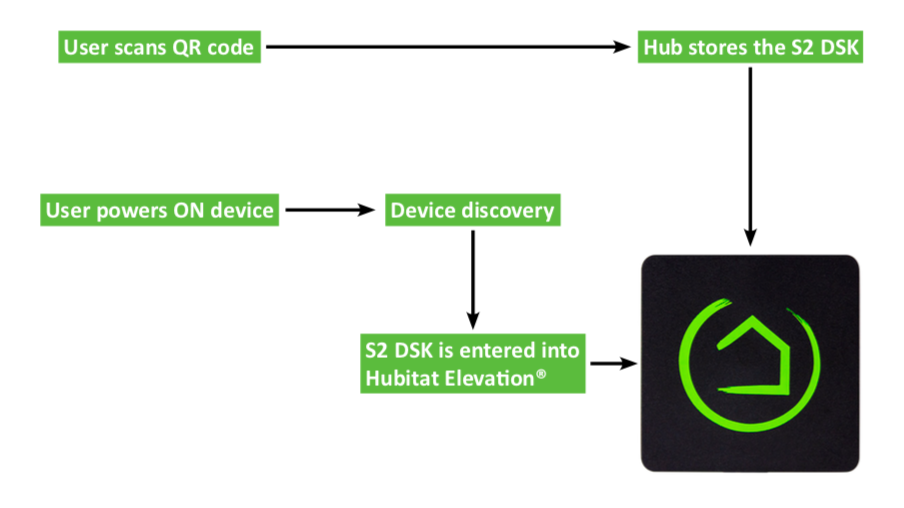
Z-Wave SmartStart simplifies and significantly reduces setup time by allowing out of the box device installation, without the need for an instruction manual or complicated button and power-on sequences. With a quick scan of a QR code, SmartStart is designed to facilitate the inclusion of multiple devices simultaneously by storing unique Device Security Keys (DSK) in the hub. This ensures that the Hubitat Elevation hub is ready for error-free, and uniform inclusion across all device types and brands with secure S2 security framework, before the device is even powered on for the first time.
For added convenience, the order in which the devices are powered is irrelevant and Hubitat Elevation will include them as long as they are on the provisioning list and powered on. This also enables devices that are on the provisioning list to be factory reset or removed with classic exclusion, and they will automatically be included in the Z-Wave network again as long as they have power.
-
In the Hubitat Elevation mobile app, navigate to Devices, select the + button (upper right corner). (If you are using the old, 1.x app, this was under Tools > Z-Wave Tools.)
-
Tap the Add SmartStart Devices (or SmartStart) button.
-
Tap the QR code icon to use your device camera to scan the QR code of the SmartStart compatible device.
- NOTE: If this is the first time you have used the Hubitat Elevation app on your mobile device, you will be prompted to allow access to the mobile device camera.
- NOTE: If this is the first time you have used the Hubitat Elevation app on your mobile device, you will be prompted to allow access to the mobile device camera.
-
Scan the device QR code.
-
Pull the battery tab, or remove and replace the device battery to initiate automatic joining to the Hubitat Elevation hub. Within 10 minutes, the device will be automatically added to the hub.
-
If you are unable to scan the QR code, the Device Security Key (DSK) may be manually input by tapping on the pencil icon.
-
You must enter the entire Device Security Key (DSK) and select which security keys to use.
- NOTE: Ensure you have selected the SmartStart Boot Mode button.
- NOTE: Ensure you have selected the SmartStart Boot Mode button.
-
Pull the battery tab, or remove and replace the device battery to initiate automatic joining to the Hubitat Elevation hub. Within 10 minutes, the device will be automatically added to the hub.
-
Continue adding additional S2 SmartStart devices. Each device’s unique Device Security Key (DSK) will be stored in the hub, but will not be included in the Z-Wave network until they are powered on. The Hubitat Elevation app will indicate the device status in the Z-Wave network. The device DSK is cross-referenced against the provisioning list and the device is included if authenticated. Within 10 minutes, the device will be automatically added to the hub.
-
Tap the trash can icon to remove a device from the provisioning list. Removing an item from the SmartStart provisioning list does not remove it from the hub. You must also follow the manufacturer instructions to manually exclude the device or factory reset it, so it will no longer be part of the Z-Wave network. Keeping devices in the provisioning list allows them to be factory reset or excluded, and they will automatically be included in the Z-Wave network again as long as they have power.
- NOTE: Any device that has been removed from the provisioning list, but has not been factory reset or excluded from the Z-Wave network, will be automatically included again if it has power, and it will repopulate the provisioning list showing the Included status.
- NOTE: Any device that has been removed from the provisioning list, but has not been factory reset or excluded from the Z-Wave network, will be automatically included again if it has power, and it will repopulate the provisioning list showing the Included status.
As of platform version 2.5.1, you may also perform the above steps from the hub web interface: navigate to Devices > Add Device, select Z-Wave, then select SmartStart and follow the prompts to scan a code.
Copy Z-Wave network information
Z-Wave Replication - Copy network information from the Hubitat Elevation hub to a secondary Z-Wave controller
-
Select the Devices menu item from the sidebar, then select Add Devices in the upper right:
-
Select Z-Wave under Add Device Manually (it is not recommended to use the "Find by..." menus in this case, as these devices are unlikely to be listed in these options).
-
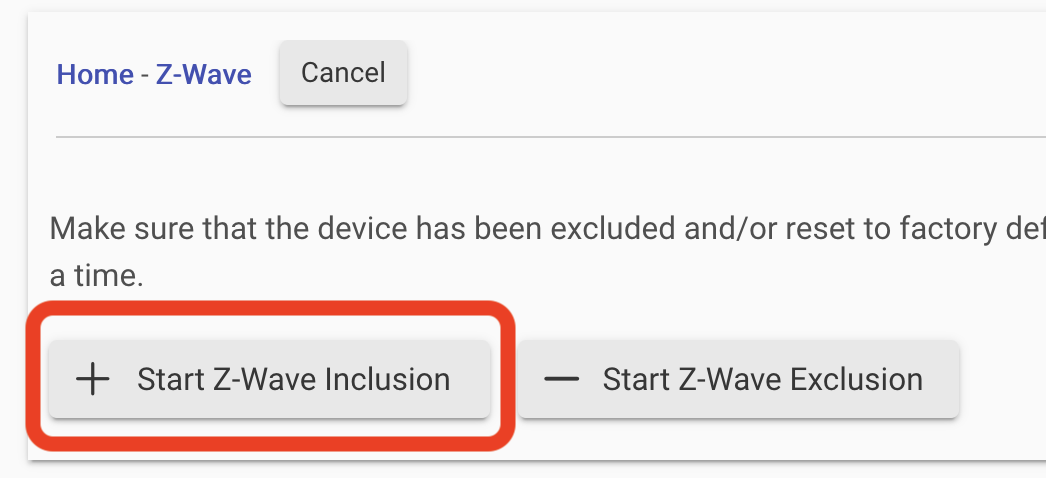
Select Start Z-Wave Inclusion.
-
Enable Learn Mode on the hub/controller that will be the Z-Wave secondary controller. If successfully included, the device should appear like a "regular" new Z-Wave device on Hubitat Elevation, and network information from the Hubitat Elevation hub will be replicated on the secondary controller.
Refresh a Z-Wave node
Z-Wave Refresh - Query the Z-Wave radio to refresh the status of the node
- Navigate to Settings, then select Z-Wave Details.
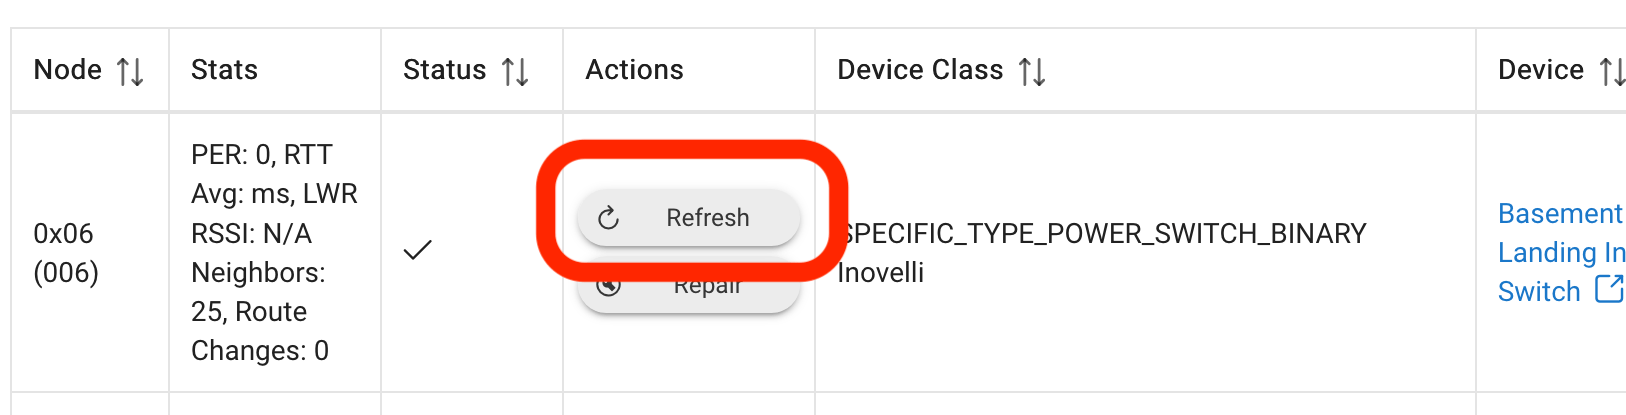
- Find the desired node in the Z-Wave Radio Devices table.
- Select the Refresh button to update the status of the node from the Z-Wave radio. The returned result may be OK (checkmark), UNKNOWN or FAILED. The user may then take corrective action if necessary.
- NOTE: A node that shows the status FAILED, may be the result of a sleepy device that is temporarily offline to reduce battery consumption. Simply activating the device may transition it back to OK status.
- NOTE: A node that shows the status FAILED, may be the result of a sleepy device that is temporarily offline to reduce battery consumption. Simply activating the device may transition it back to OK status.
Repair Z-Wave
Each Z-Wave device builds a neighbor table to keep track of which router devices are its closest neighbors. When you initiate the Z-Wave Repair function, you are instructing each Z-Wave device on the network to re-establish which routing devices are its closest neighbors, and therefore the most efficient route back to the hub. This also tells each device to forget about router devices that no longer exist on the Z-Wave network, or are now out of range and no longer able to be used for routing.
Z-Wave Repair - Rebuilding the Z-Wave Routing Tables
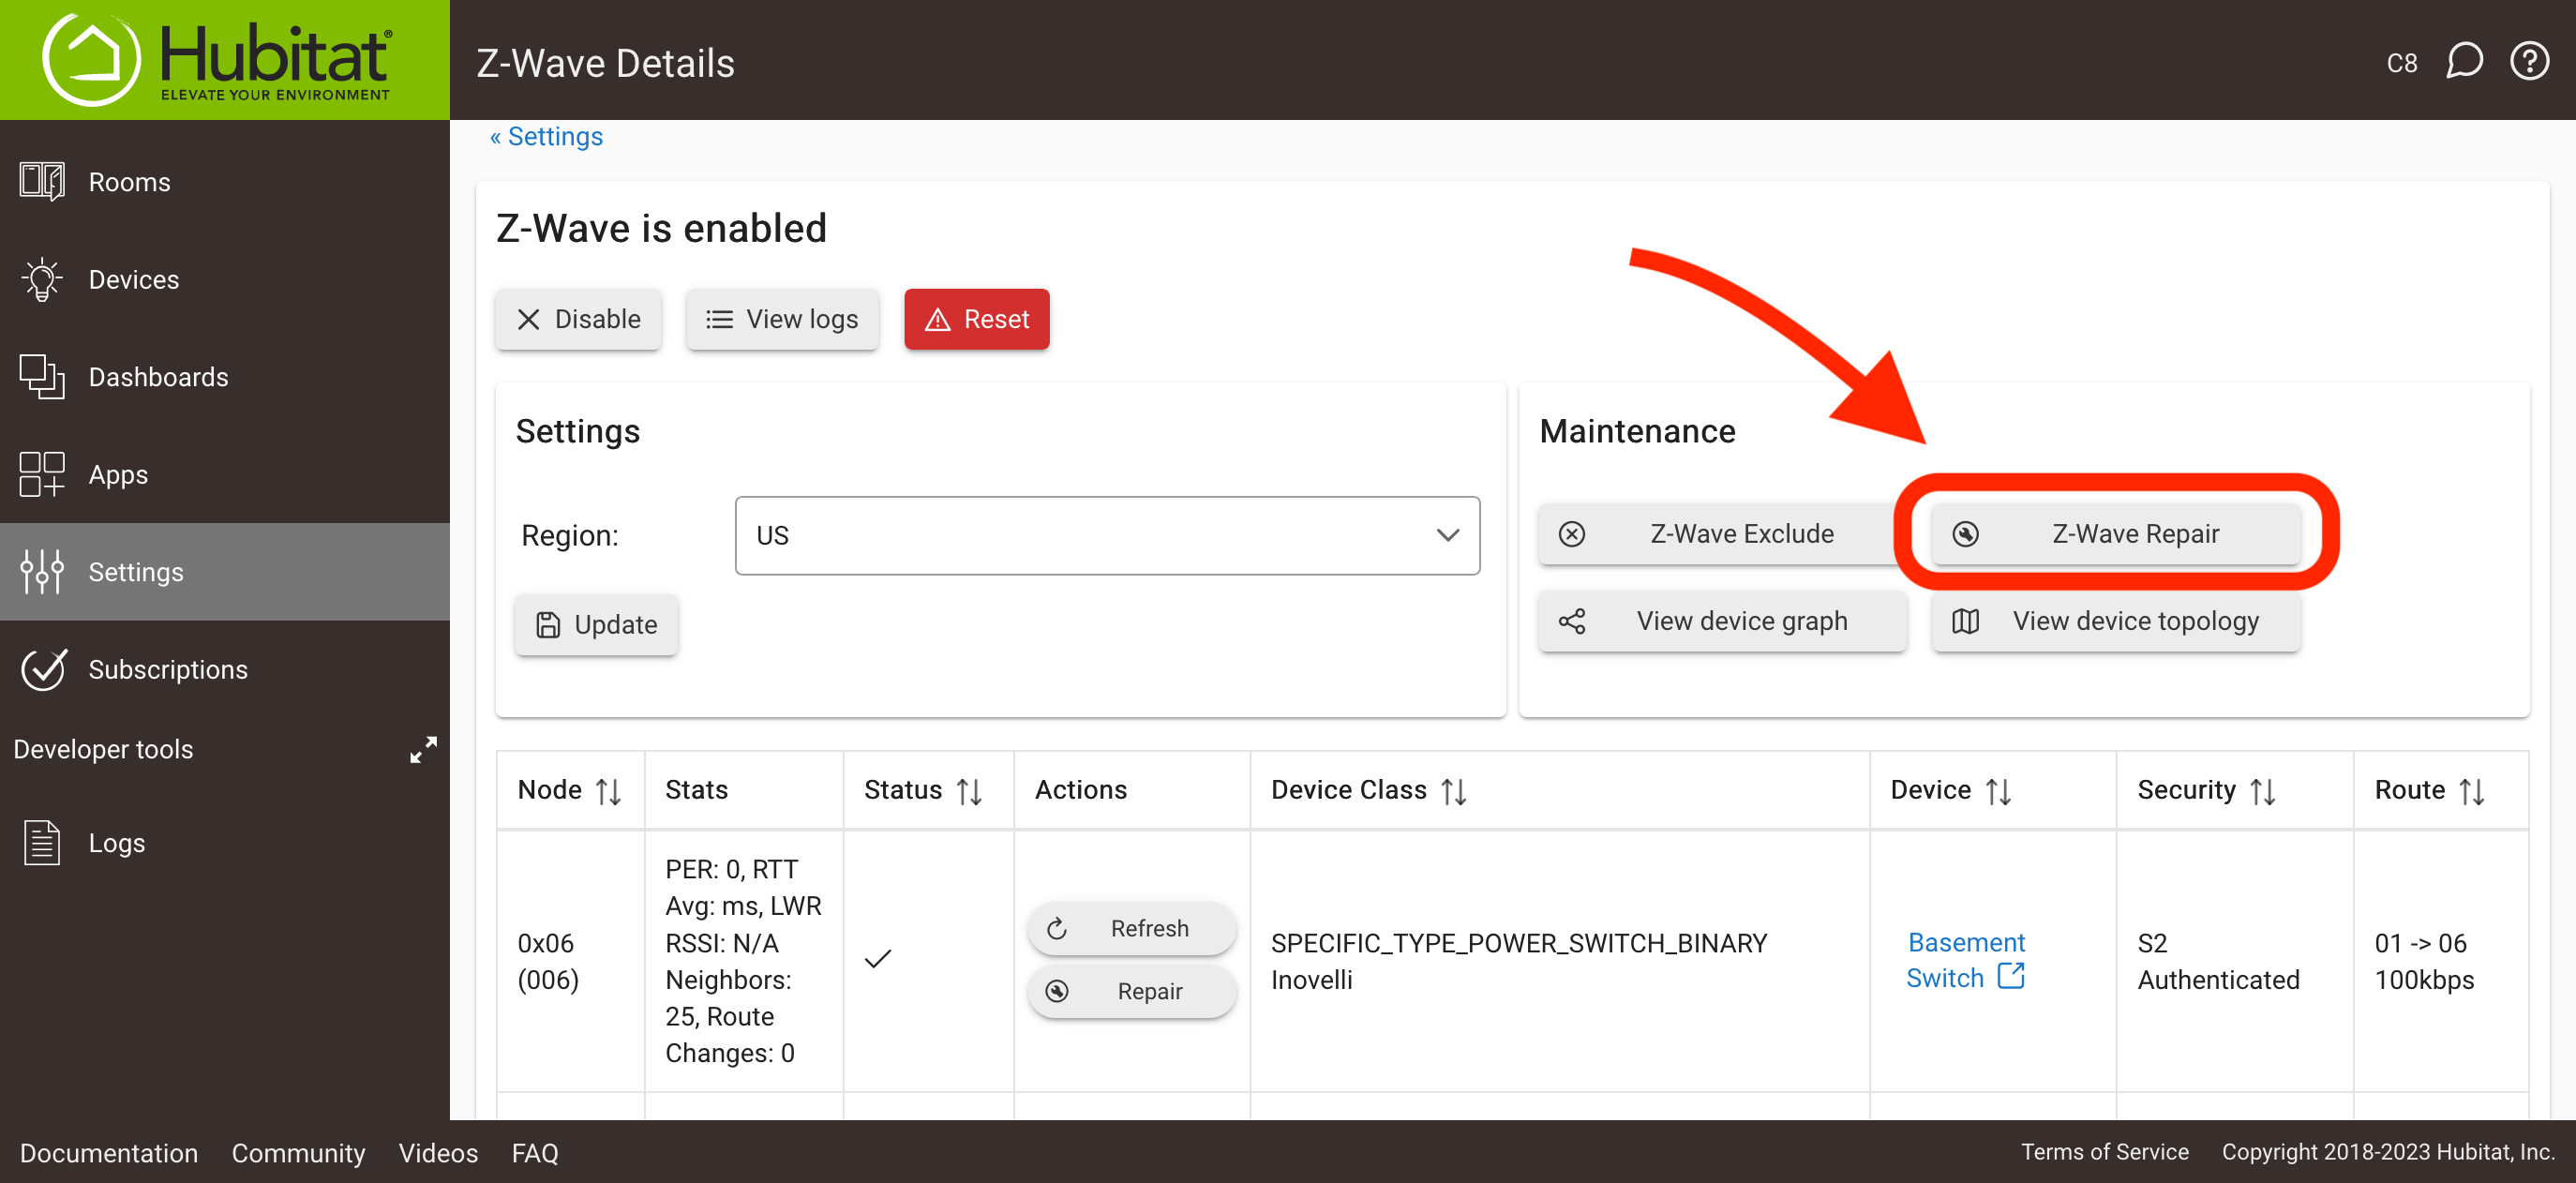
- Navigate to Settings, then select Z-Wave Details.
- Select the Rebuild network button. (NOTE: This is a full Z-Wave network repair. A per-node repair may also be performed using the Rebuild route button under the Actions column in the row for that node. This is preferred whenever possible, as a full repair is a network-intensive activity.)
Z-Wave Learn Mode
NOTE: As of Hubitat Elevation platform release 2.2.5, the hub cannot be utilized as secondary controller for the purpose of migrating devices from a primary controller to Hubitat Elevation.
Z-Wave Plus S2 Learn Mode - Receive network information from another Z-Wave Plus S2 compatible controller
-
Start by enabling Z-Wave Inclusion mode on the Z-Wave Plus S2 primary controller, so devices may be added its network.
-
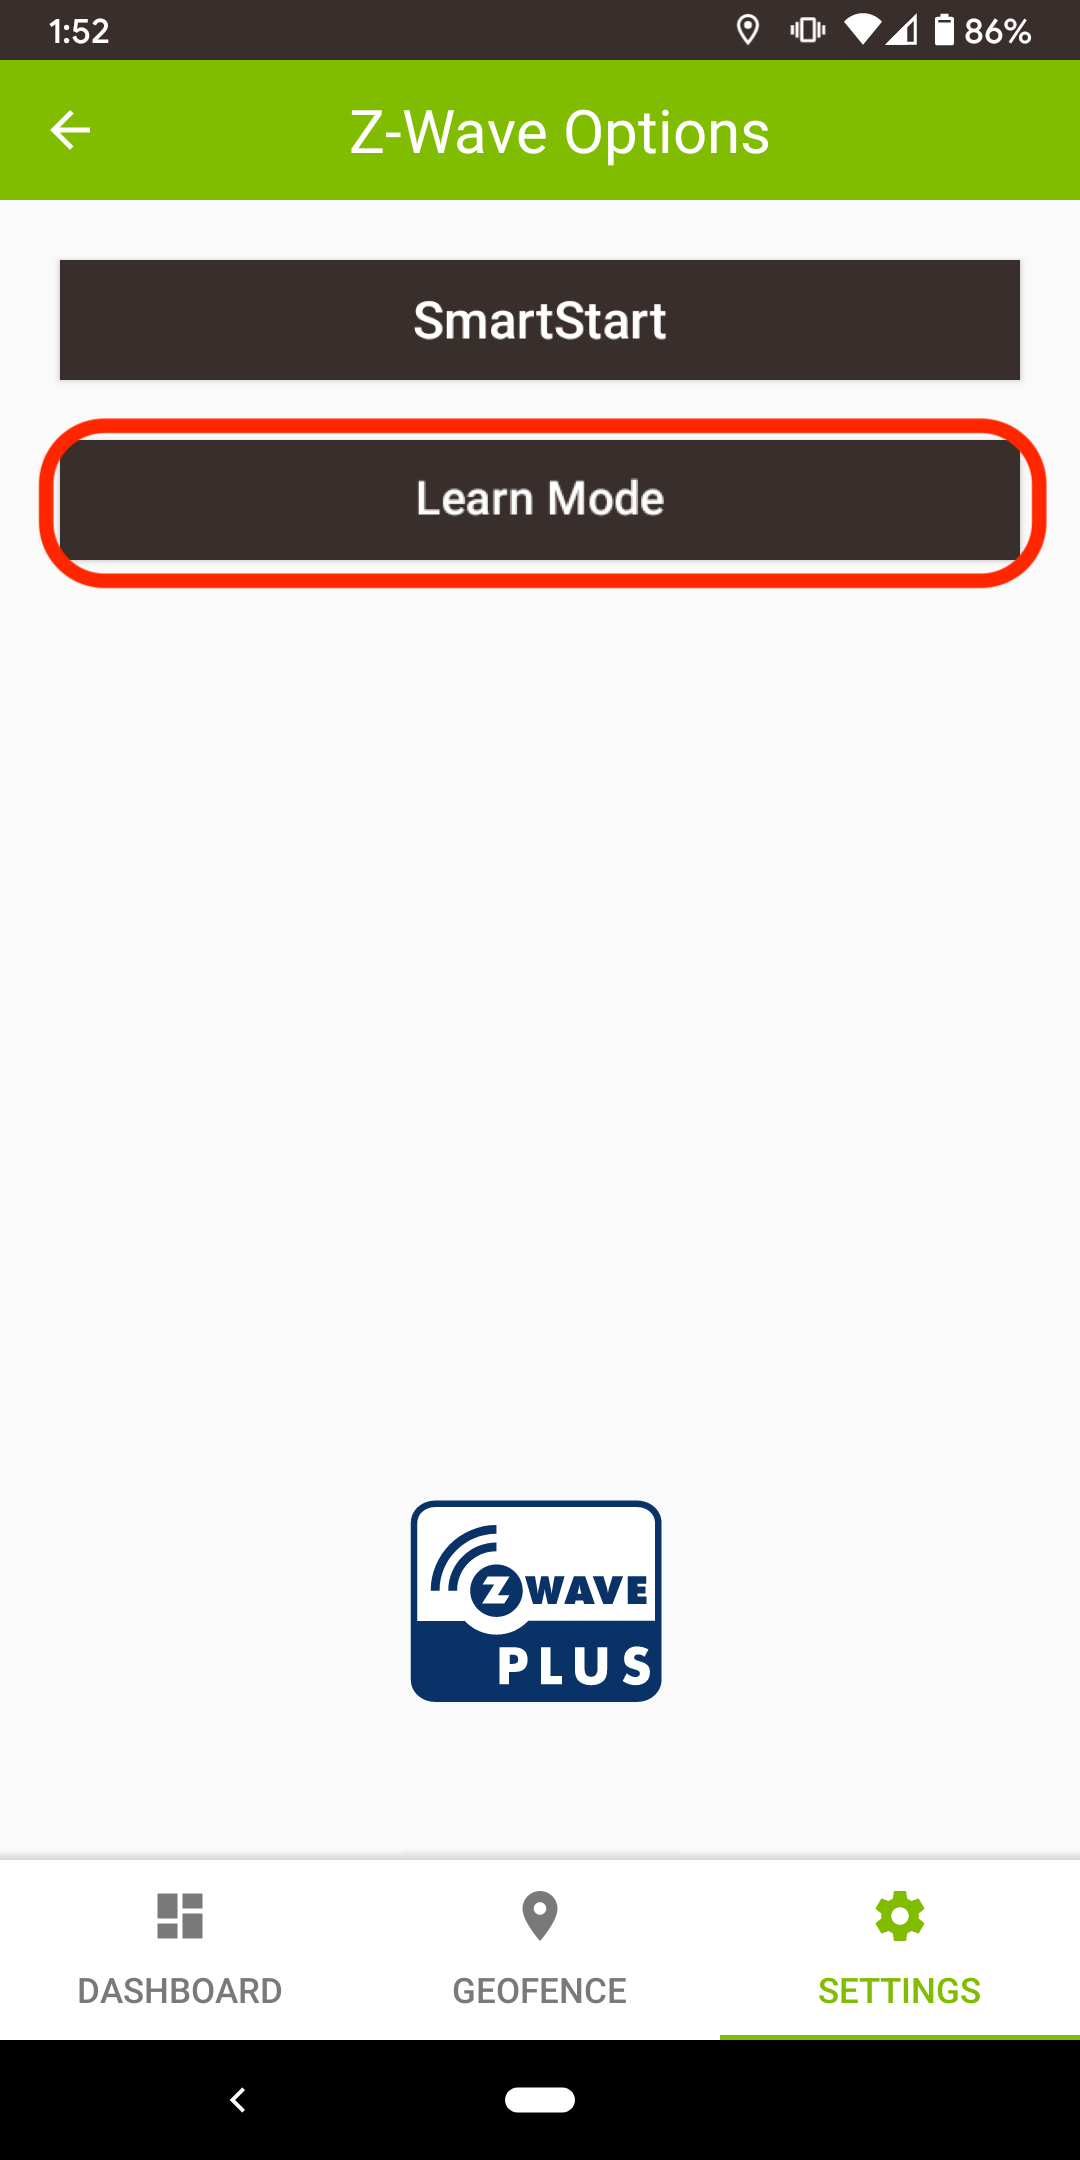
Using the Hubitat Elevation mobile app, navigate to Tools and press the Z-Wave Tools card.

-
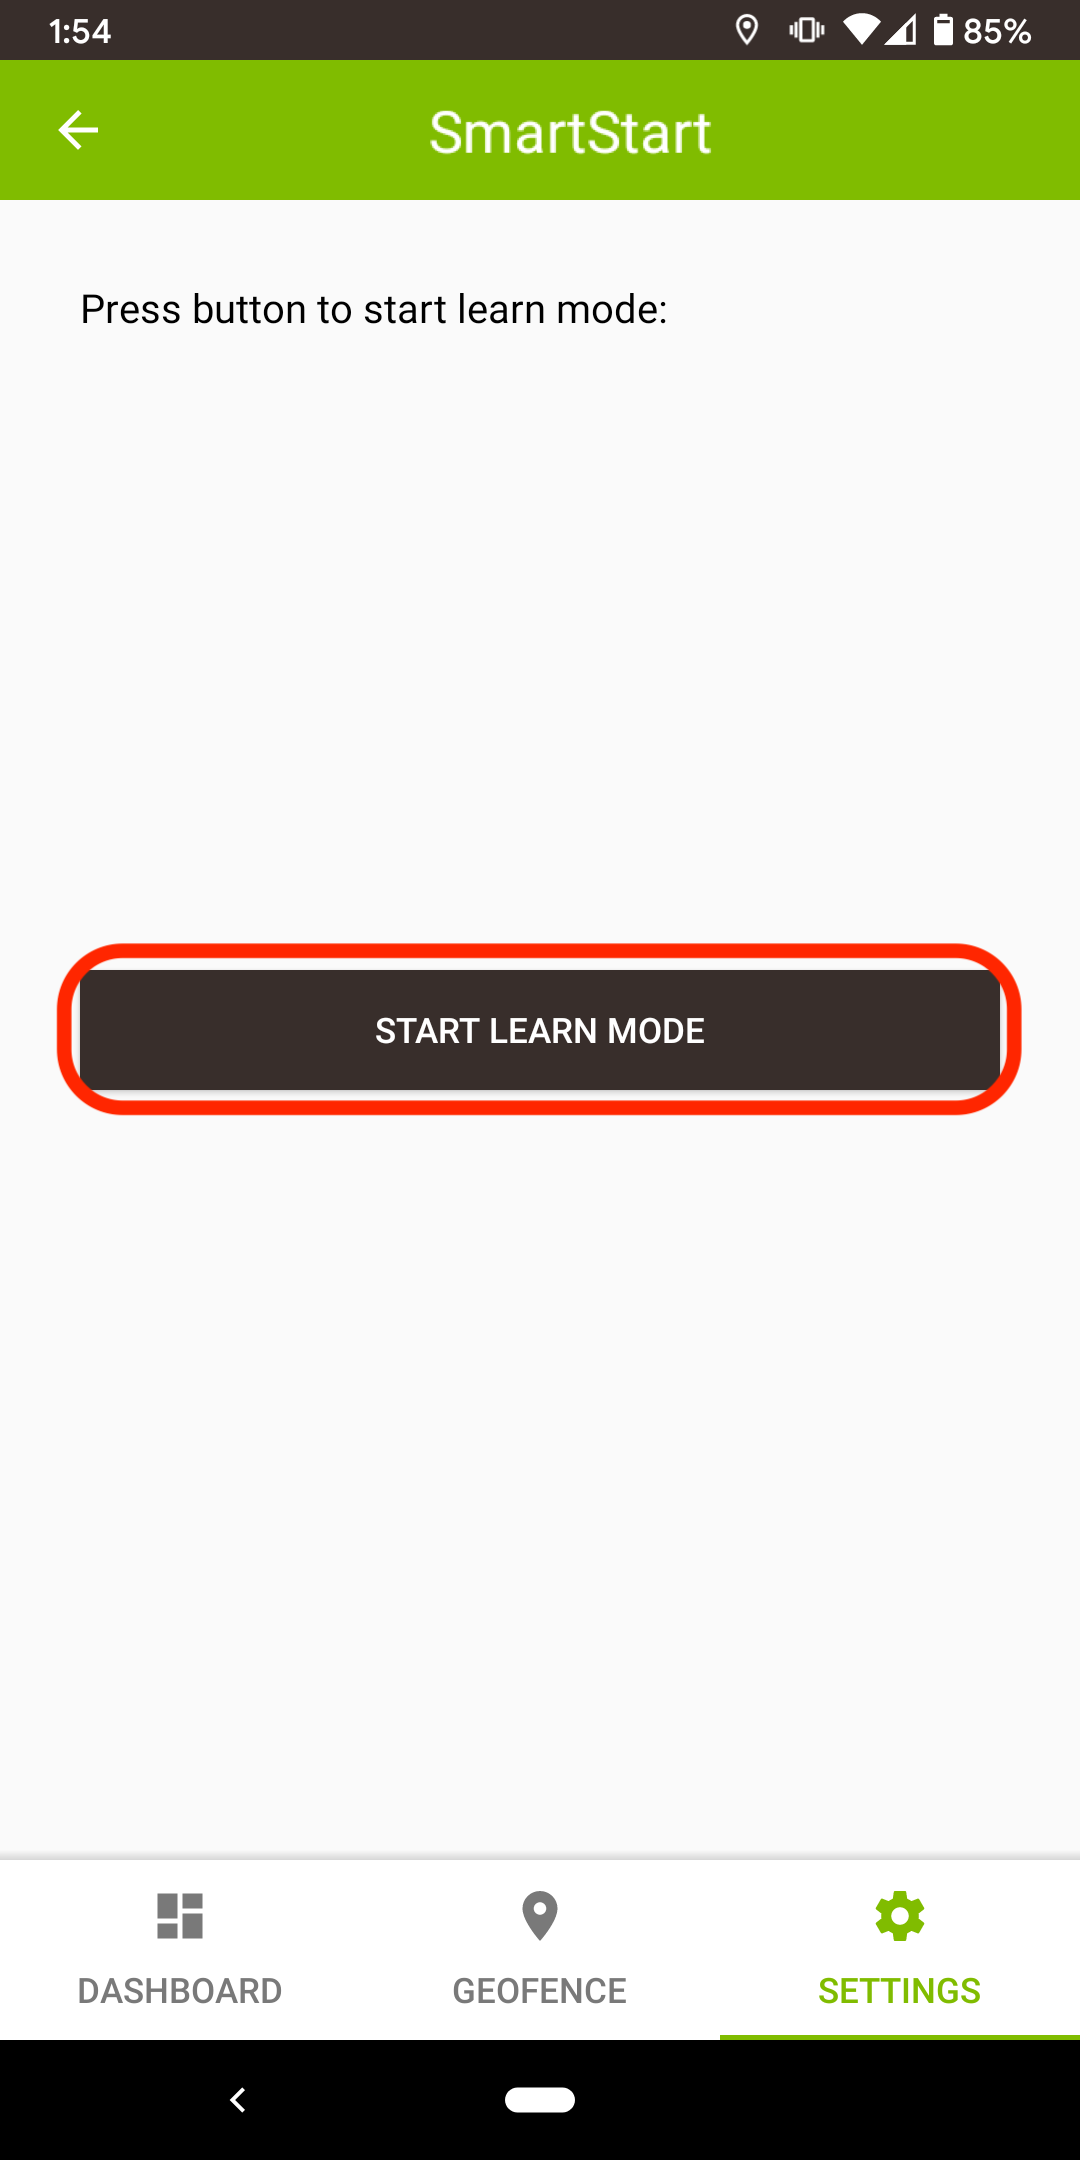
Tap the Learn Mode button, then Start Learn Mode.
-
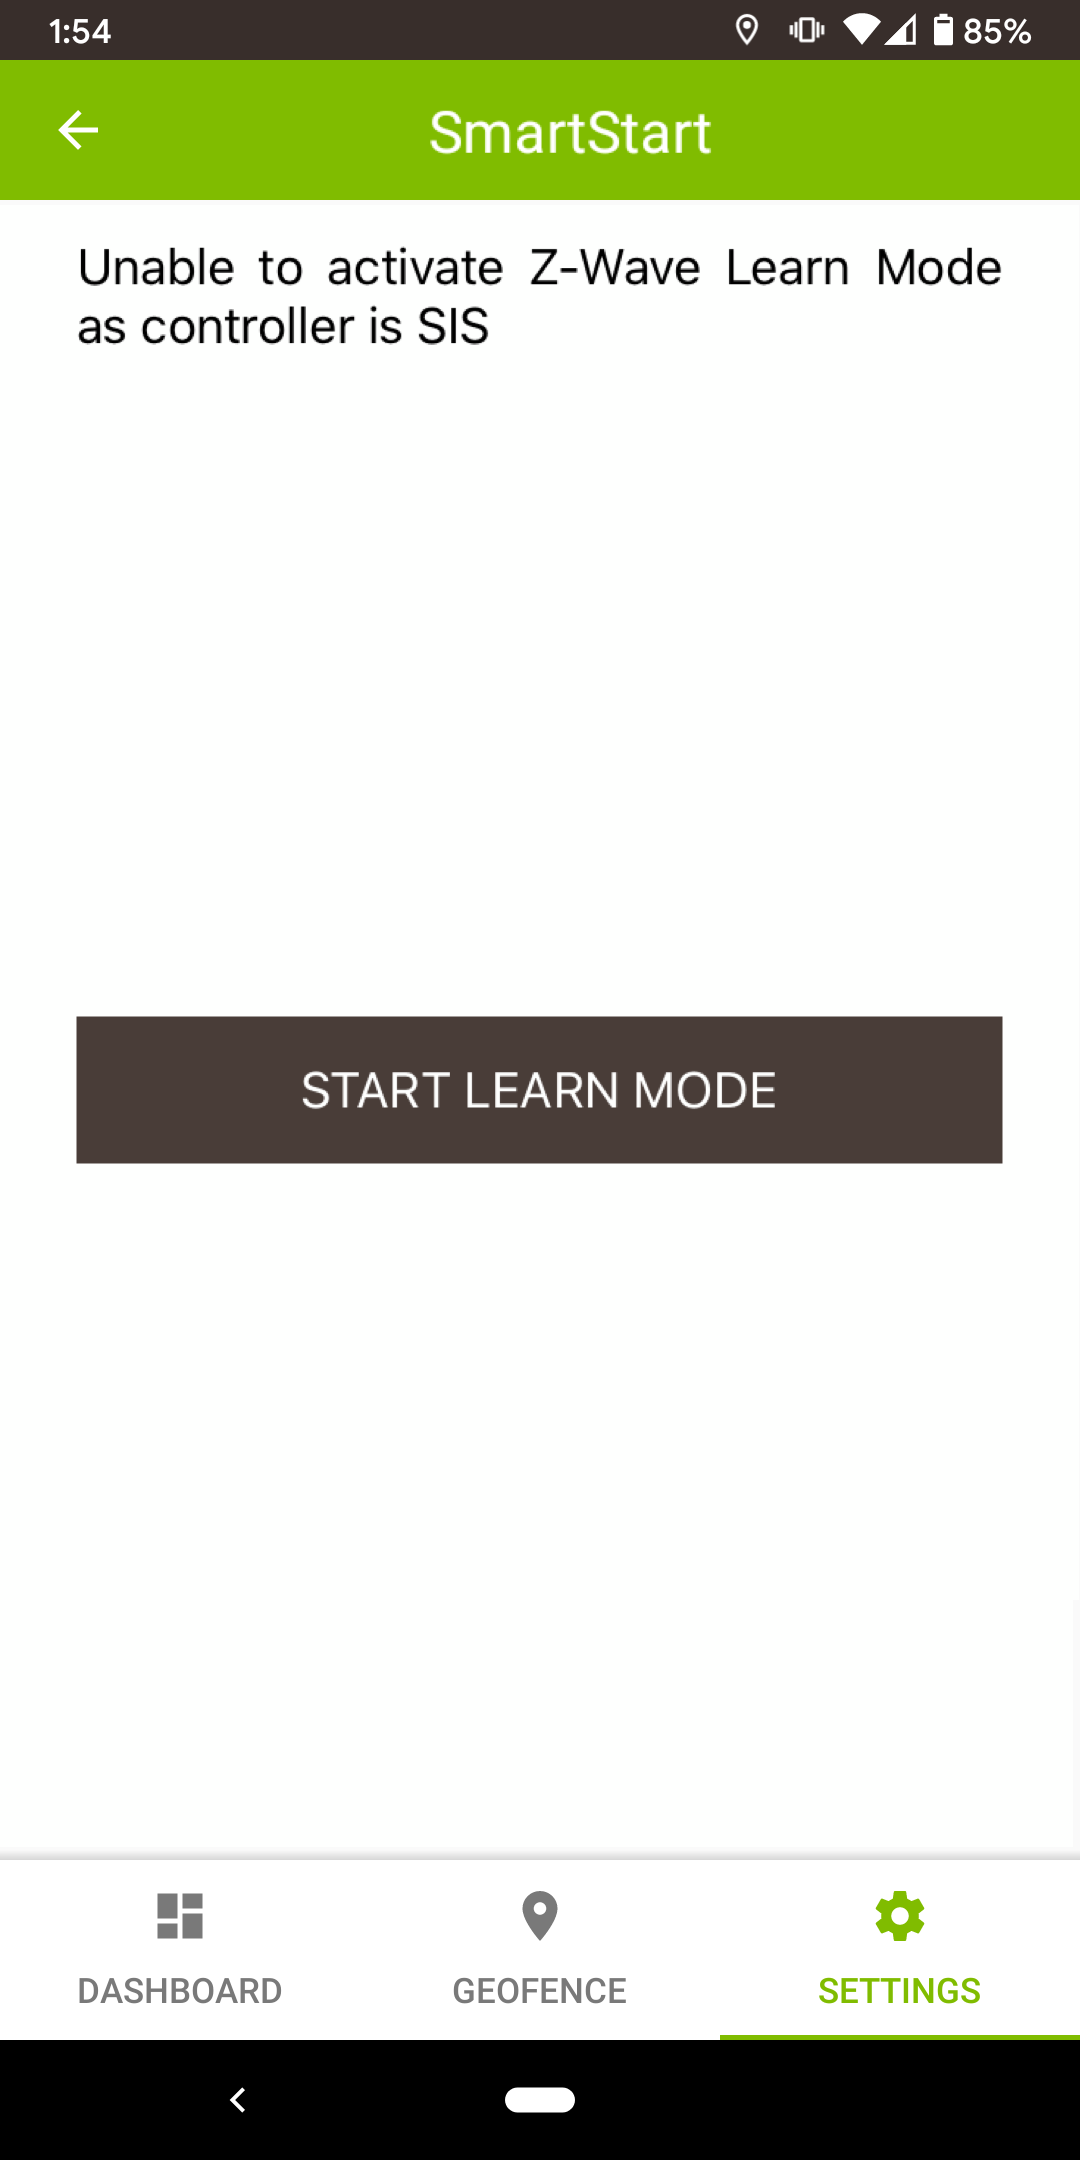
NOTE: If the hub has any nodes joined to it, then it cannot receive network information from the primary controller. To allow the hub to join as a secondary controller, you must first exclude all joined Z-Wave devices.
-
Leave all security modes enabled on the primary Z-Wave Plus S2 controller.
-
The primary controller will prompt the user for the first segment of the DSK (Device Specific Key) from the Hubitat Elevation mobile app.
-
Enter the first 5 digit segment shown in the mobile app, into the primary controllers user interface when prompted.
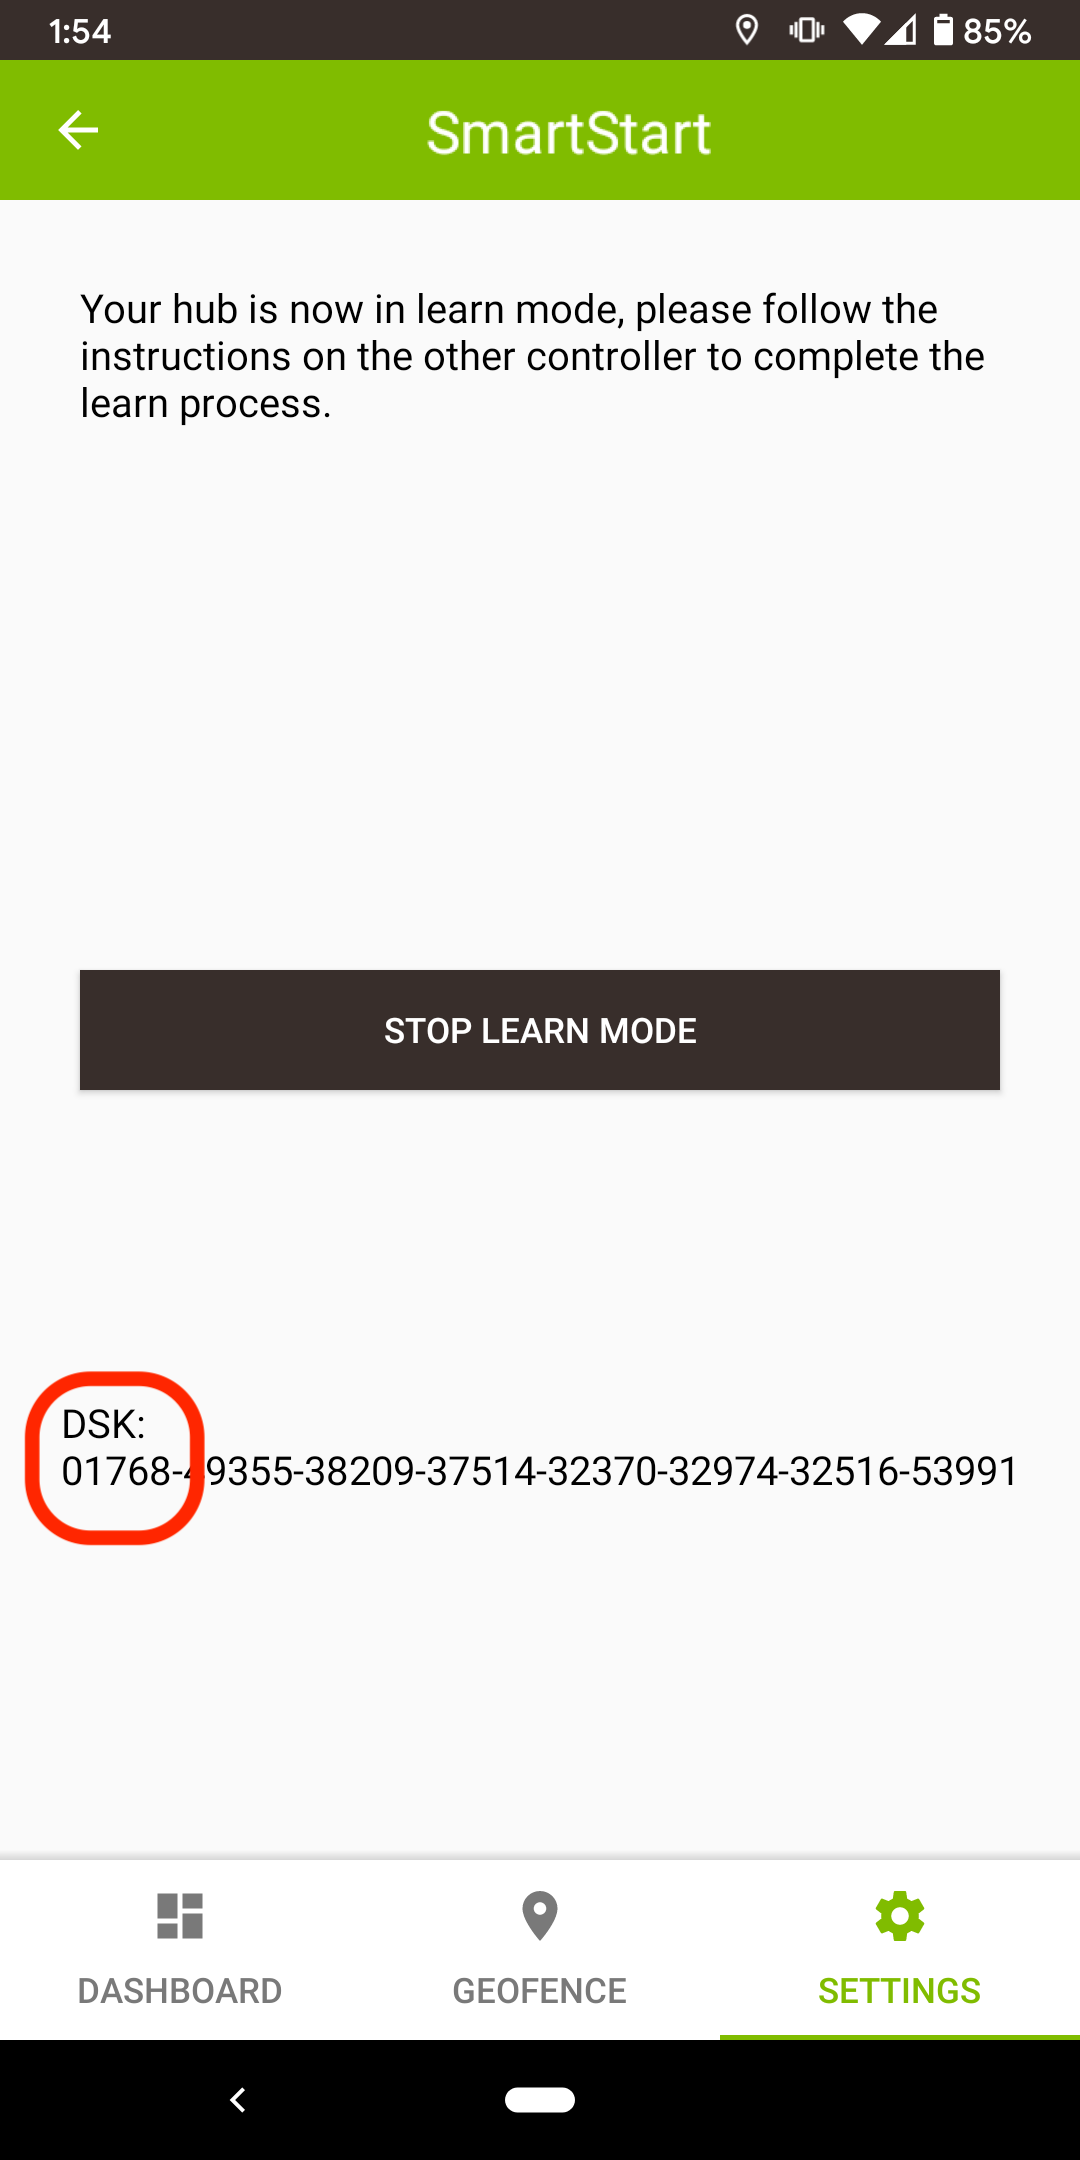
-
When successfully added, network information from the primary controller will be replicated on the Hubitat Elevation hub.
Z-Wave Learn Mode (for non-S2 capable Z-Wave radios) - Receive network information from another Z-Wave controller which does not support S2 secure encryption
-
Start by enabling Z-Wave Inclusion to add devices to the network of the Z-Wave primary controller.
-
Using the Hubitat Elevation mobile app, navigate to Tools and press the Z-Wave Tools card.
-
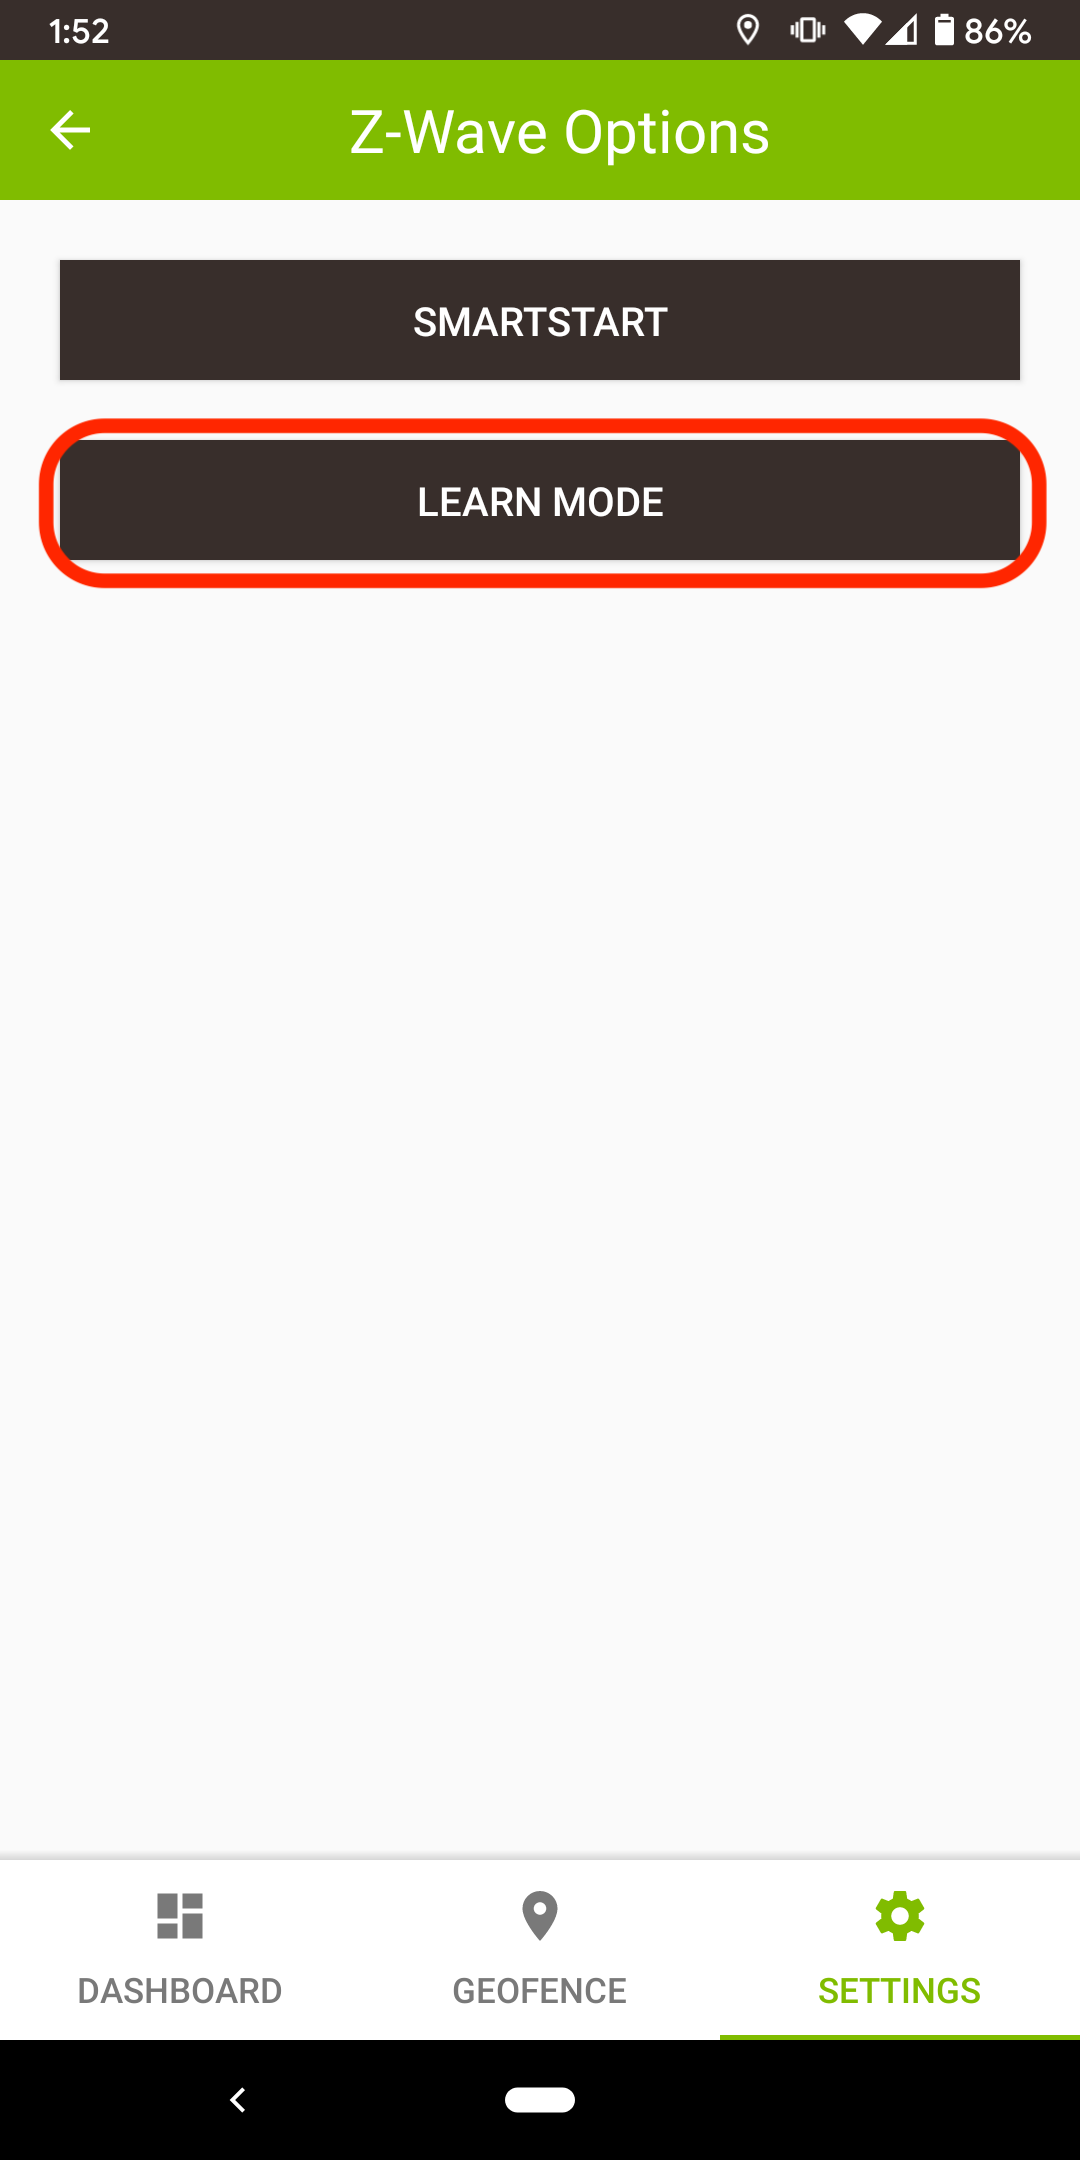
Tap the Learn Mode button, then Start Learn Mode.
-
NOTE: If the hub has any nodes joined to it, then it cannot receive network information from the primary controller. To allow the hub to join as a secondary controller, you must first exclude all joined Z-Wave devices.
-
The primary controller should indicate a device has joined its Z-Wave network.
-
When successfully added, network information from the primary controller will be replicated on the Hubitat Elevation hub.
Replace a failed Z-Wave node
If a device becomes unresponsive or is no longer available, the Hubitat Elevation hub has advanced user functions to Replace, or Remove the failed node.
Z-Wave Capability Rediscovery - Replacing a failed node on the network
- Navigate to Settings, then select Z-Wave Details.
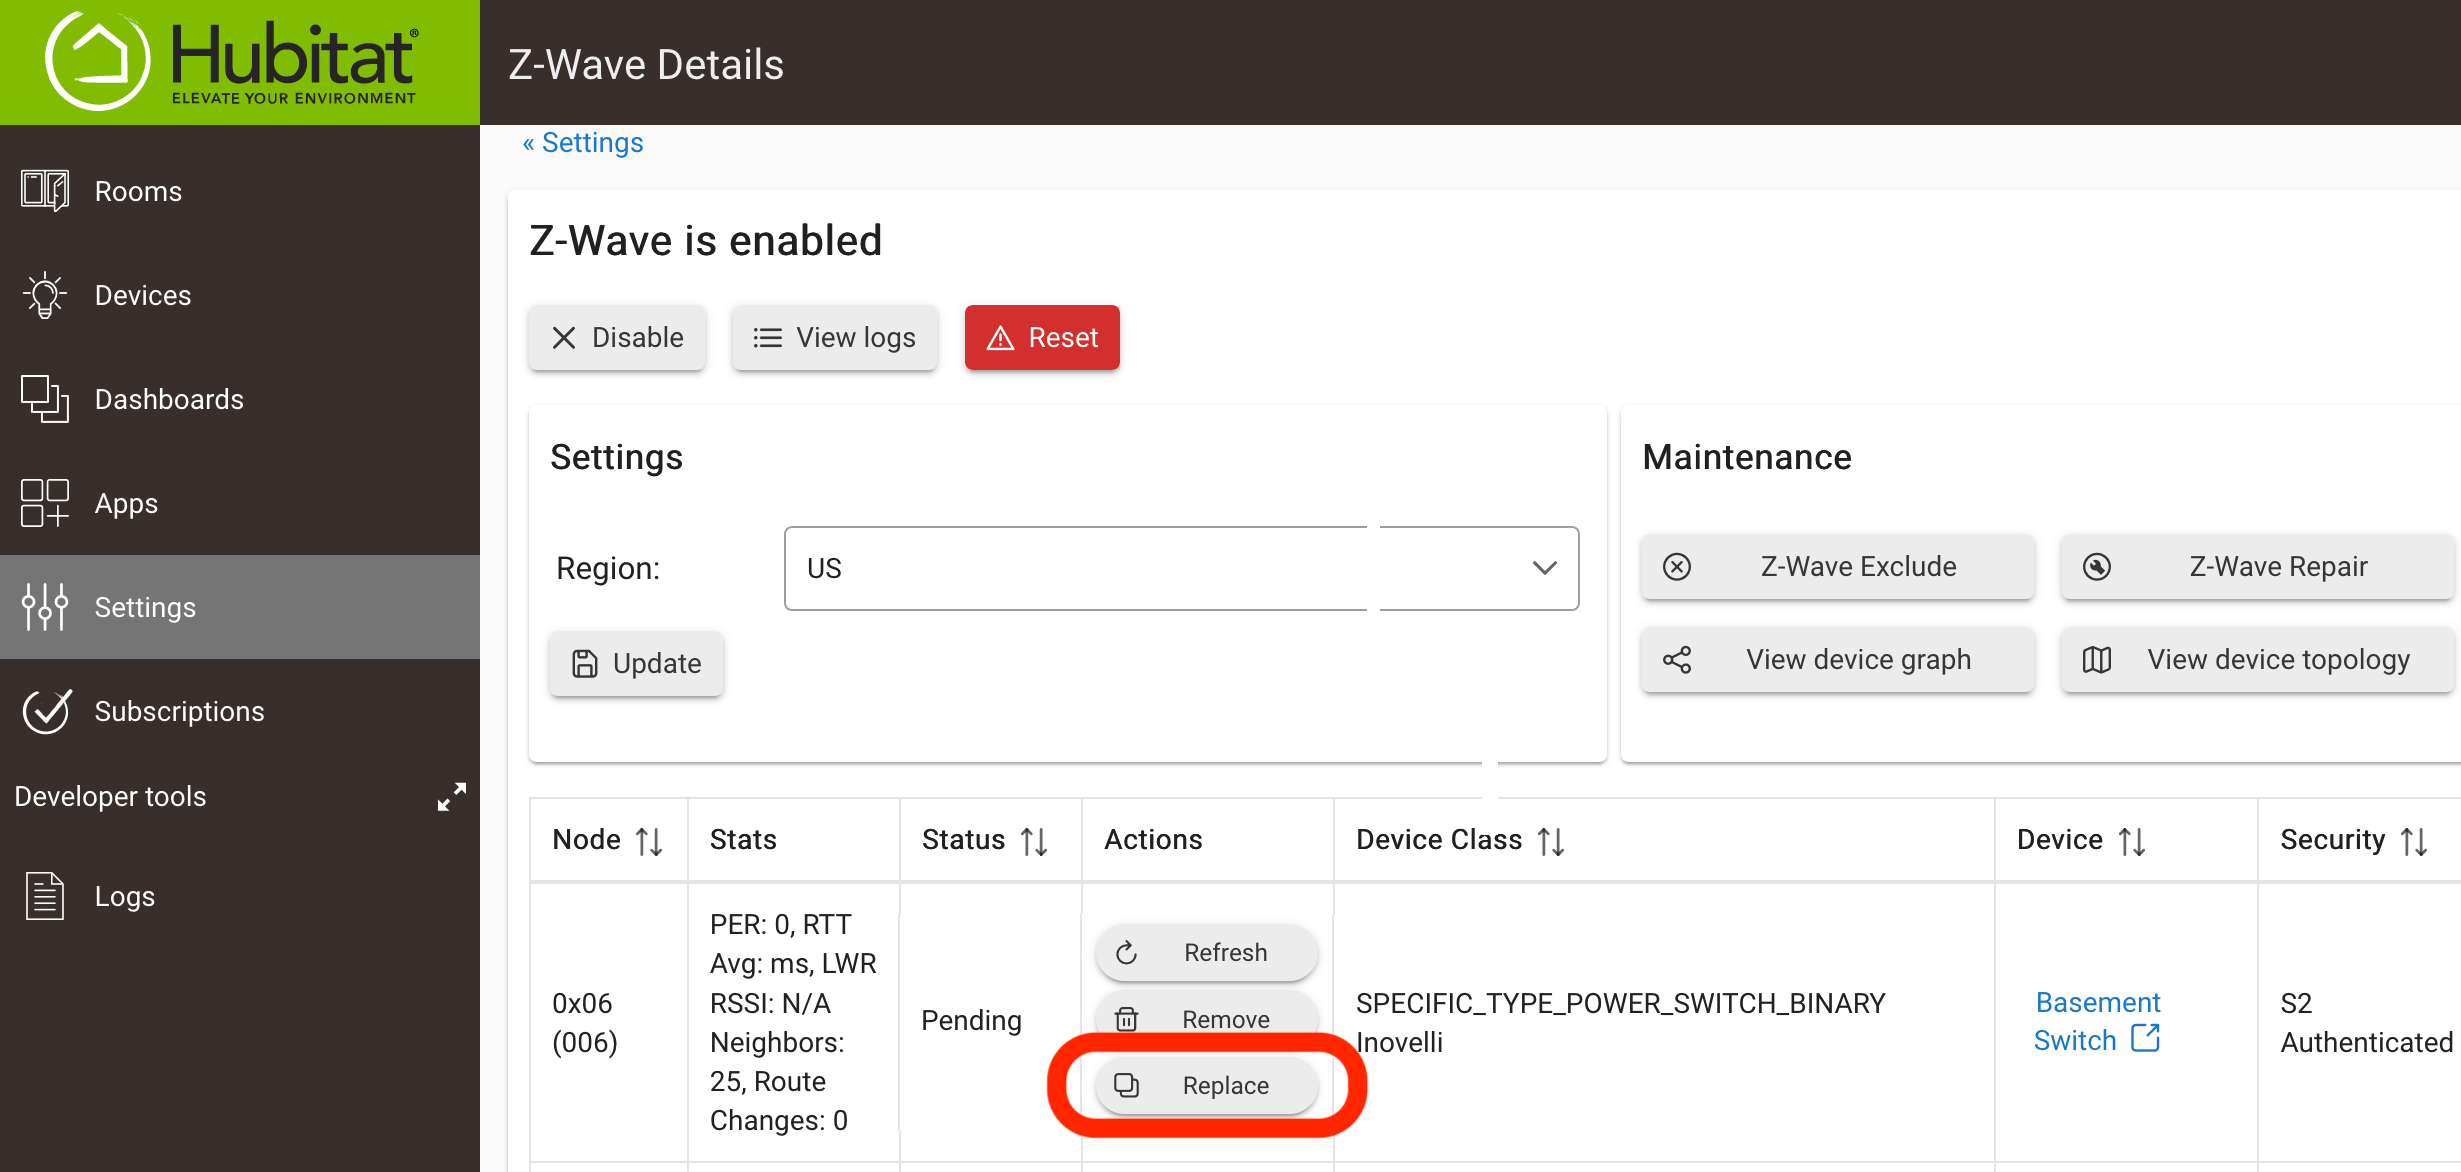
- If the device is marked FAILED in the Status column of the Z-Wave Radio Details page, a Replace button will be available. Selecting this button will initiate Inclusion Mode so the user may add a new device or the previously joined device. It will be joined to the Hubitat Elevation hub with the same Z-Wave node ID as the failed device.
Remove a failed Z-Wave node
Any node the Hubitat Elevation hub cannot reach using routing and explorer frames is considered to be failed or non-responsive. Sleeping node types such as motion and contact sensors can be considered as failing after missing more than 2 consecutive Wake Up periods. Users may choose to remove the failed node. NOTE: Removing the device from its device details page (using the "Remove" button at the bottom) is preferred over this method; see instructions on the Device Detail page documentation for more.
Remove Failed Node - Removing a failed node on the network
-
Navigate to Settings, then select Z-Wave Details.
-
Select the Remove button, if available, in the row corresponding to the desired node.
- NOTE: Only nodes that have failed will display the Remove button.
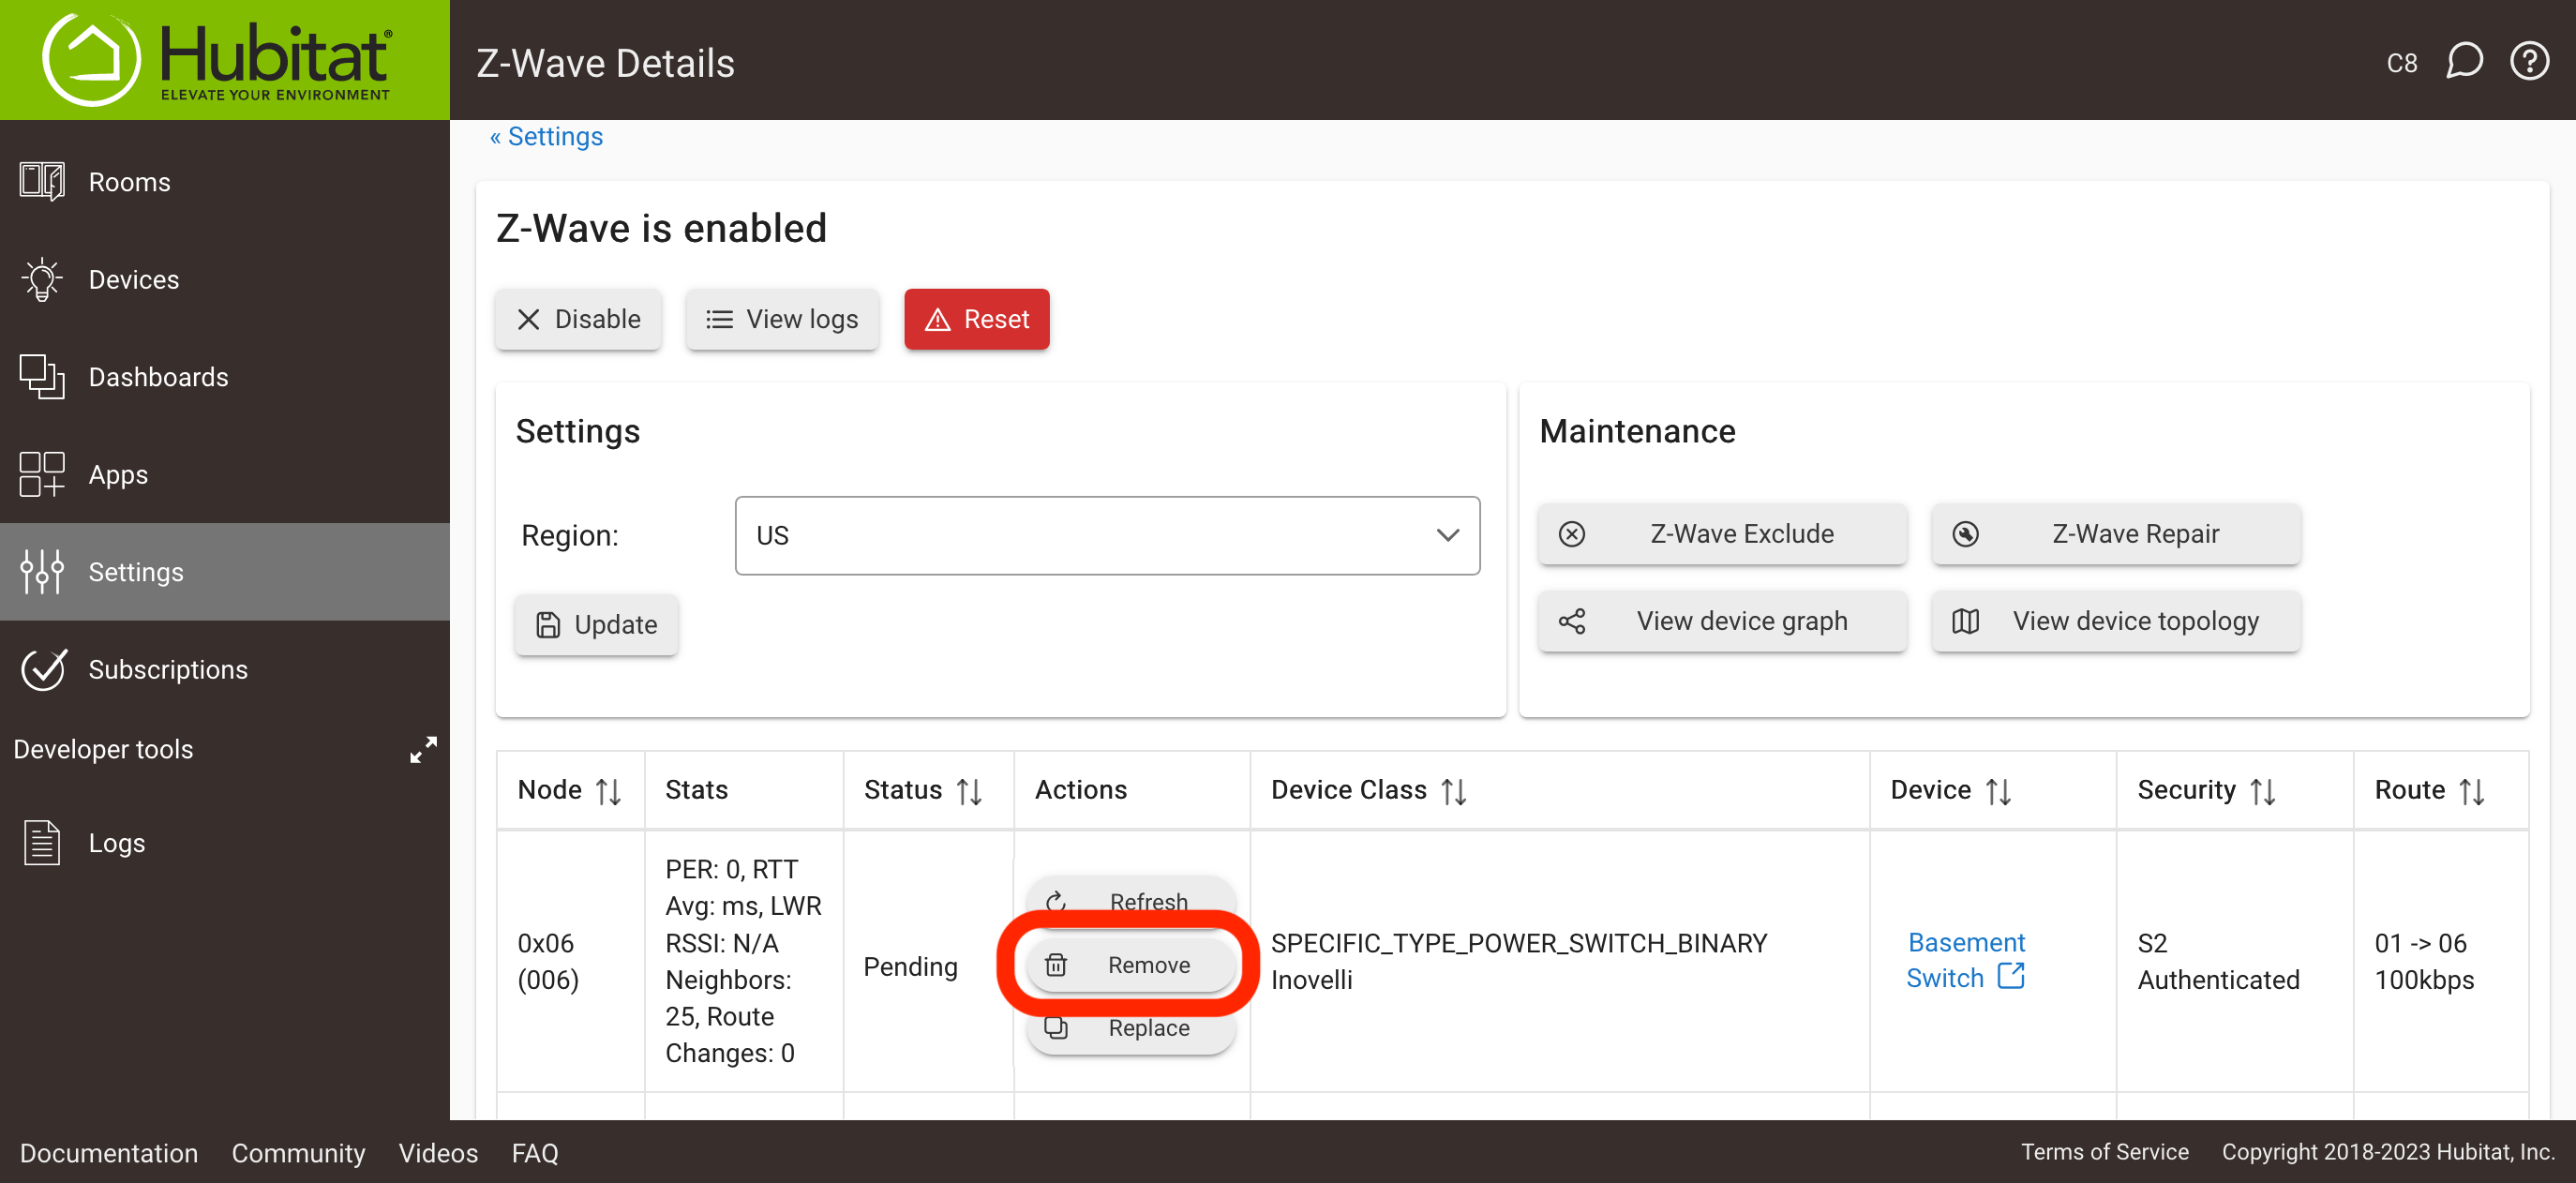
- NOTE: Only nodes that have failed will display the Remove button.
-
A node that has an entry in the hub database, but is non-responsive may be Force Removed from the Hubitat Web Interface Device Detail page. However, if a device is Force Removed, it will leave a node entry in the Hubitat Elevation Z-Wave Radio Devices list. Check for and manually remove the "ghost" entry, if present, by following steps 1-2 above (it will helpful to note the node ID before removing the device).
Repair a Z-Wave node database entry
If a Z-Wave device node entry remains, but there is no matching database entry, a Discover button will appear in the Z-Wave Details table to allow the device to be (re)added the hub database.
Repair a Z-Wave database entry - Adding a node back to the hub database
- Navigate to Settings, then select Z-Wave Details.
- Select Discover button, if available, to interrogate the device, assign it a driver, and add the node into the Hubitat Elevation database. The device will then appear in the Devices list.
- NOTE: The Discover button will only appear when there is no device in the hub database that matches the Z-Wave node entry.
Z-Wave Region Selection
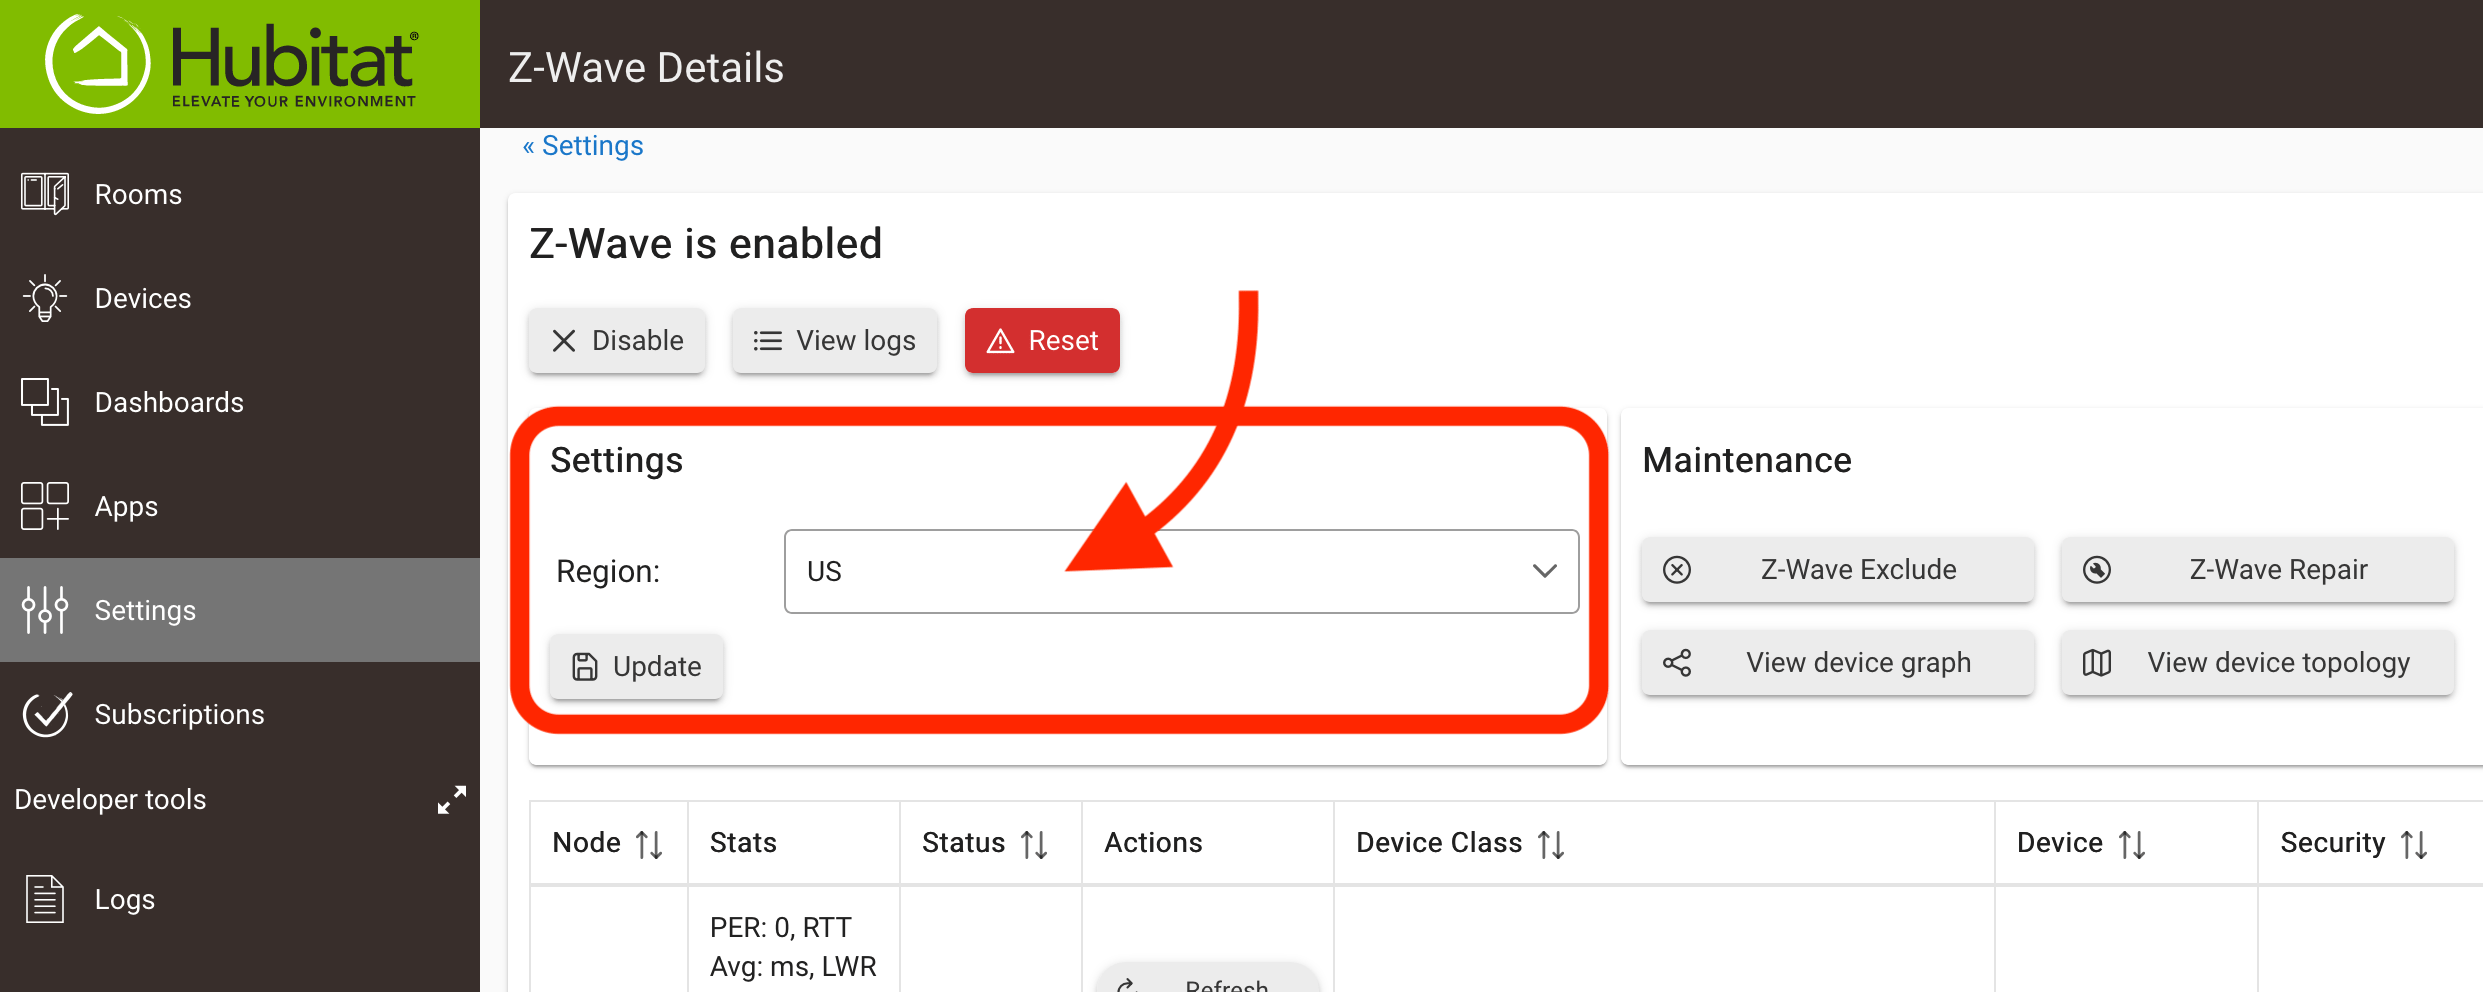
Selecting the Z-Wave Region drop-down menu will allow the user to specify which licensed Z-Wave frequency, applicable for their country, should be used by the hub for Z-Wave radio communication. Only devices licensed to operate in your country should be used. It is not possible for the hub to operate on more than one Z-Wave frequency at a time.
Z-Wave Region - Select the applicable region for your country and licensed Z-Wave frequency compatible with your devices
-
Navigate to Settings, then select Z-Wave Details.
-
From the Z-Wave Region drop-down menu, select your country, then select the Update button.
-
Select Settings (in the sidebar on the left), then select Shut Down. It is not adequate to simply reboot the hub, since the Z-Wave radio is not powered down during a reboot. You must shut down for Z-Wave region changes to take effect.
-
After the LED on the front of the hub turns red, unplug the hub from wall power, wait at least 30 seconds, then reconnect to power and wait for the hub to reboot.
Z-Wave Radio Power
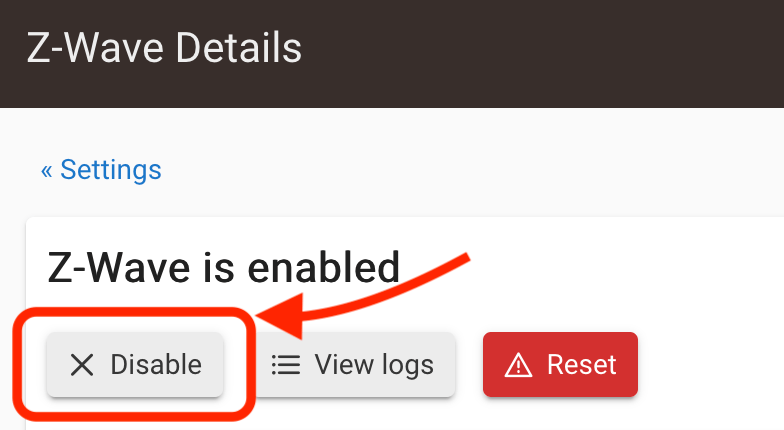
The Z-Wave radio may be enabled or disabled by selecting the desired state from the drop-down menu. This may be useful if you have a Z-Wave device that has become unresponsive, but does not have a FAILED status. You can set the Z-Wave status to Disabled, select the Update button, then change back to Enabled, and again select the Update button, rather than shutting the hub down to power off the Z-Wave radio.
Z-Wave Status - Select Enable or Disable to control the output of the Z-Wave radio
- Navigate to Settings, then select Z-Wave Details.
- Under the Z-Wave is enabled or Z-Wave is disabled status heading, select Disable or Enable to change the status.
Factory Reset for Z-Wave Radio
Z-Wave Factory Default Reset - Restoring the hub Z-Wave radio to factory default settings
- Navigate to Settings > Diagnostic Tool.
- Select the Advanced button (and confirm your understanding of all warnings).
- Select the Z-Wave Reset button (and confirm your understanding of all warnings).
WARNING! Resetting the Z-Wave radio to factory default will remove all devices from the Z-Wave radio database and the corresponding nodes from the Z-Wave Details table (though the Hubitat devices will remain in Devices — no longer usable but possibly useful for reference). All Z-Wave devices will need to be re-included in order to function again. This will entail setting up each device as if it were a new device, including rebuilding all apps/rules that used the device. PROCEED WITH CAUTION.
Note that the above procedure affects only the Z-Wave radio; other hub contents remain unaffected.