Mobile App
Learn how to download and use the (optional) Hubitat Elevation mobile app
Hubitat Elevation Mobile App
NOTE: This document applies to version 2.0 of the Hubitat Elevation mobile app. This app has a green background with a white logo (rather than a white or black background with a green logo of the v1 app). This app is a new/separate app, not an update to the existing app. We suggest upgrading to the new app if you are using the v1 app.
Are you an existing Hubitat mobile app user looking to transition to the Hubitat Elevation version 2.0 app? See our how-to guide here: https://community.hubitat.com/t/how-to-transition-to-the-new-hubitat-mobile-app/139800
Take mobile control with the Hubitat Elevation App!
With the Hubitat mobile app, you can:
- View and control devices (using the Devices tab) locally or remotely
- Receive push notifications
- Use your phone as a presence sensor by using the geofence functionality (for example, automations can work differently depending on whether you are home!)
- Add devices, including Z-Wave Smart Start devices (see Add Device for how to add any type of device)
- View or change hub mode or Hubitat Safety Monitor arm state
- Easily access Easy Dashboard or Hubitat Dashboard for more customized viewing or control of devices
- Add family members for mobile presence detection and push notifications
- Access documentation via a direct link
- Set up and administer the hub (by accessing its regular web interface) any time on a local network, or while away from home with a secure Remote Admin subscription
- NOTE: Remote Admin is an optional subscription service and is not required to access your hub from a local network or use built-in cloud features like remote Dashboard access
About Remote Access: Out of the box, you can connect to a hub from the mobile app or web browser connected to the same local network. By adding Remote Admin, you can access all of your hubs, including your rules, apps, device info and settings from anywhere with Internet access. Remote Admin is password protected using our secure servers to maintain your privacy and works on mobile devices, tablets, and computers with a web browser. All home automation processing remains local on your hub for speed and reliability.
NOTE: The Hubitat mobile apps are an optional addition to your Hubitat Elevation experience. Hub administration can be done using a web browser and any device on your local network (or via remote options such as Remote Admin); the app is not required for use of the hub itself. However, it does provide some additional features or make existing features easier to access.
How to Use the Mobile App
- If you have not already set up your hub, follow the setup and registration instructions in the Registration and Setup document.
- Make sure your hub location is configured correctly in Settings > Hub Details, specifically Latitude and Longitude. The mobile app will use this location as the center of the geofence by default; having a correct precise location set on your hub will simplify geofence setup in the app.
- If you have not already, download the appropriate mobile app from the above links.
- Launch the mobile app on your smartphone or tablet. When asked to log in, use the same Hubitat account that you used to register the hub previously or in step 1.
- If asked to select a hub, select the desired hub (if you have multiple hubs, note that the app can be associated with only one at a time, but it can be switched between hubs).
- If asked to choose a mobile app device or create a new mobile app device, select the appropriate option:
- Choose an existing mobile app device from the list if you have previously used your current mobile device with the selected hub (or wish to associate the existing mobile app device on the hub with this one, e.g., if you upgraded/replaced your phone)
- Select "Create new mobile app device" if this you wish to create another mobile app device on the hub for this mobile device (e.g., if you have an existing mobile app device for your phone but are creating a new one for a family member on another phone, a tablet or additional device for yourself, etc.).
- If you wish to use push notifications and geofence functionality, accept the prompts from your device to allow push notification and location access (background/always-on location is required for accurate background geofencing; on Android, select "Allow all the time" when prompted, or on iOS, select "Always").
- To verify location access on iPhone/iPad: Navigate to Settings > Privacy & Security > Location Services > Hubitat and ensure is set to Always.
The mobile app offers five tabs for specific tasks:
Home
The Home tab in the mobile app allows you to:
- View or change the hub mode
- View or change Hubitat Safety Monitor arm state
- View your current geofence (presence) status
- View the last 1-5 Hubitat push notifications set to this device (more history on the Notifications tab)
- View or control devices you have "favorited" (can be changed on the Devices tab)
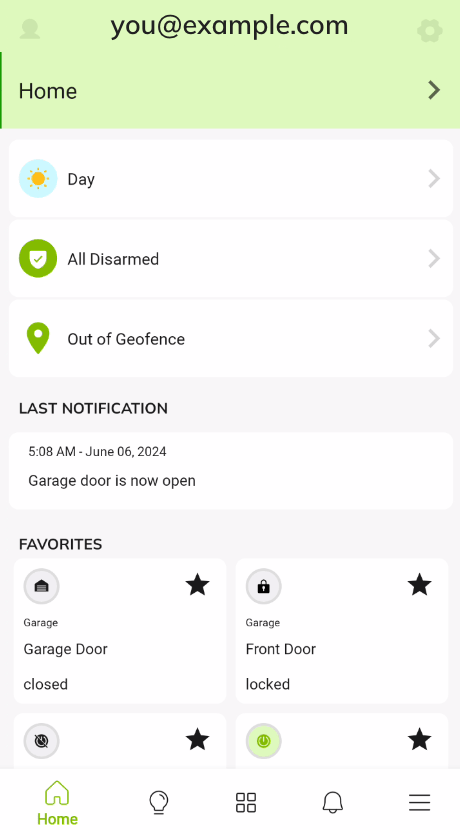
(screenshot of "Home" tab of Hubitat mobile app on Android; iOS looks similar)
All of these items are optional and can be turned on or off by using the settings (gear) icon in the upper right of the home page. The order these items are displayed on the Home tab can also be changed from this page.
The user (person) icon in the upper left can be used to view the Hubitat account you are logged into, including convenient links to change your password, view optional subscriptions associated with your account/hub(s), and view a list of any hub(s) registered under this account. You can also use this icon to log out of the mobile app.
Geofence
The Home tab shows "Inside of Geofence" or "Outside of Geofence" by default (if enabled), which reflects whether your mobile app device will show as present or not present on your hub. Are you having problems with geofence in the mobile app or need help configuring it? If so, see "How to Troubleshoot Geofence Problems" in the How to Set Up Mobile Presence document.
Devices
The Devices tab allows you to view and control devices on your hub. Devices are sorted by room, which can be configured on your hub. To expand or collapse the list of devices under a room, tap the room name or arrow to the right of the room name or hide or show devices in that room. To expand or collapse all rooms at once, use the menu (three bars or dots) icon in the top right and select Collapse All or Expand All. This menu can also be used to hide or show the "No room assigned" list (which will display devices without a room assigned to them).
The Devices tab can show only device types compatible with the mobile app or all devices on your hub. Currently, compatible devices are switches, dimmers, bulbs, thermostats, and window blinds. By default, all devices are shown. To toggle display of all devices or compatible devices only, use the menu icon on the top right of the page. (For more advanced control and display of a wider variety of device types, consider a Dashboard.)
For quick control of any device (e.g., to easily turn a switch or bulb on or off), tap the device icon in the top left of the tile. For more control (e.g., to set the level of dimmer or bulb or the setpoint or mode of a thermostat), tap near the center of the tile.
Tap the star icon in the top right of any device tile to "favorite" that device for easier access on the Home tab.
Dashboards
The Dashboards tabs provide easy access to any dashboards you have created on this hub. Both Easy Dashboard and Hubitat Dashboard are supported.
If you are using a third-party dashboard or wish to display other content on this tab, tap the gear/settings icon in the upper right of the Dashboards tab, turn on the Enable custom dashboard option, and provide the URL to display when the Dashboards tab is selected.
Notifications
The Notifications tab provides a list of the most recent notifications sent from your hub, newest first. To view the entire text for any notification (long notification text will be truncated after two lines), tap the notification text.
While the Home tab can be configured to show 1-5 of your most recent notifications, the Notifications tab typically shows you a longer list (more past notifications) and also allows you to view the full text.
More
The More tab offers additional device and app settings and information:
Mobile App
- Geofence: View or change your current geofence center or radius, view your current geofence/presence status (inside or outside radius), and enable or disable app geofence functionality
- App Settings:
- Device Name: View or change the name of the mobile app device on your hub
- Email: Displays the e-mail address associated with the Hubitat account you used to log into the app (use the user icon on the Home tab to log out or switch accounts)
- Hub: Displays the name of the hub currently associated with the mobile app (either the only hub on your account or the one you selected after signing into the app; use the hub name link on the Home tab to switch if you have multiple hubs)
- App Version: Displays the current version of the mobile app (visit your device's mobile app store to update if necessary)
- Allow Rotation: Enable or disable the ability of the app to rotate between landscape and portrait mode as your device changes orientation
- Delete Account: Allows you to submit a ticket to delete your Hubitat account
Help
Offers links to other helpful Hubitat sites and features, including:
- Find hubs: Searches for Hubitat hubs on your local network
- Documentation: Directs you to https://docs2.hubitat.com (documentation site)
- Community: Directs you to https://community.hubitat.com (community forum and peer-to-peer support with staff engagement)
- Support: Directs you to https://support.hubitat.com (for warranty issues)