Add Device
How to discover (pair, include, or add) Zigbee, Z-Wave, Matter, and other devices on your Hubitat Elevation hub
Add Device
The Add Device page allows you to add Z-Wave, Zigbee, certain LAN, or virtual devices to your hub. This process is sometimes known as inclusion, pairing, or discovery. Some other devices, such as Lutron and the Philips Hue Bridge, are added using integration apps, which can be found on the Apps page instead.
How to Add a Device
Follow the instructions in this video to add a device to your Hubitat Elevation hub using the mobile app:
Alternatively, continue with the instructions here to add a device using the hub interface or mobile app:
The processes for adding Zigbee, Z-Wave, and Matter devices to the hub are largely similar. (For virtual devices, see below.) To see the specific process for your type of device, consult the appropriate section:
How to Add a Zigbee Device
Here's how to add new Zigbee devices:
-
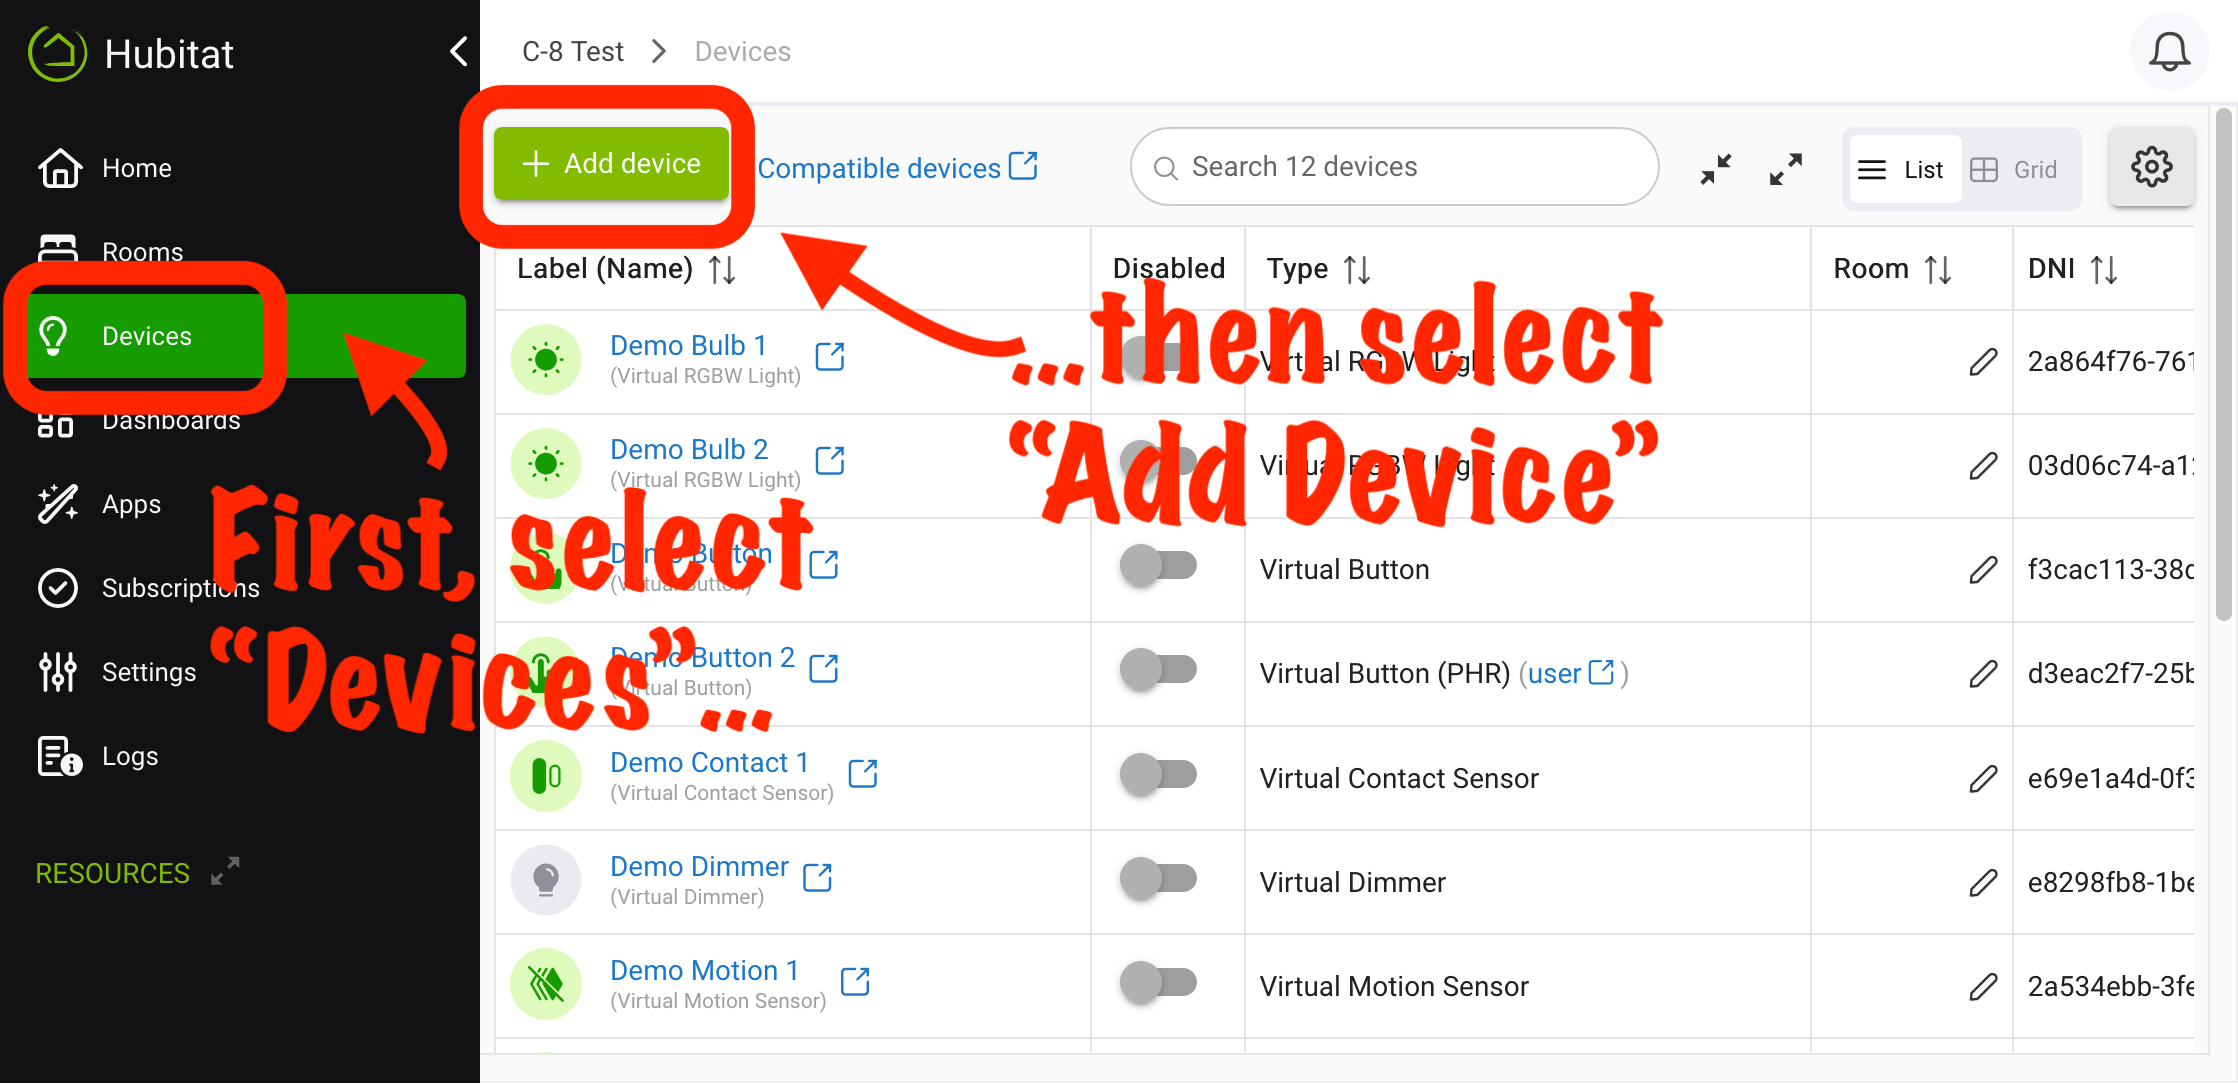
Select the Devices menu item from the sidebar, then select Add Device in the upper right:
-
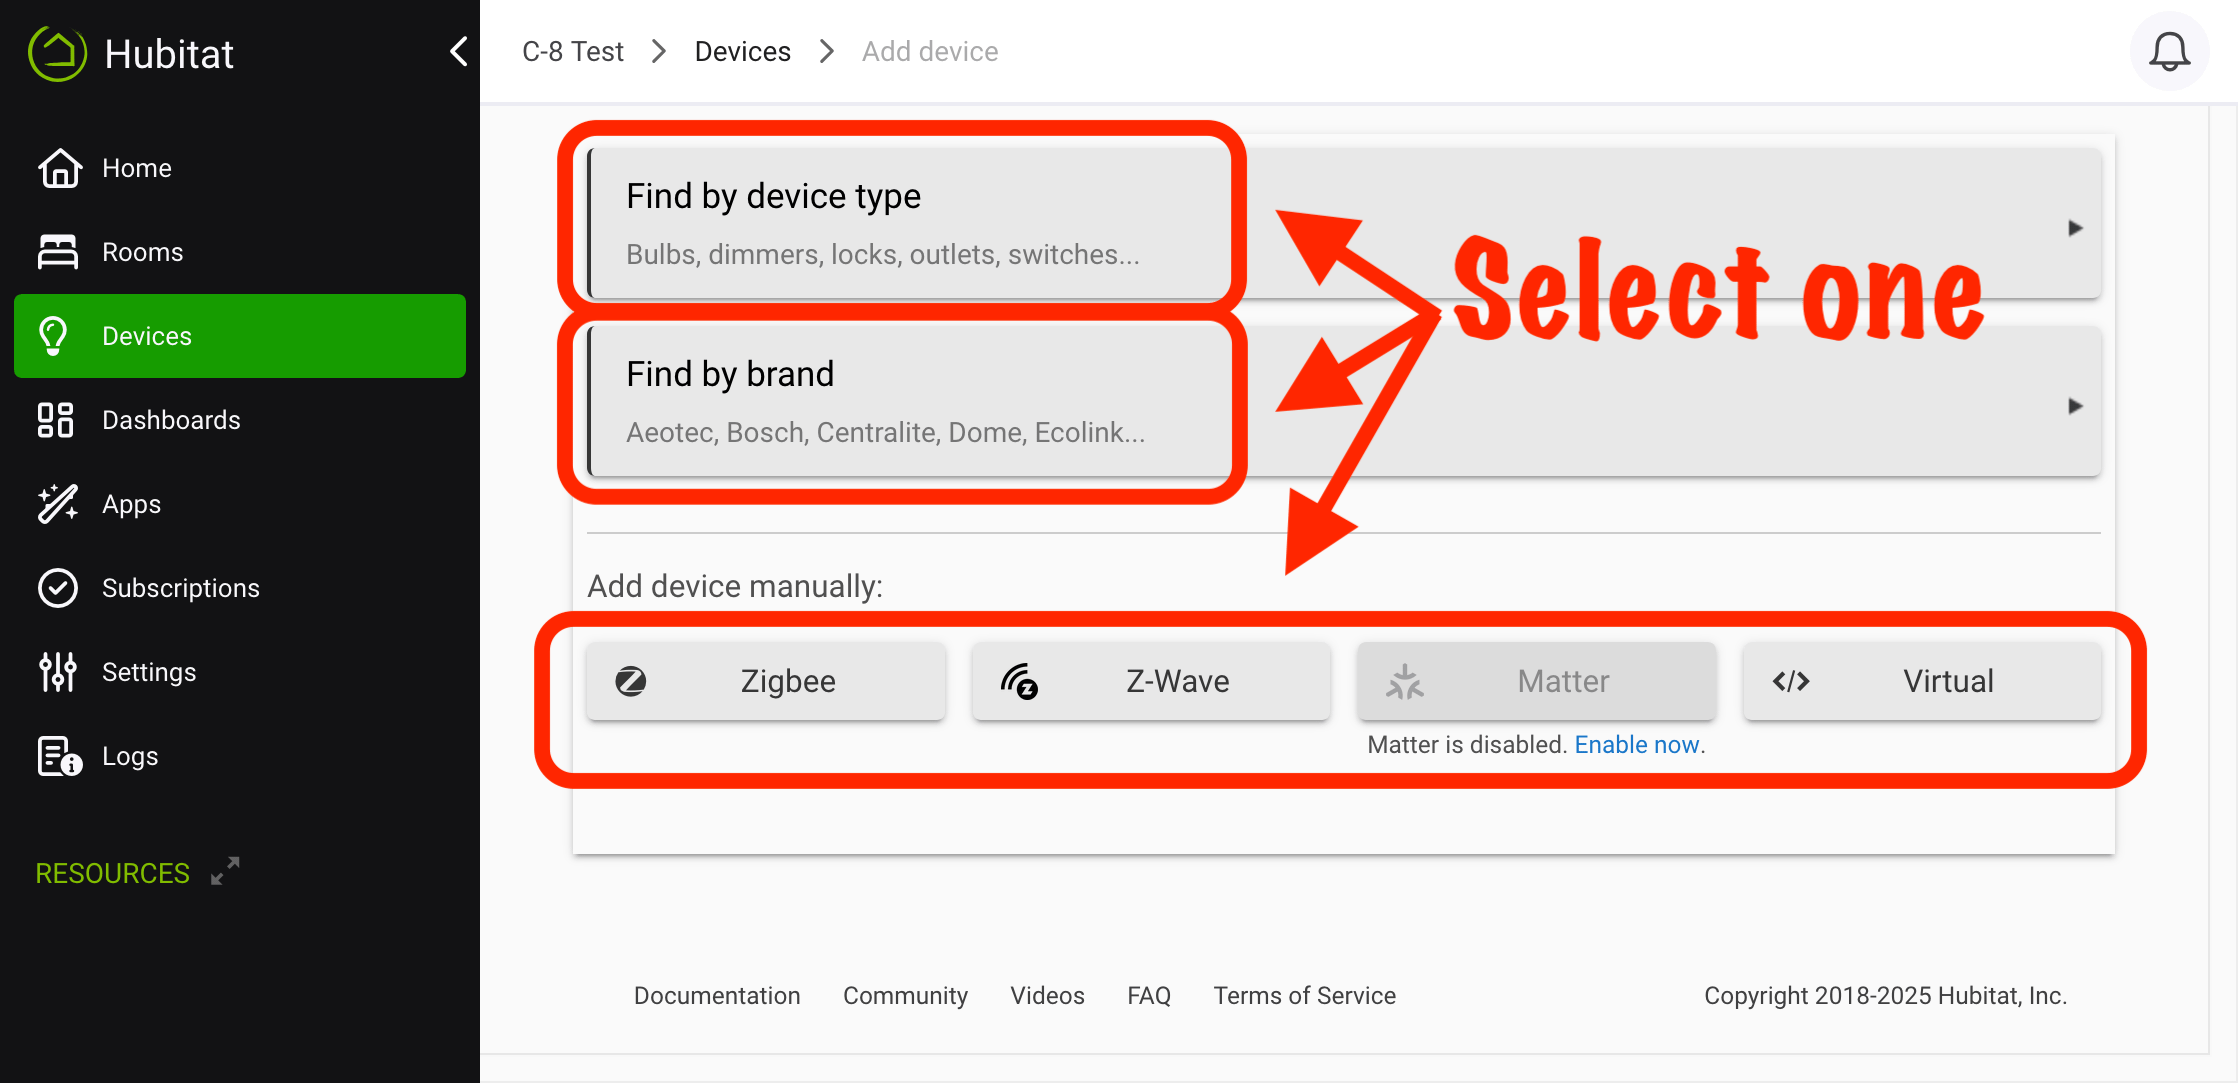
Select Find by device type (to see compatible devices sorted by type, like dimmer or motion sensor) or Find by brand (to see compatible devices sorted by manufacturer/brand), then continue following the prompts to find your specific device.
- Pairing instructions will appear on this page for most compatible devices. Consult your device manual if available, as instructions may vary slightly between hardware or firmware revisions of similar devices.
- Pairing instructions will appear on this page for most compatible devices. Consult your device manual if available, as instructions may vary slightly between hardware or firmware revisions of similar devices.
-
Alternatively, under Add a device manually, select Zigbee (or the appropriate protocol for your device).
-
Put your device in paring mode, according to the device-specific instructions presented in step 2 or the ones included with your device, and follow the prompts.
Additional Zigbee notes:
- Hubitat can discover multiple Zigbee devices at the same time (although it may be easier for you to know which device is which if you only attempt to join one at a time).
- Model C-8 users will see additional pairing options that can be used if regular pairing fails. Reset the device and try again with one of these methods if needed:
- Pair while trying to avoid Zigbee 3.0 repeaters: try if a device appears to have been added correctly but is unresponsive and does not display any attributes under Current States on the device detail page.
- Pair while exchanging keys in clear: try if a device is discovered but remains stuck on "Initializing..." after the regular countdown expires. This is a less secure method but may help older devices pair. (This was previously labled "legacy pairing mode.").
- "Iris V1 Zigbee" is a Zigbee pairing method that is available on model C-7 and earlier hubs only and intended only for Iris V1 Zigbee devices. This is the generation manufactured by AlertMe and is not intended for Iris V2 or V3 devices (manufactured by CentraLite or iMagic by GreatStar). These devices should use standard Zigbee pairing.
- In case of Zigbee radio failure (e.g., inability to add or control devices) and none of the above helps, see also: https://docs2.hubitat.com/en/how-to/build-a-solid-zigbee-mesh#zigbee-problems
NOTE: Whether you search by type/brand or manually start pairing or inclusion based on device protocol does not affect the outcome of pairing (as long as you choose the correct protocol if doing so manually). For example, if you have Zigbee device and already know how to pair it, it may be fastest to simply manually select "Zigbee" than to find the brand/model in the menus.
How to Add a Z-Wave Device
Here's how to add a new Z-Wave device:
-
Select the Devices menu item from the sidebar, then select Add Device in the upper right:
-
Select Find by device type (to see compatible devices sorted by type, like dimmer or motion sensor) or Find by brand (to see compatible devices sorted by manufacturer/brand), then continue following the prompts to find your specific device.
- Pairing instructions will appear on this page for most compatible devices. Consult your device manual if available, as instructions may vary slightly between hardware or firmware revisions of similar devices.
- Pairing instructions will appear on this page for most compatible devices. Consult your device manual if available, as instructions may vary slightly between hardware or firmware revisions of similar devices.
-
Alternatively, under Add a device manually, select Z-Wave (or the appropriate protocol for your device).
-
Put your device in inclusion mode, according to the device-specific instructions presented in step 2 or the ones included with your device, and follow the prompts.
-
Some Z-Wave devices will include without any additional action required. In this case, you are done! Devices that support S2 security may prompt as described in the next steps.
-
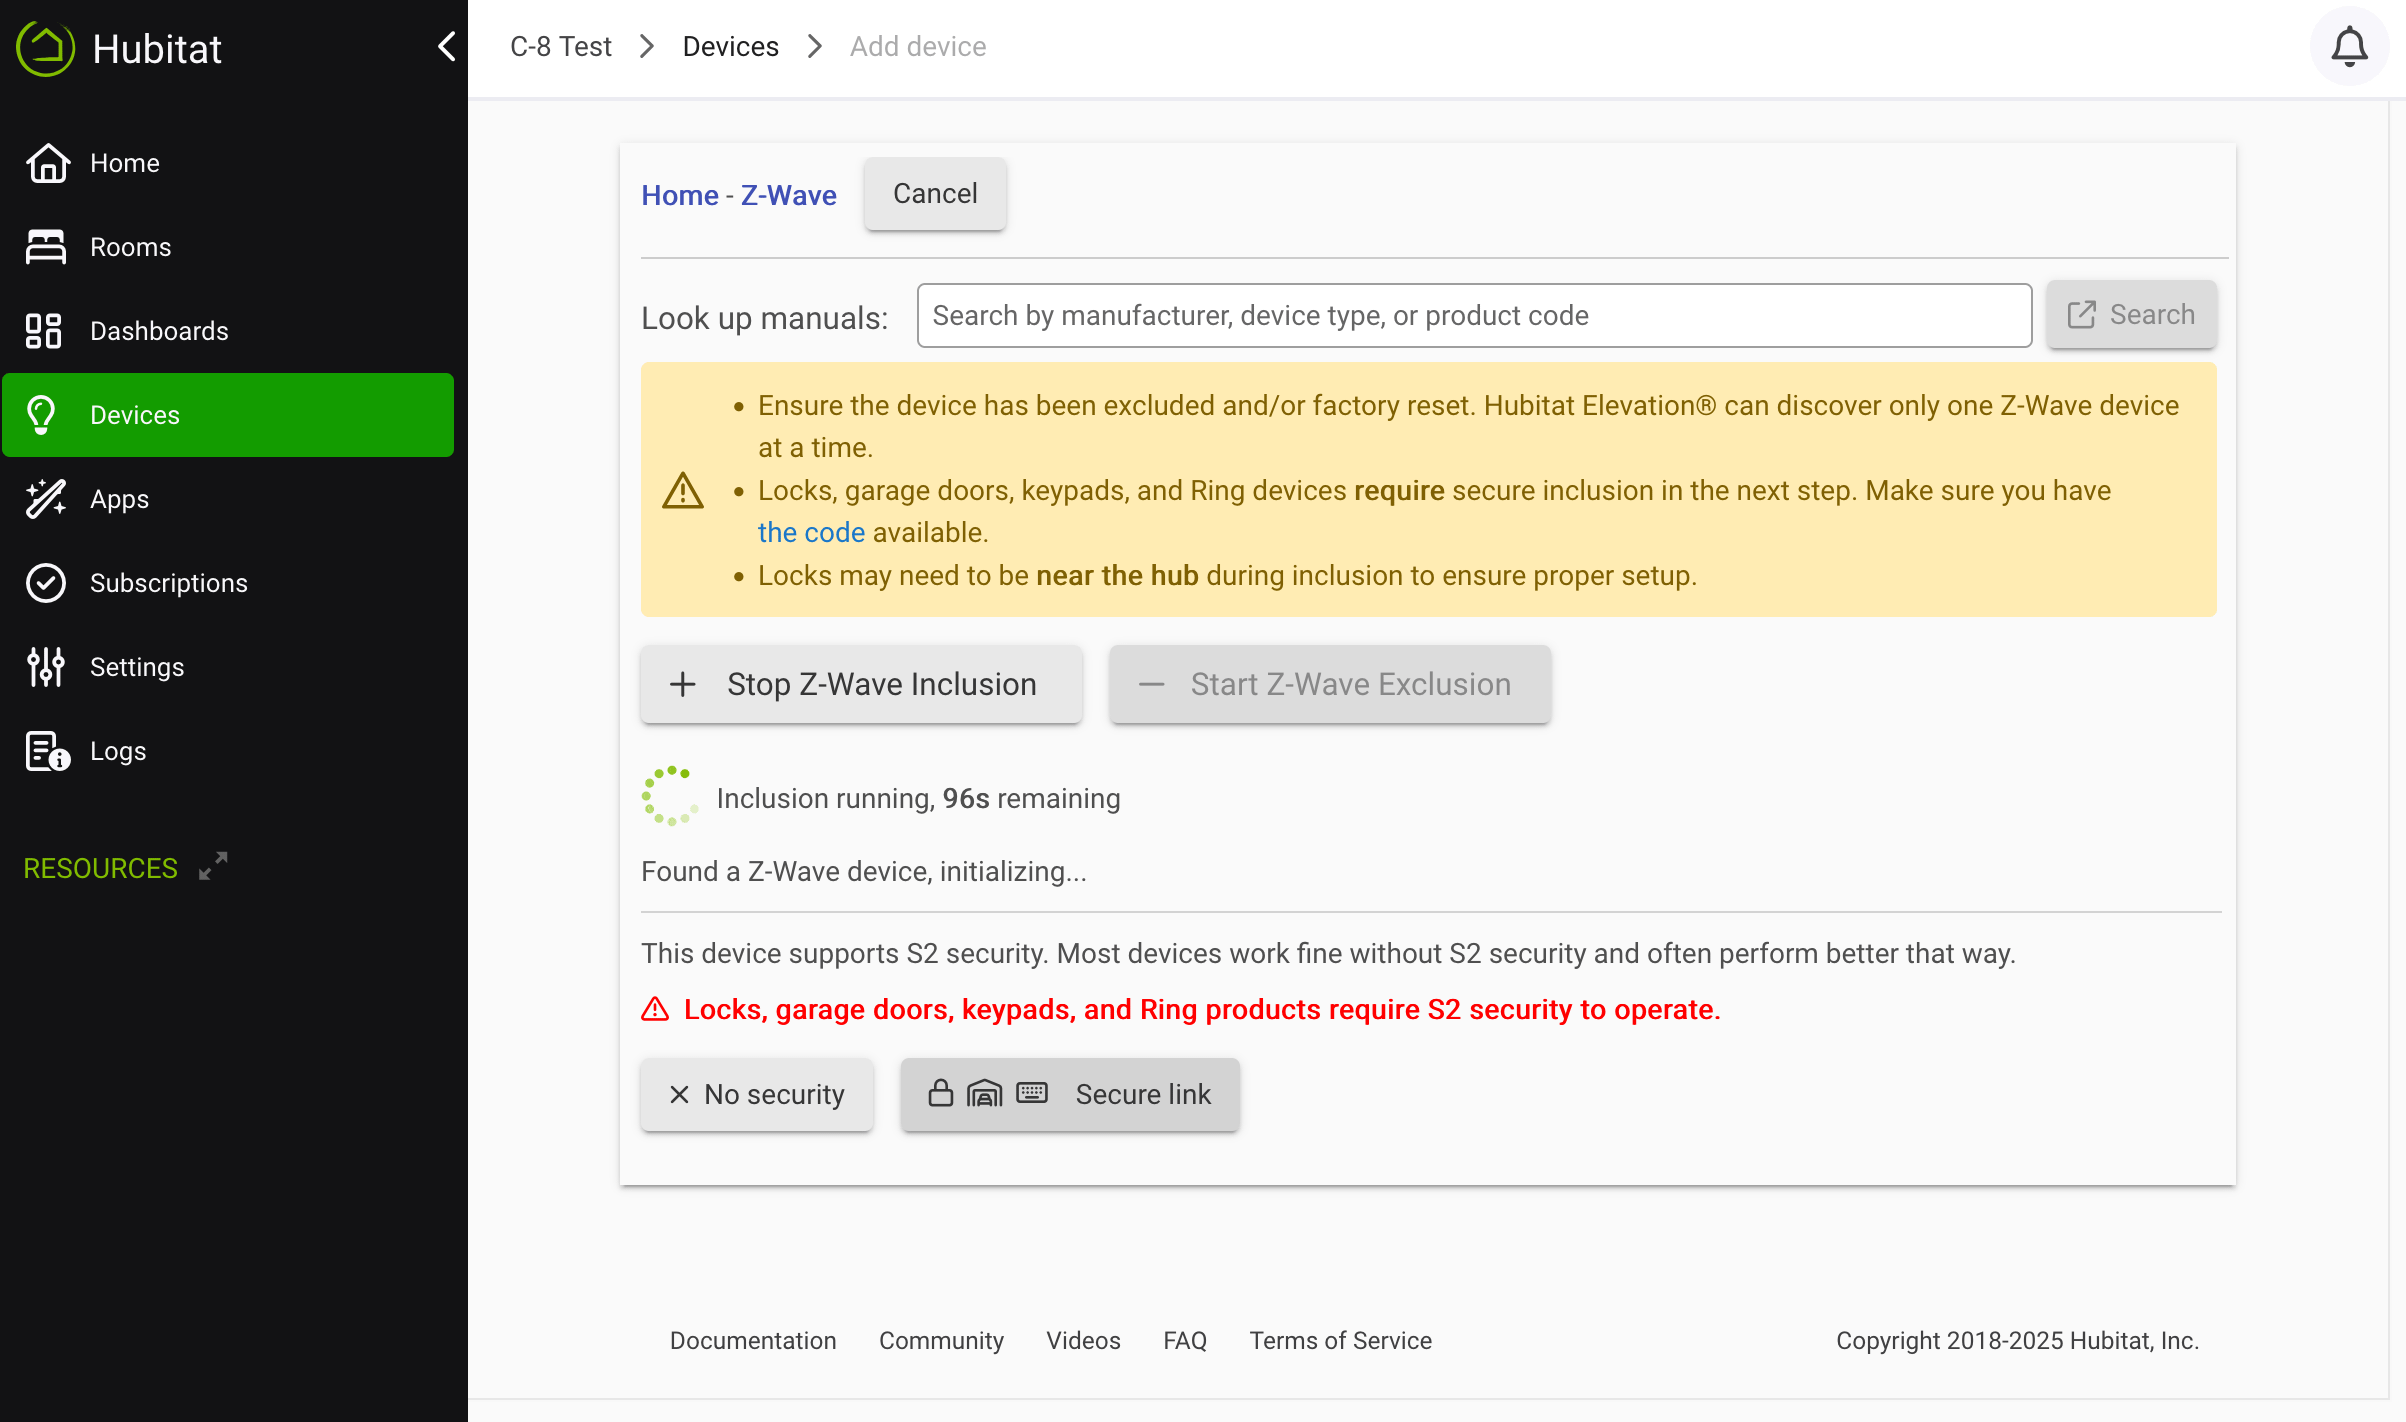
For Z-Wave devices that support S2, you will see a security popup shortly after pairing begins asking if you want to include with or without security. Choose your desired option:
-
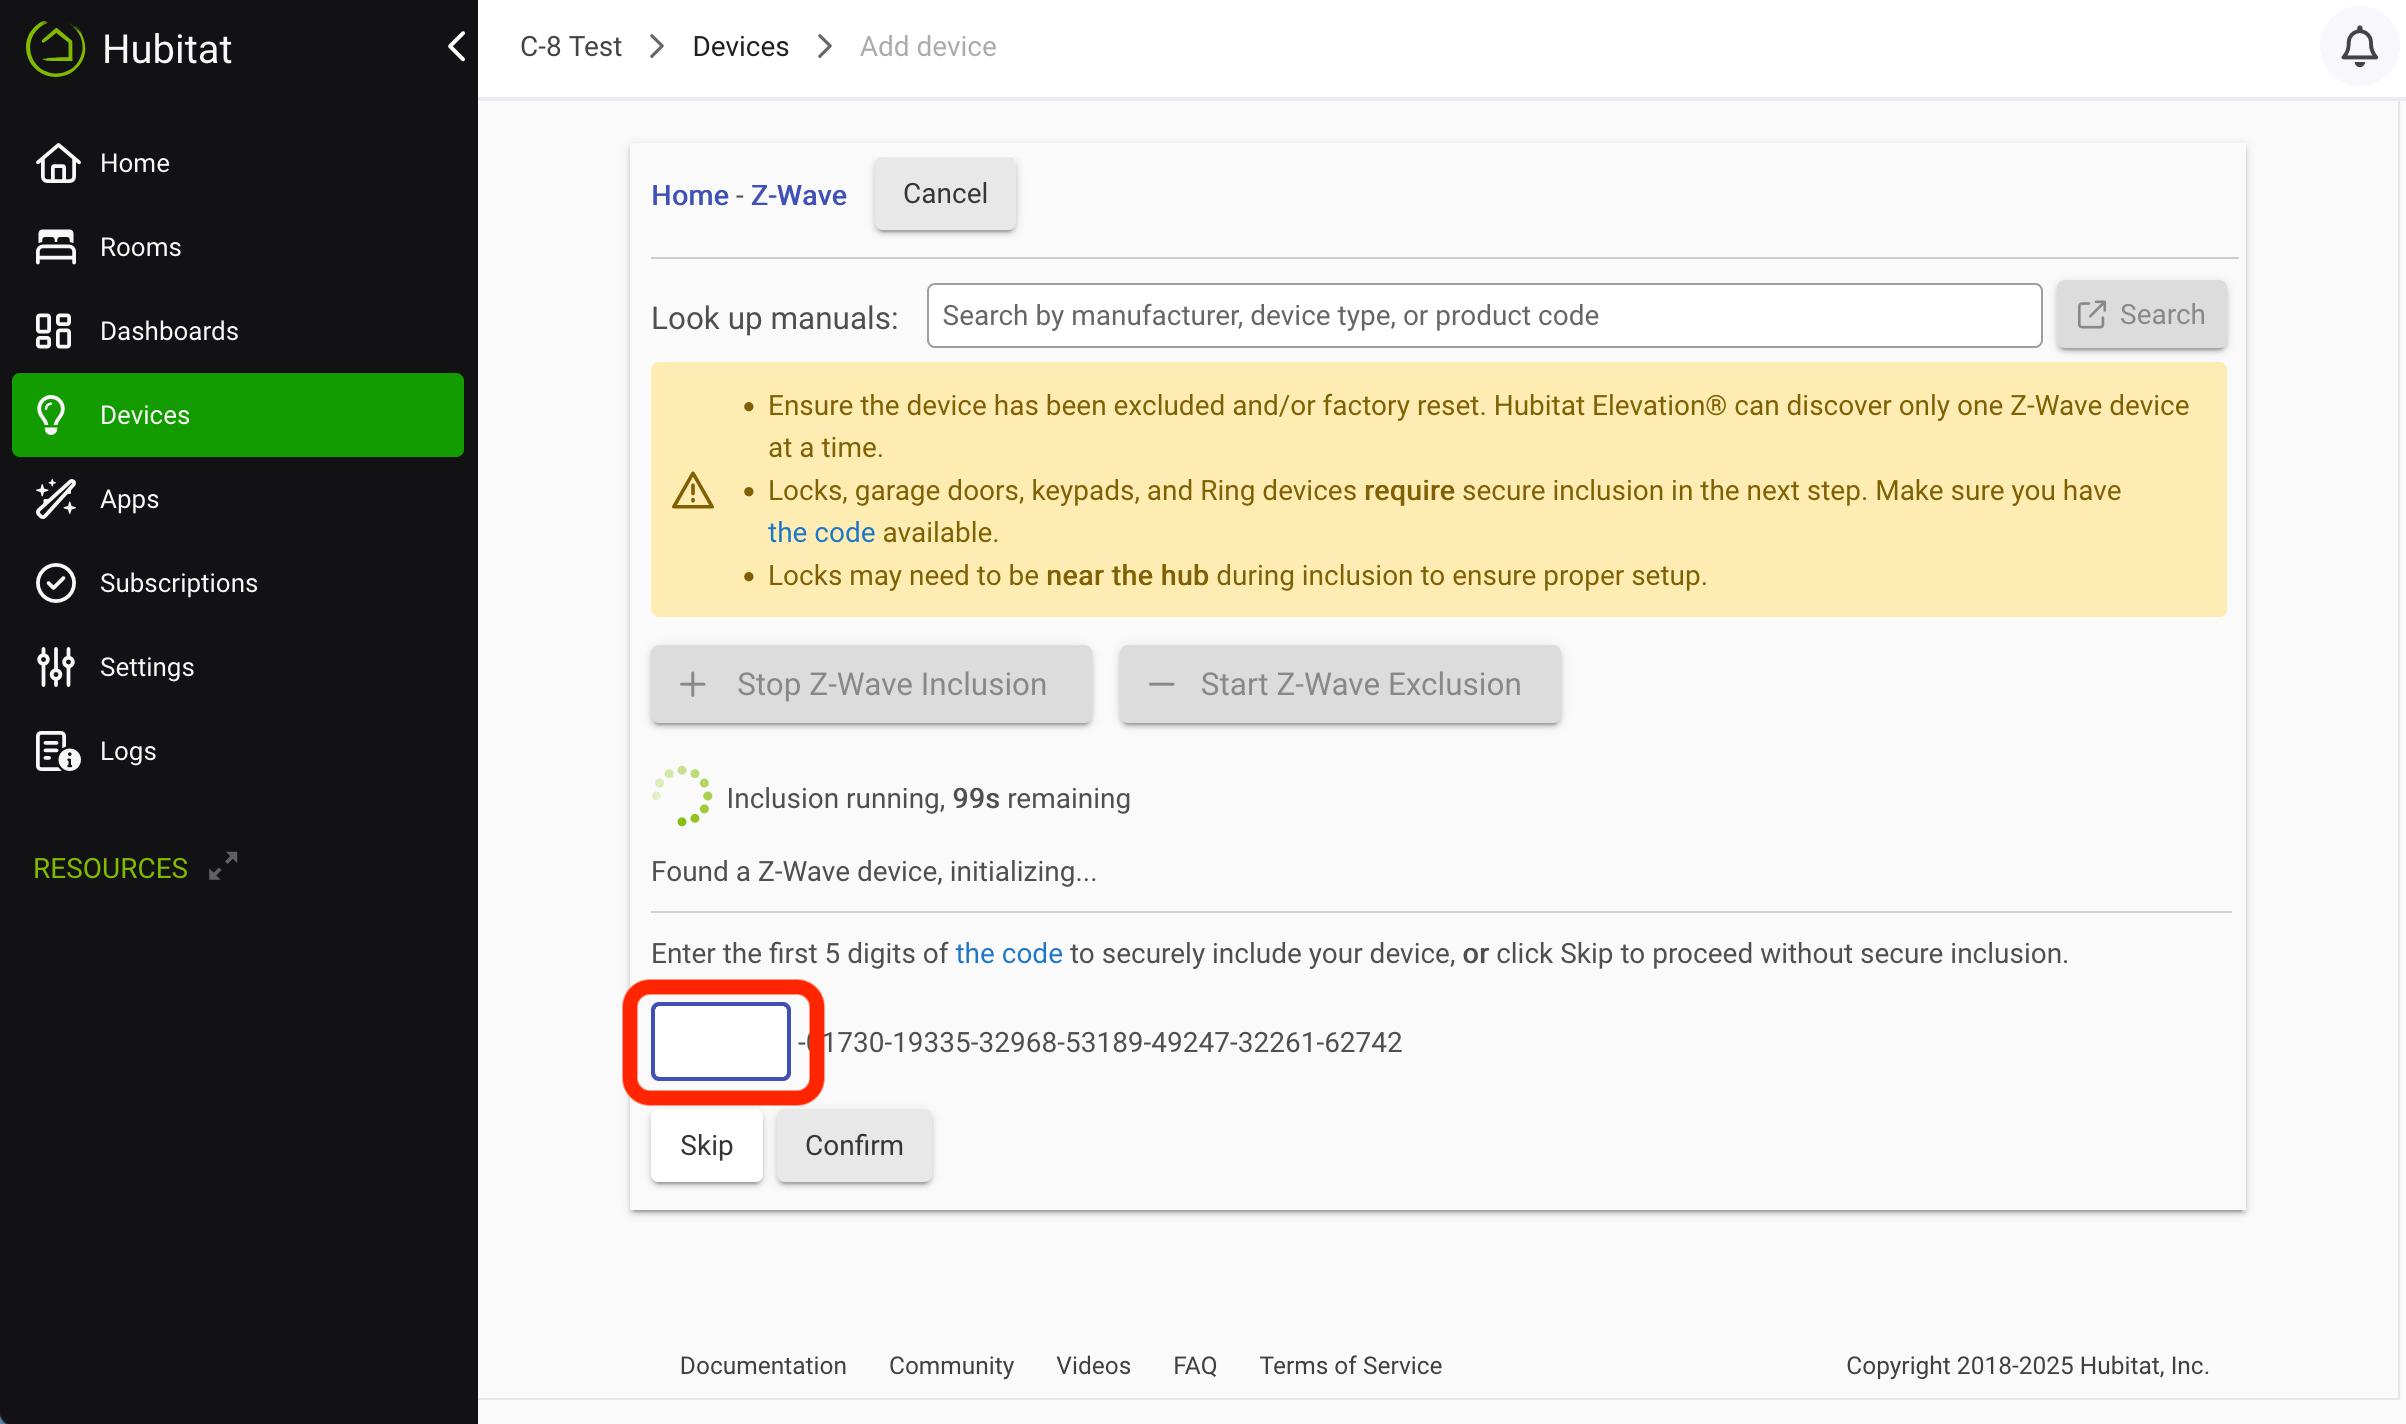
If you choose to continue with security, you will be prompted to either enter part of the device-specific key (DSK) or confirm that the code you see matches the device, depending on the type of S2 used. This code can usually be found on a sticker on the device or in the packaging.
As an alternative to the above, Z-Wave devices that come with a SmartStart code (QR code, usually on the device, in the box, or both) can also be added using SmartStart. This process is described in How to Add a Z-Wave LR Device below (SmartStart is required for LR but also works for any SmartStart device, which will add as a traditional Z-Wave node if the device does not support LR). SmartStart is supported on hub models C-7 and later.
Are you having problems including a Z-Wave device? See How to Exclude a Z-Wave Device below — try an exclusion and then try including again.
Note that you can include only one Z-Wave device a time. To include another Z-Wave device, start the inclusion process over for the next device, and repeat until you are finished.
A note on Z-Wave security: Devices that support security but only the older S0 security will not prompt, as they do not require a DSK. They may pair either securely or not, depending on what the device requests (some devices have different secure and non-secure pairing modes you can select from; others default to security).
Hub model C-5 and earlier does not support S2, and secure devices may pair with either S0 or no security, depending again on the device type (barrier devices like locks require security) and if a specific inclusion mode was selected by either you (on the device) or the hub Z-Wave settings.
It is recommended to avoid S0-only whenever possible, as having a large number of such devices can create lots of Z-Wave traffic.
How to Add a Z-Wave LR Device
Z-Wave LR (Z-Wave Long Range) devices are backwards-compatible with traditional Z-Wave networks but can only be included as either a traditional Z-Wave node or a Z-Wave LR node.
To include as a traditional Z-Wave device, see the steps above for Z-Wave devices. To include as a Z-Wave LR device (model C-8 or later with platform 2.3.9 or later and US region only), Z-Wave SmartStart must be used. Note that all Z-Wave LR devices must support SmartStart, but not all SmartStart devices support Z-Wave LR. SmartStart will still include the device as a traditional Z-Wave node if LR is not supported.
Before using SmartStart, locate the device's SmartStart QR code.
This is often located on the device itself, the device packaging, or a small insert inside the device packaging. It is often a QR code with the numeric DSK (device-specific key) next to it. You will need this later. Do not power on the device at this time.
To add a device using Z-Wave SmartStart, you can use either the hub interface or the moble app.
To use the hub:
- Follow the steps for "regular" Z-Wave devices above, except choose SmartStart instead of Start Z-Wave Inclusion.
- Select Scan QR (approve camera usage on your device if necesssary) and scan the SmartStart QR code you located. When scanned,
select Send to return to your hub. - Verify the scanned code, provide a Name for your device (will
be used when adding device to your hub and show in SmartStart list
with this name before adding as well), then select Add QR code. - Proceed with the After adding QR code steps below.
To use the mobile app:
- Open the Hubitat mobile app and navigate to the Devices tab (at the bottom). Then, select the + icon (plus icon) on the toolbar and choose Add SmartStart Devices (if you are using the legacy mobile app, find this option instead under Tools > Z-Wave Tools – but we suggest upgrading to the current version).
- Select the SmartStart button.
- Select the QR code icon from the top-right (and allow camera access for the app if prompted).
- Scan the SmartStart QR code you located. Provide a name for the device when prompted (to be used on the hub, e.g., "Living Room Dimmer" or "Hallway Motion"; this can be changed on the hub later).
- Proceed with the After adding QR code steps below.
After adding QR code (via either method):
5. Power on the Z-Wave device by inserting the battery, removing tabs/covers protecting the battery, plugging in the device, or otherwise connecting it to power. Within approximately 10 minutes, the device should be automatically added to your hub.
6. If you do not see the device added to your hub after waiting at least 10 minutes, consult the manual for troubleshooting, or try a factory reset of the device as described in its manual.
For additional information about Z-Wave LR on Hubitat, see How to Use Z-Wave LR on Hubitat.
How to Add a Matter Device
Here's how to add new Matter devices (available only on hub models C-5 and newer):
-
Recommended for all Matter devices but required for Matter over Thread devices: join your Matter device to an existing Matter Fabric (in other words, "commission" it on that network). Examples include Apple Home, Alexa, or Google Assistant.
- Thread devices require a Thread border router on your network, which certain models of the above systems also support. (If your system successfully commissions the device, you're good!)
- Matter over Wi-Fi (or Ethernet) devices or Matter Bridges can be added using the Hubitat Elevation mobile app without the hub web interface and without commissioning the device with another Matter controller first. In this case, the remaining steps and use of the hub web interface (as assumed in the rest of these instructions) are not necessary to add the device.
-
Select the Devices menu item from the sidebar, then select Add Device in the upper right:
-
Under Add a device manually, select Matter. (If you have not yet enabled Matter on this hub, follow the prompts, reboot your hub when instructed, and return to this step again afterwards.)
-
Get a setup code from the commissioning Matter Fabric (hub, etc.), then type or copy/paste that code under "Enter the 11 digit setup code provided by the commissioning hub or bridge device." Then, select the Start pairing button, and wait for the process to complete.
- IMPORTANT: Note that this might not the QR code or numbers on the device (or box, etc.) itself as used for initial commissioning, unless you are performing the initial commissionining of a Matter over Wi-Fi device. In this case, you can also select Scan QR (or do the same if the system you are sharing from provides a code you can scan, too).
- The process for getting a setup code from the commissioning Fabric will vary depending on the platform/hub/software you are using for that purpose. Look for an options like "pairing mode" or "multi-admin" to add to another Fabric
- For example, using Apple Home: Long-press on the accessory in the Home app, choose Accessory Settings, select Turn On Pairing Mode, and use the Setup Code provided by the Home app for the above step
- For example, using Amazon Alexa: Navigate to Devices, find your device in the list (select the appropriate category at the top, or select All Devices), select the settings (gear) icon for the device in the upper right, select Other Assistants and Apps, select Add another, wait for the setup code to be created, and use this code in the step above.
For more tips on using Matter devices with Hubitat Elevation or for information on how to commission and pair with the mobile app, see: How to use Matter on Hubitat Elevation.
How to Add Other Devices
Other types of devices are normally added using a different process. For example:- LAN and cloud devices are often added via an integration app. Examples include:
- Philips Hue, LIFX, WiZ, Yeelight
- Lutron systems and their devices (Caséta, RA2, etc.)
- AirPlay and Chromecast TTS devices
- A device represting your mobile phone/tablet for presence detection (geofencing) or receiving push notifications: created (or re-associated if previously created by this process) by signing into the Hubitat mobile app
- Virtual devices are typically manually created by the process described in the section below
- Community-created integration apps or drivers typically come with installation instructions that you should follow
Naming a Device
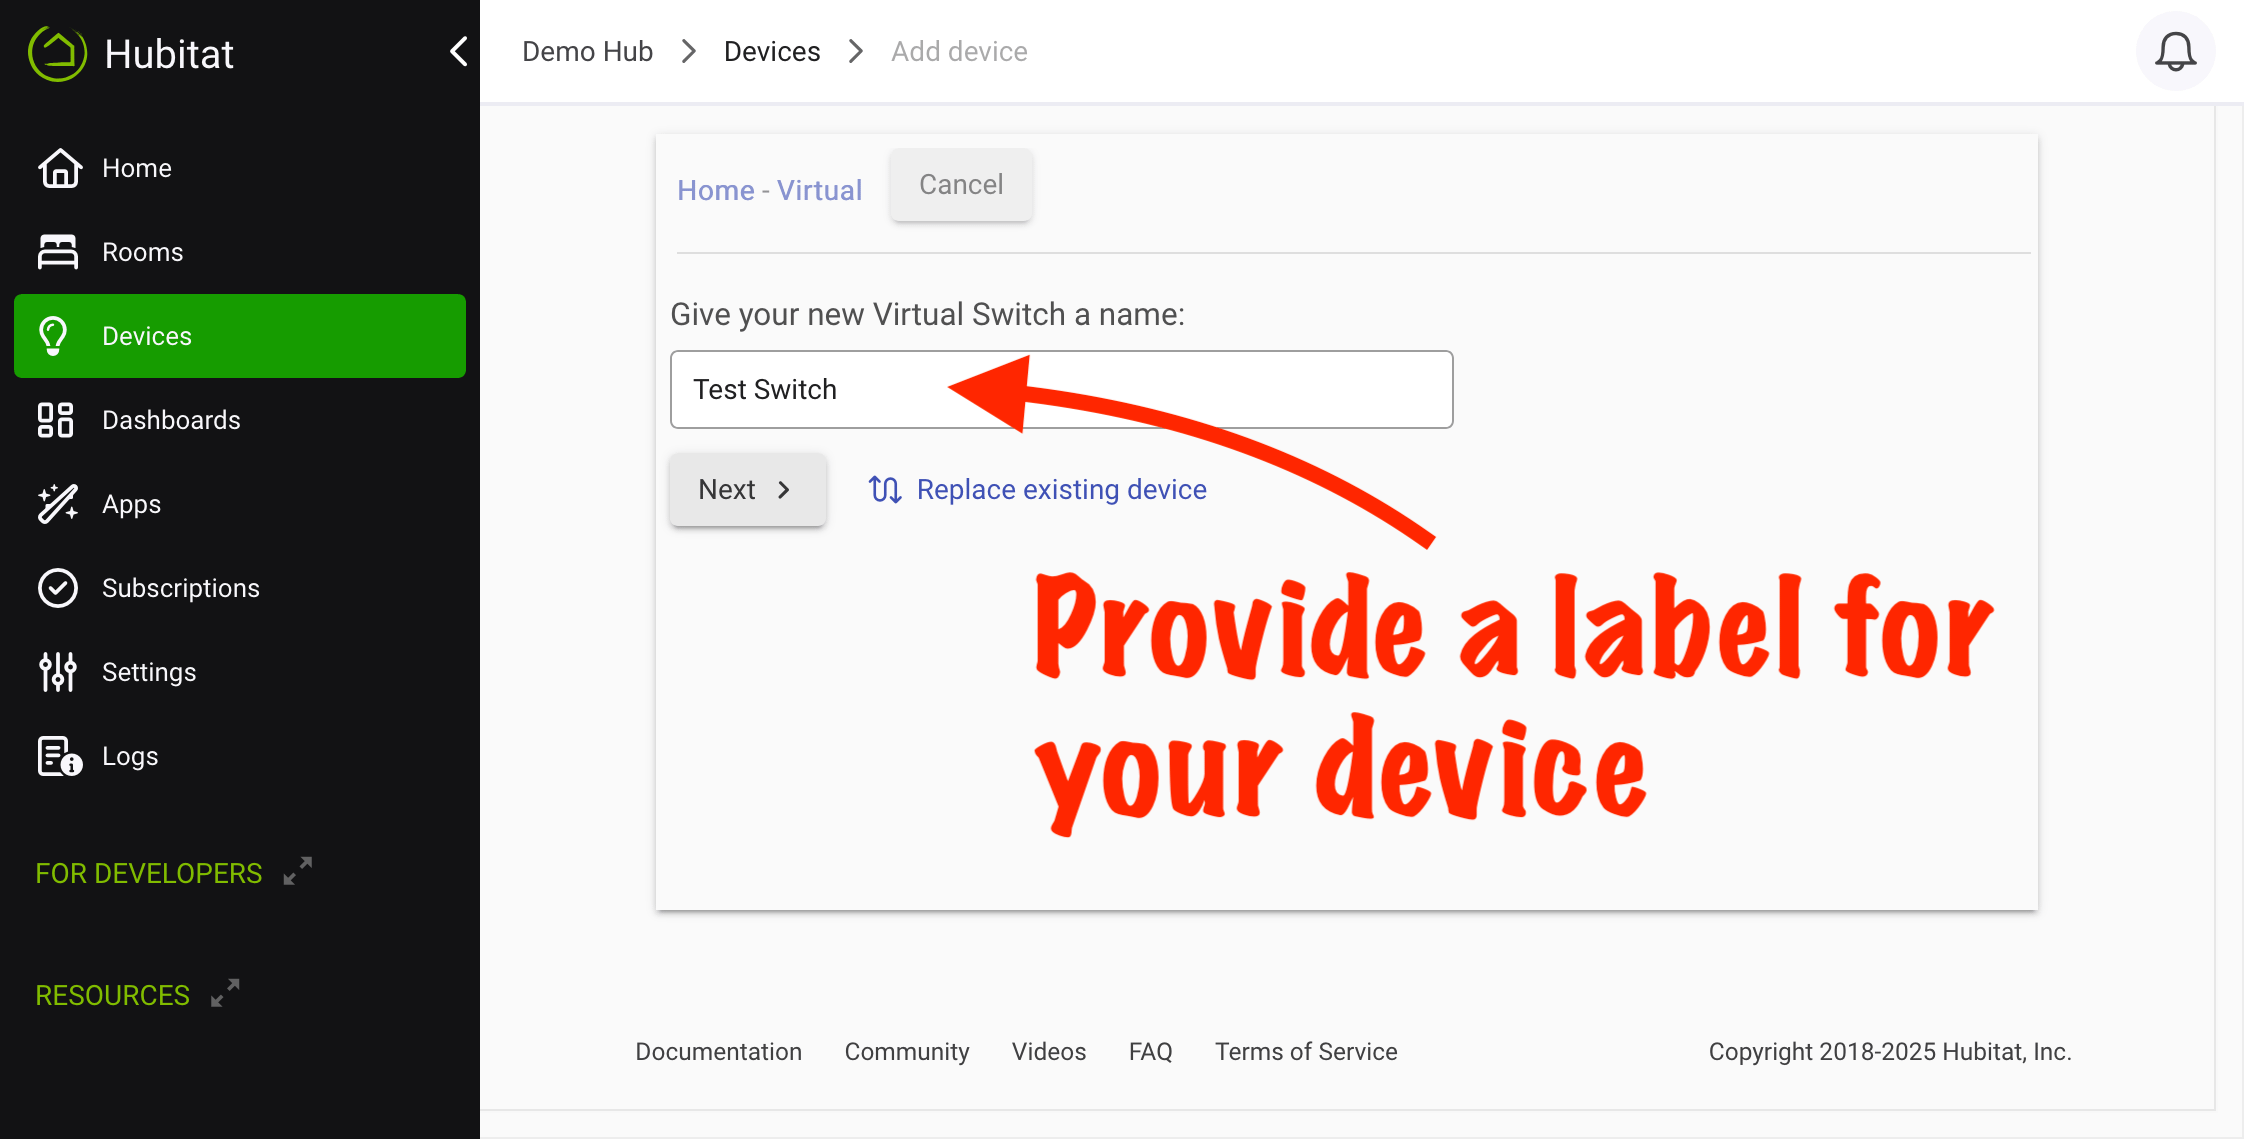
After the hub discovers your device, you can give it a name. This sets the "Device Label" for the device and can be edited at any time after on the device detail page. This how the device name will appear in apps and logs, and it will also be used as the most prominent name on the Devices page.
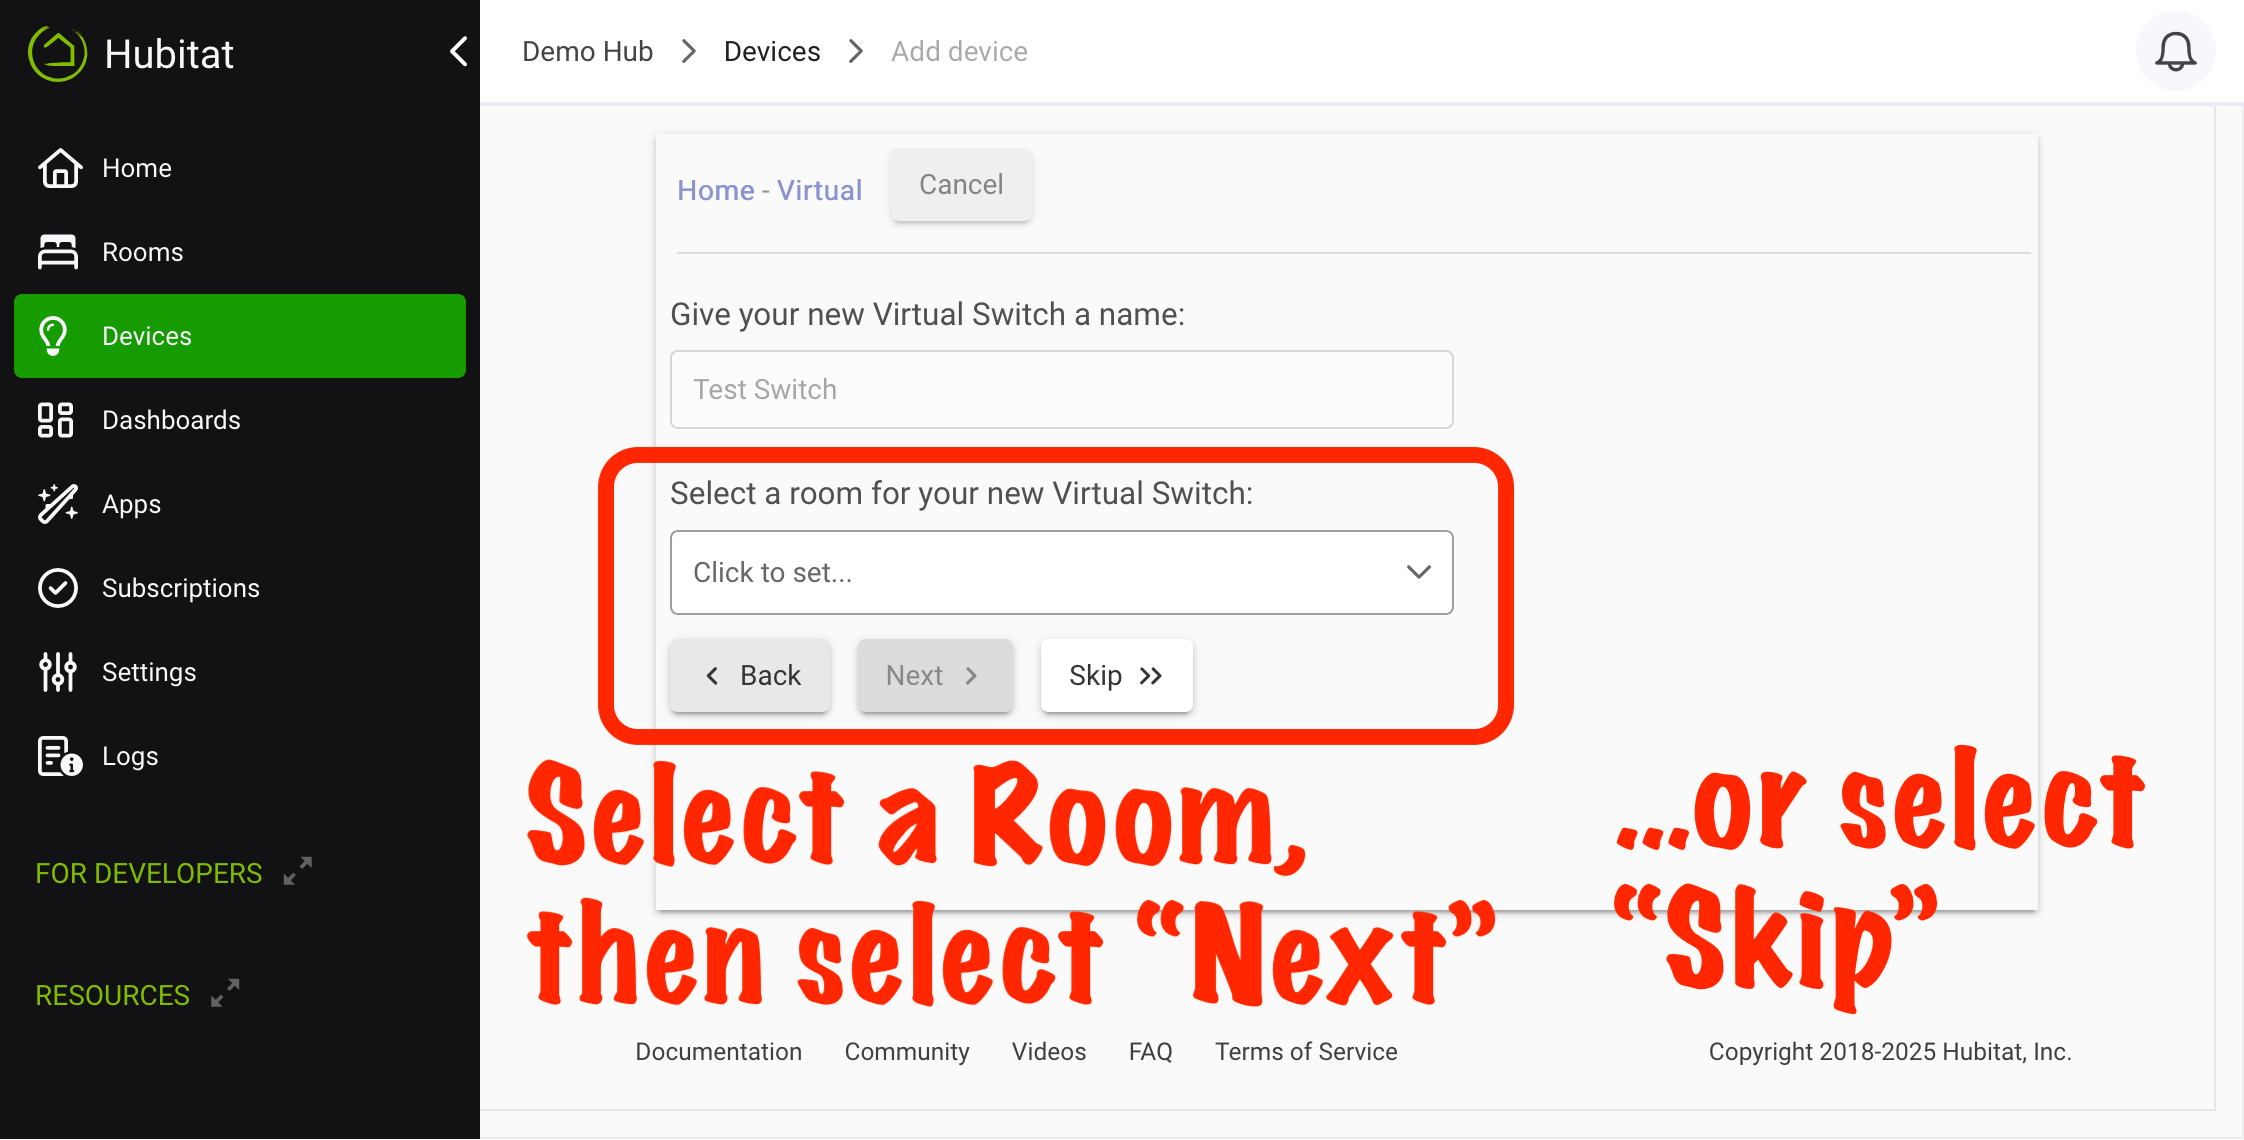
After providing a label, you can optionally assign the device to a room. This will appear in Rooms in the left-side of the hub UI, show the device listed under the room in the Lights/Switches tab of the mobile app (supported device types only), and allow easier configuration with certain apps that offer room-based selections (e.g., Room Lighting).
Z-Wave Exclusion
If you have a Z-Wave device that will not pair, try a general exclusion with the device, then try again. An exclusion of some kind (or a reset of the device) is always necessary if the device was in use on a Z-Wave network previously. It may also be necessary after a failed inclusion attempt to your hub.
How To Exclude a Z-Wave Device
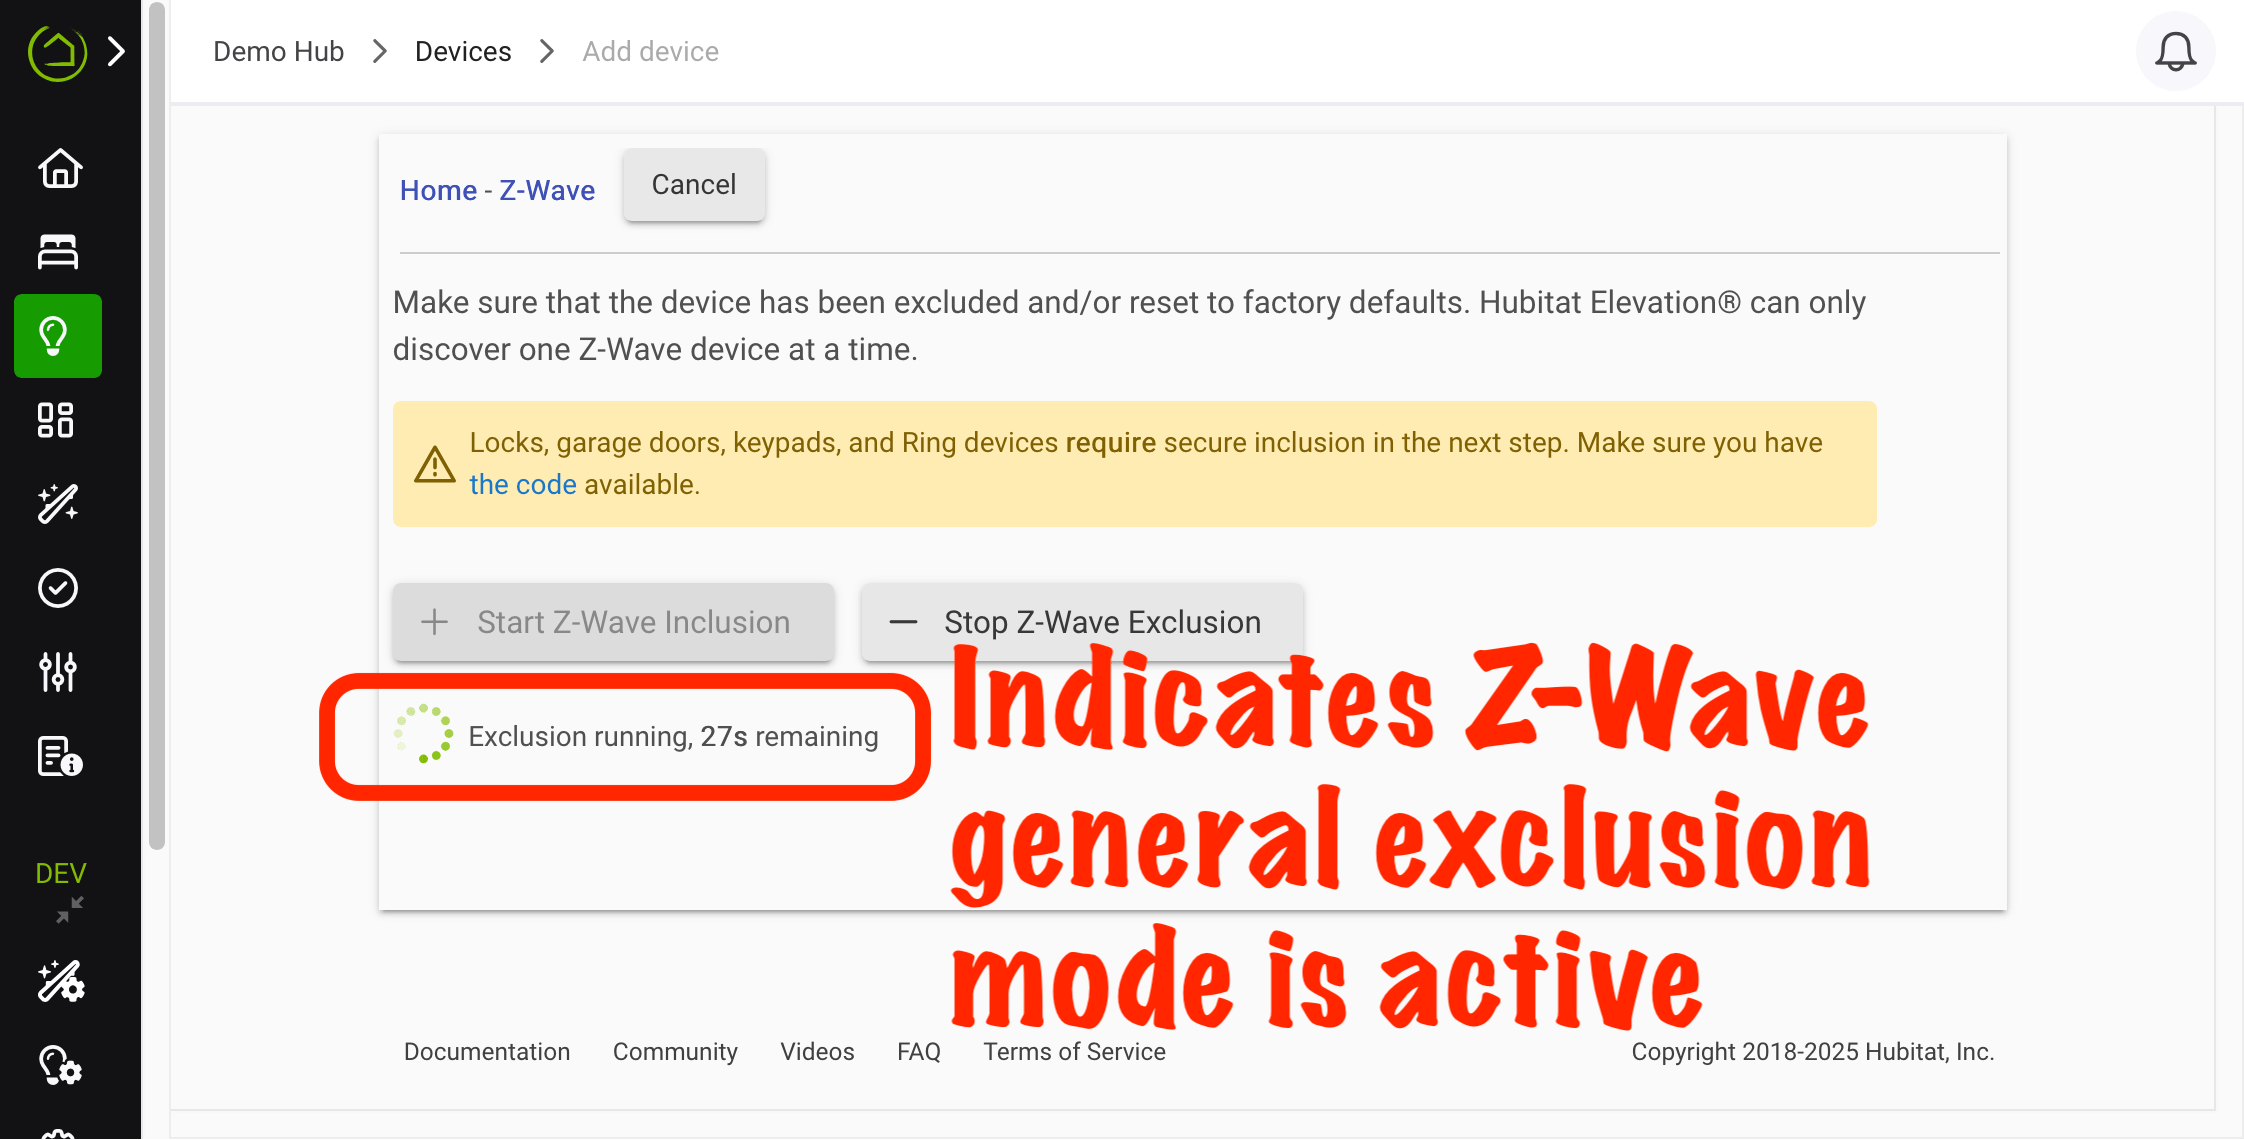
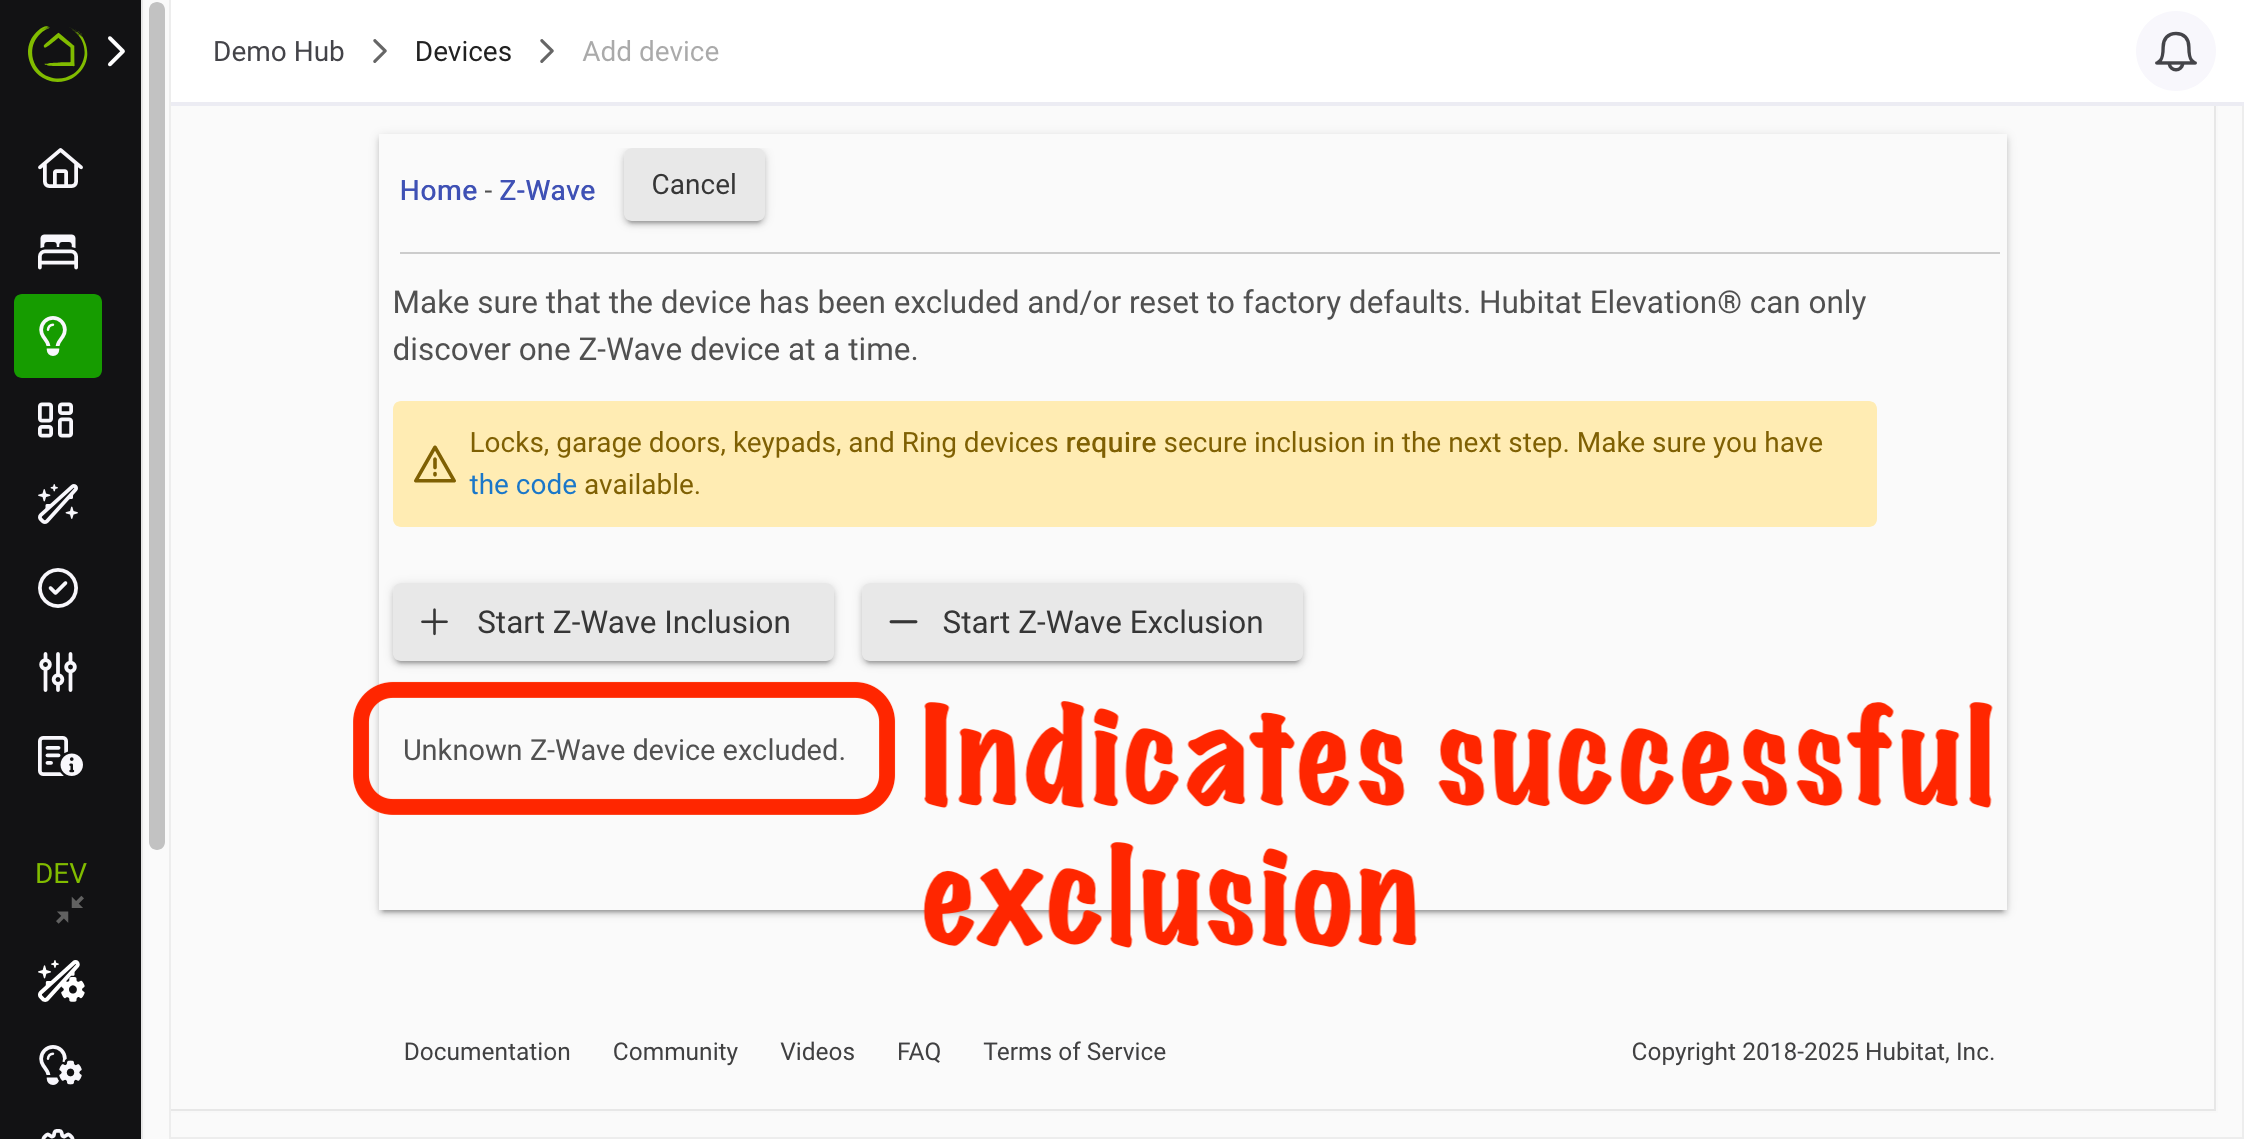
To do perform a general Z-Wave exclusion, select the Z-Wave button or use the Find by... buttons to locate your specific device. Then, select the Start Z-Wave Exclusion button, and put your device in exclusion mode (usually by pressing or holding a specific button or combination of buttons on the device; see the manufacturer's instructions). If successful, you should see a message "Unknown Z-Wave Device was excluded." This means this device no longer is associated with a previous Z-Wave network and can now be paired with Hubitat Elevation.
Virtual Devices
Virtual devices are useful as "simulated" devices that do not correspond to a real/physical device. For example, a virtual switch device using the "Virtual Switch" driver allows you to send on() and off() commands to the device and have the switch state update to on or off in response, simulating the behavior of a "real" device without actually doing anything. Among other possible uses, this can be helpful to test how an app works without needing to use a real device.
Virtual devices can be created using the Virtual button under Add Device Manually.
(Some LAN or cloud devices can or must — depending on the device — also be manually created in the same way as virtual devices using a specific driver and setup instructions provided for that device or integration.)
Troubleshooting
See the Troubleshooting section in How to Add and Manage Devices.