Button Controller 5.1
Create "Button Rule" automations to run in response to button events from real or virtual devices
Button Controller 5.1
Buttons devices are a great way to control lighting, change modes, override automations, or easily perform any other actions your hub can do. With Button Controller, any number of buttons can be configured to control devices or perform other automations. Button Controller is the most powerful built-in option for writing "rules" that will execute in response to button events.
The feature set is nearly identical to that of Rule Machine, as is the action editor for each "button rule" you create. The Rule Machine documentation may therefore be helpful to consult for users who are not already familiar with it. Like Rule Machine, button rules allow you to define actions to run. The main difference between the two apps is that you do not need to specify trigger events and cannot use required expressions; each button rule is effectively a rule triggered by the button event for which you configured these actions.
Users who prefer an interface similar to that of Basic Rule rather than Rule Machine may wish to consider Basic Button Controller instead.
Installing the Button Controllers app
-
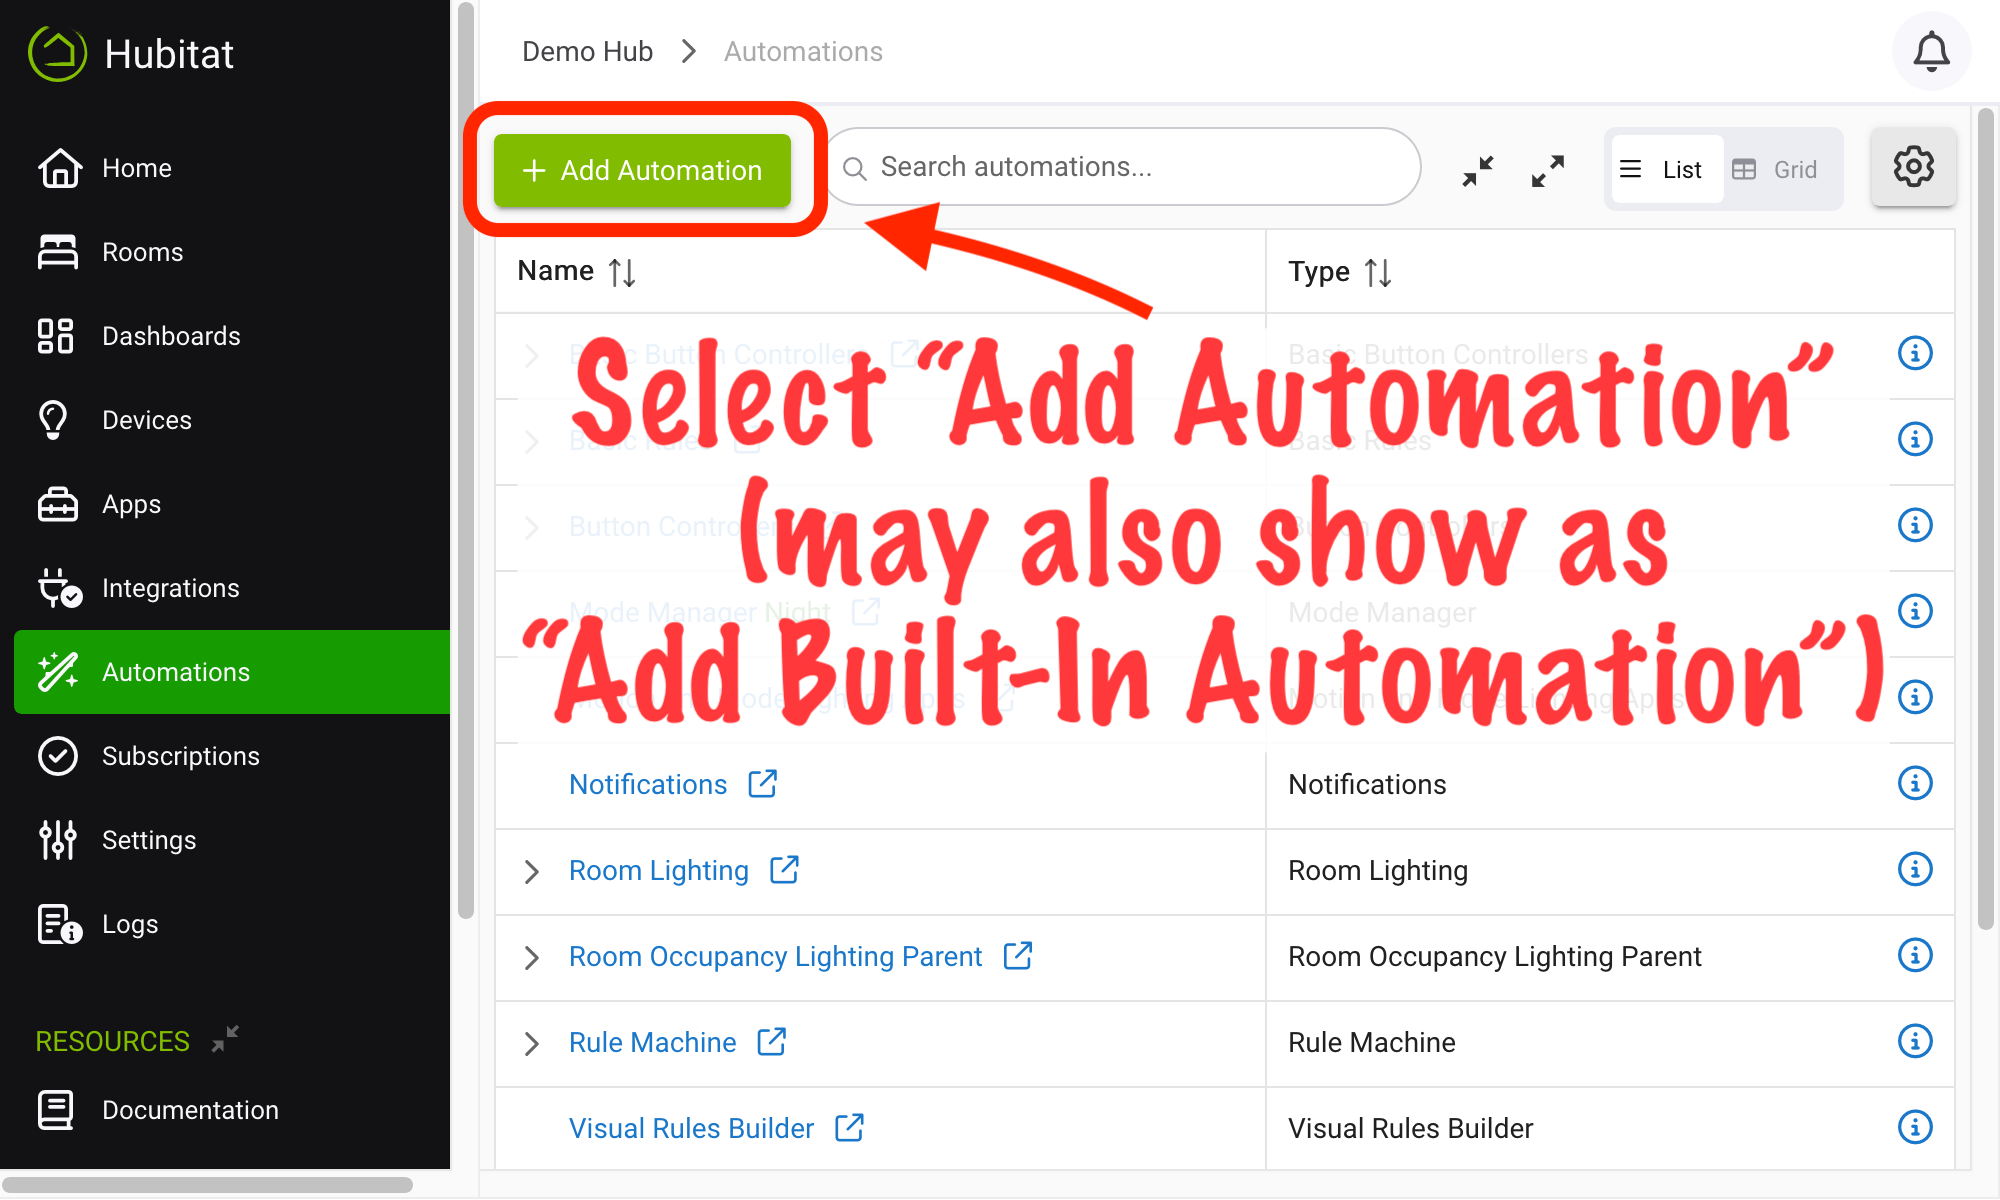
From the sidebar of your hub, navigate to Automations and select Add Automation or Add Built-In Automation:
-
Choose Button Controllers from the list of built-in apps.
If you haven't already, add your button device using the process found in Add Device. In the case of Lutron Pico buttons, you will use the Lutron mobile app to add them to the Lutron Smart Bridge Pro or Lutron RA2 Select Main Repeater, in combination with the Lutron Integrator app to add them to your Hubitat Elevation hub.
Configuring your buttons
-
Open the Button Controllers app on your hub (if not already open from the steps above).
-
Select Create New Button Controller.

-
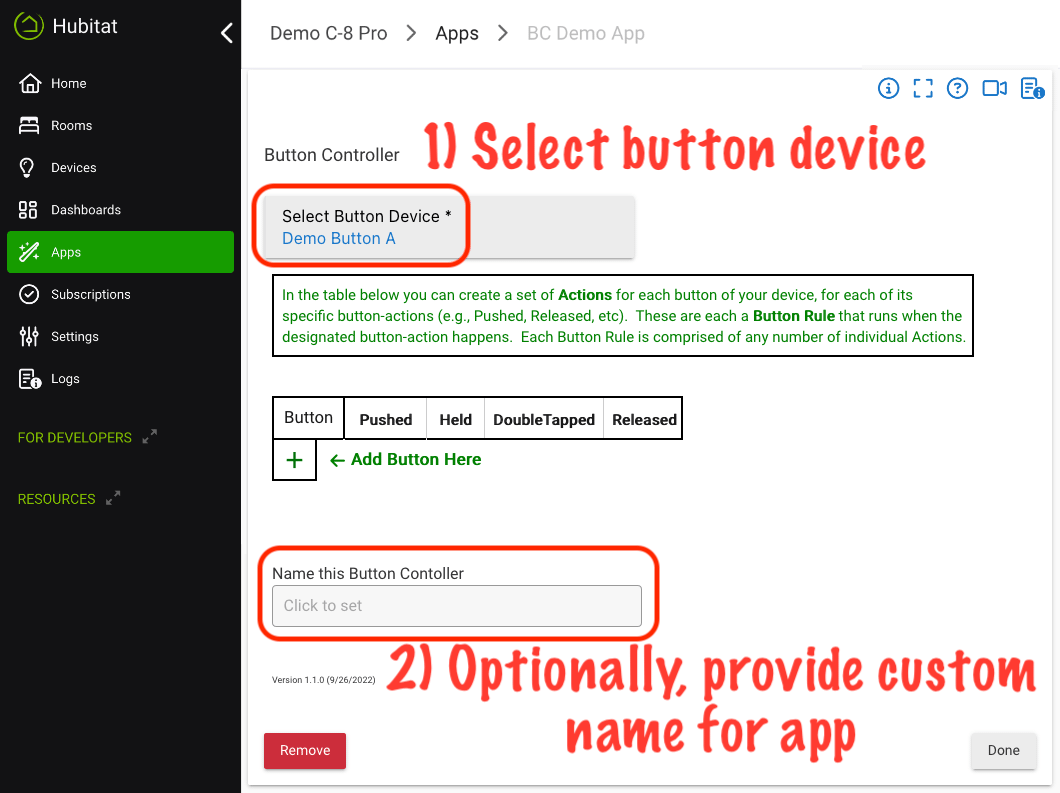
Select the button device (this is the device whose button events this app will respond to), then optionally provide a custom name for the Button Controller app (this is how it will display in your Apps list and, if enabled, logs).
-
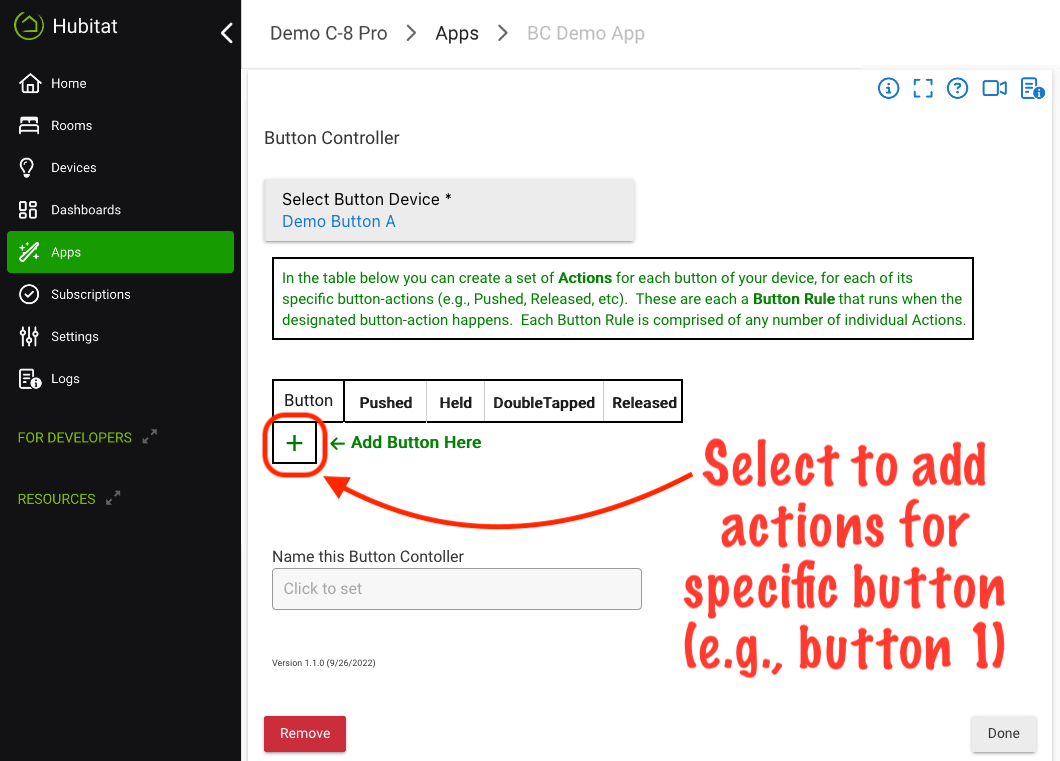
Now, select the "+" icon to add a specific button (button number) to the list of buttons in the table. You can add one button at a time or add all buttons you want at once if the device offers multiple buttons (e.g., the most common type of Pico remote offers buttons 1-5; every button device offers at least one button, and the actual numbers offered will vary depending on the device and driver).
-
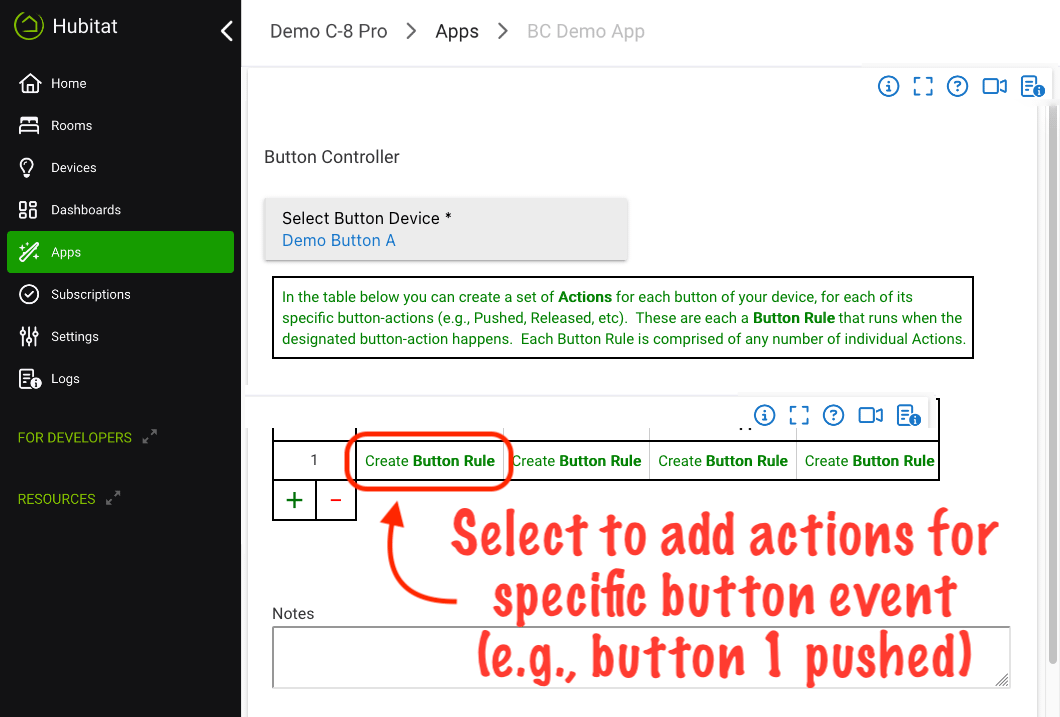
To create actions to run in response to a specific button event (e.g., "button 1 pushed"), select the Create Button Rule link in the table cell corresponding to the desired button number (row) and event name (column). You must first add a row for the desired button number as described above.
-
You may now add or edit actions to perform in response to this button event. Start by adding a new action with the "+" icon at the bottom of the actions table:
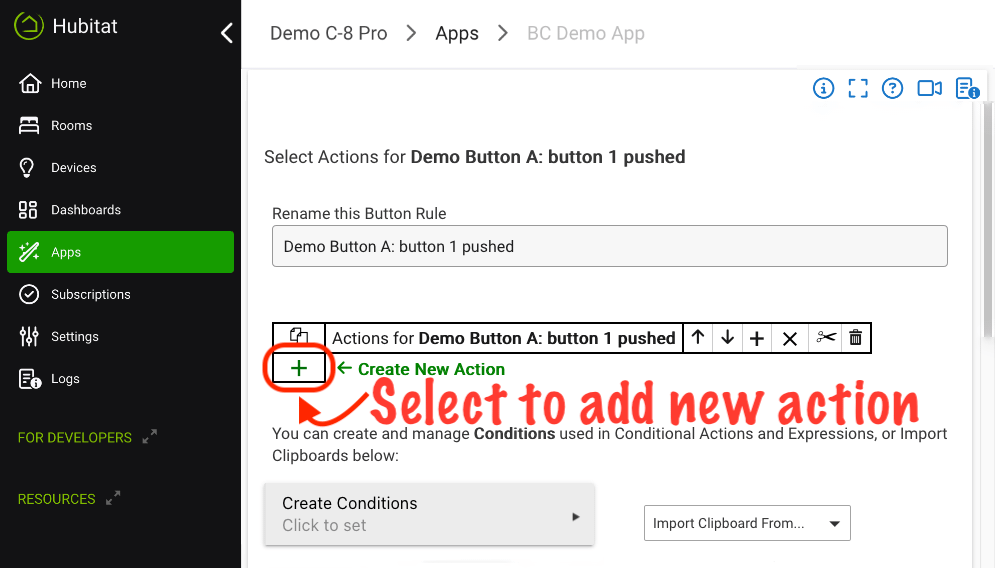
Then, select the desired action using the menus and other options presented. For example, you can choose Control Switches, Push Buttons > Turn switches on/off to turn a switch (or dimmer, bulb, etc.) on or off:
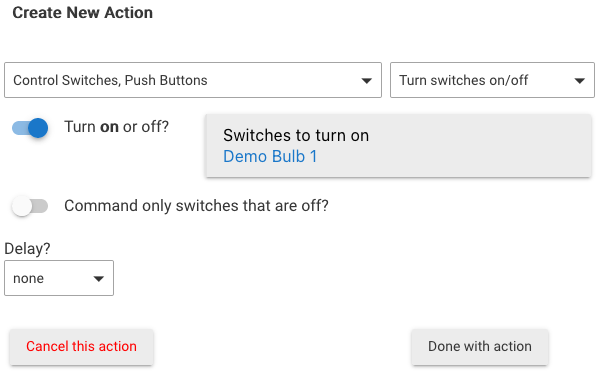
Some actions may have one or more options you can configure (in the above example, you must select whether to turn the switch on or off). When you are done adding a specific action, select Done with action. If you have selected an action add but changed your mind, select Cancel this action (or add it and then delete it later). You may add additional actions for the same button event. This can be helpful to create more complex automations or to control multiple devices in response to the same button event.
NOTE: As mentioned above, actions are nearly identical to those found in Rule Machine, and the Rule Machine documentation may therefore be helpful to consult. Operations to insert, edit, delete, cut/copy/paste, and disable actions in the editor also work similarly.
- When you are done selecting actions for a particular button event, select Done with Button Rule. Repeat the process for each additional button event you want to automate (e.g., you can add different actions for "button 2 pushed").
Configuring held and released actions
While not supported by all button devices, some do support both held and released actions. These can be used with dimmers and bulbs that support smooth dimming. It is a particularly neat automation to increase or decrease light levels while a button is held and stop the change when the button is released. The Hubitat/Hue Integration is one such application where this can be used if your button device also supports held and released actions (Hue bulbs brought in through this integration do support the necessary commands, though groups do not).
- When connected to Hubitat Elevation via the Lutron Integration, the Lutron Pico remotes are one type of button device that supports both held and released button actions. Using a Lutron Pico as the example device, define the action that should occur when the increase button is held. For a 5-button Lutron Pico remote, this will be button 2 held, and the action type option will be Set Dimmers and Bulbs > Start raising/lowering dimmers with Raise selected (it will appear in bold text or without a checkmark/toggle enabled next to this option) for Raise or Lower dimmer?.
- If you define that a dimmer should start raising when a button is held, then you must also define what happens when the button is released. If you do not do this, the light will continue to increase until it reaches maximum brightness, even though you have released the button. In our example, for button 2 released, choose the Set Dimmers and Bulbs > Stop changing dimmer action.
- Define the button action for decreasing the dimmer using the same method above, but instead use the Set Dimmers and Bulbs > Start raising/lowering dimmers action with Lower selected Raise or Lower dimmer?. For the Lutron Pico remote used in our example, this will be button 4 held.
- Similar to raising, if you define that a dimmer should start lowering when a button is held, then you must also define what happens when that same button is released. If you do not do this, the light will continue to decrease until is reaches minimum brightness, even though you have released the button. In our example, for button 4 released, choose the Set Dimmers and Bulbs > Stop changing dimmer action.
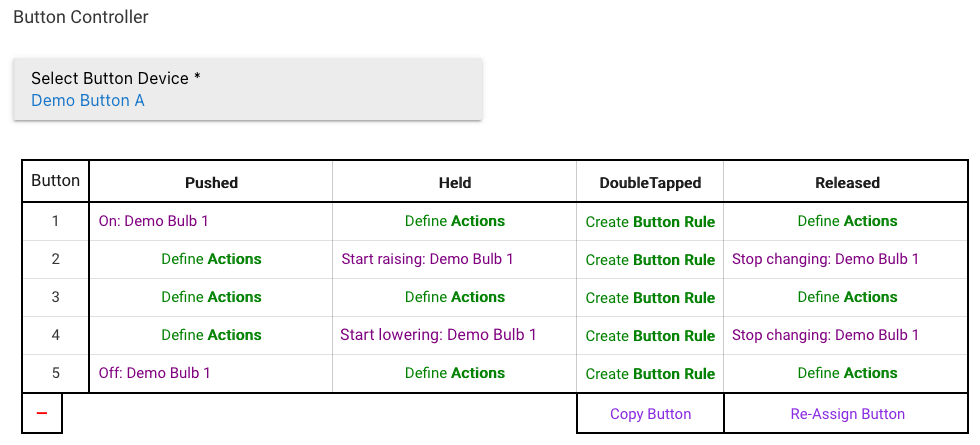
Here is an example of what a 5-button Pico setup may look like with these options (and on/off with buttons 1 and 5 pushed, as one might intuitively also want):
Logging
In each Button Rule page (e.g., the page for button 1 pushed and similar sets of actions), there are options for Logging:
- Triggers: writes an entry to "Logs" any time the specified button event occurs (e.g., "button 1 pushed" if you are in the Button Rule for "button 1 pushed"). A trigger means that the specified actions should run when that event happens.
- Actions: writes an entry to "Logs" immediately before each action in the button rule is run (or also if it was skipped — for example, because it is inside a conditional action that evaluated to false).
These options can be useful for troubleshooting.