Lutron Integrator
Learn how to use the built-in Lutron Integrator app to integrate Lutron Caséta or RA2 devices into Hubitat
Lutron Integrator
In order to connect your Lutron devices to your Hubitat Elevation network you will need a Lutron Smart Bridge Pro, RA2 Select Main Repeater or RA2 Main Repeater. Follow Lutron’s instructions to connect your devices to the Smart Bridge Pro, RA2 Select or RA2 Main Repeater, then follow these steps to connect your Smart Bridge Pro, RA2 Select or RA2 Main Repeater to your Hubitat Elevation Hub:
Installing the Lutron Integrator
-
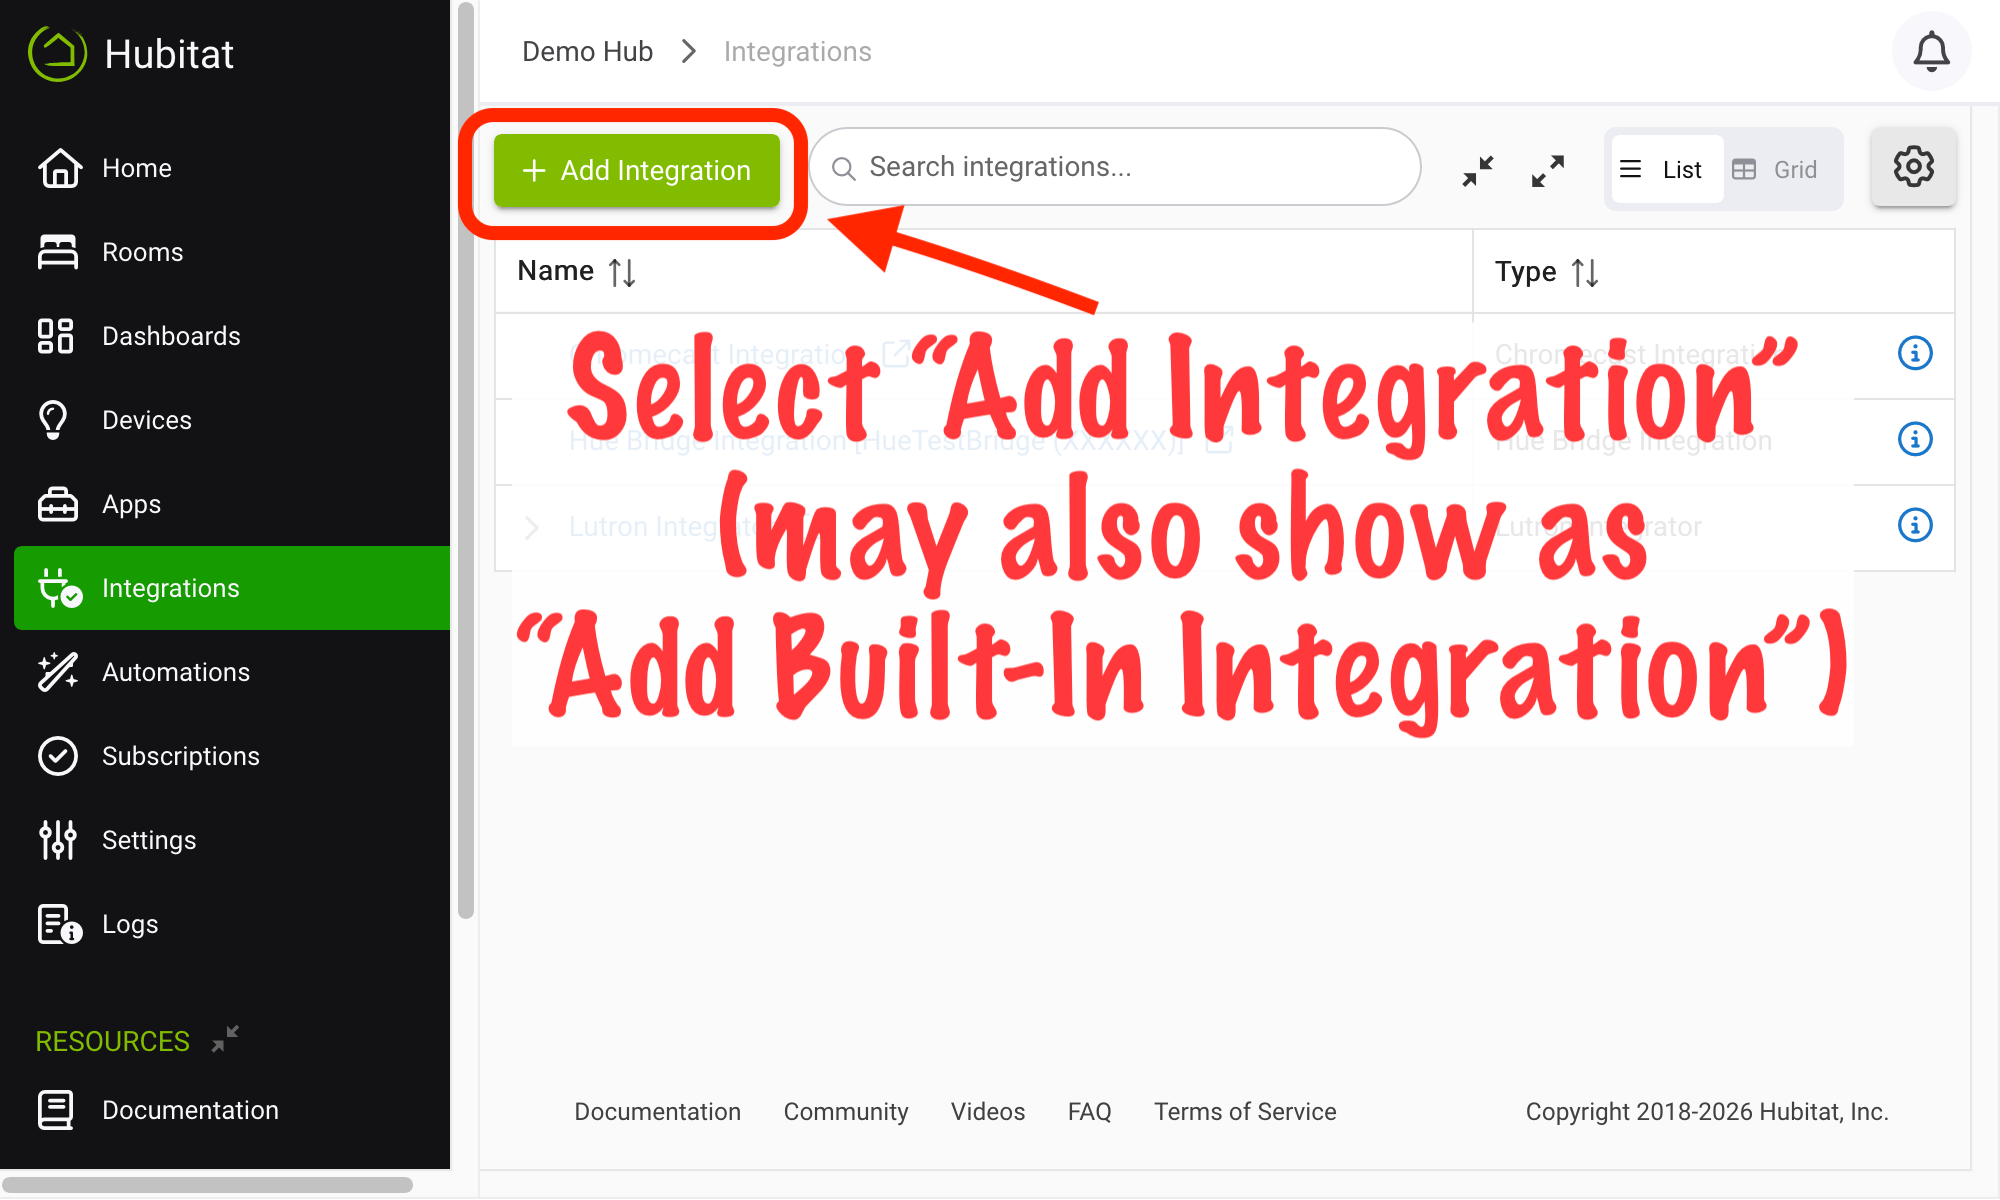
From the sidebar of your hub, navigate to Integrations and select Add Integration or Add Built-In Integration:
-
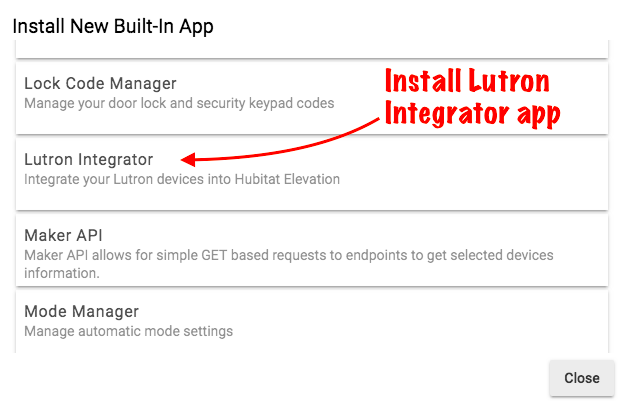
Choose Lutron Integrator from the list of Hubitat Elevation Built-In Apps
Gathering required information
You will be required to enter information from your Lutron Smart Bridge Pro or Main Repeater during the creation of a new Lutron integration on your hub. All the necessary information can be found in an integration report generated by Lutron software. For Caséta or RA2 Select, this can be done in the Lutron mobile app:
-
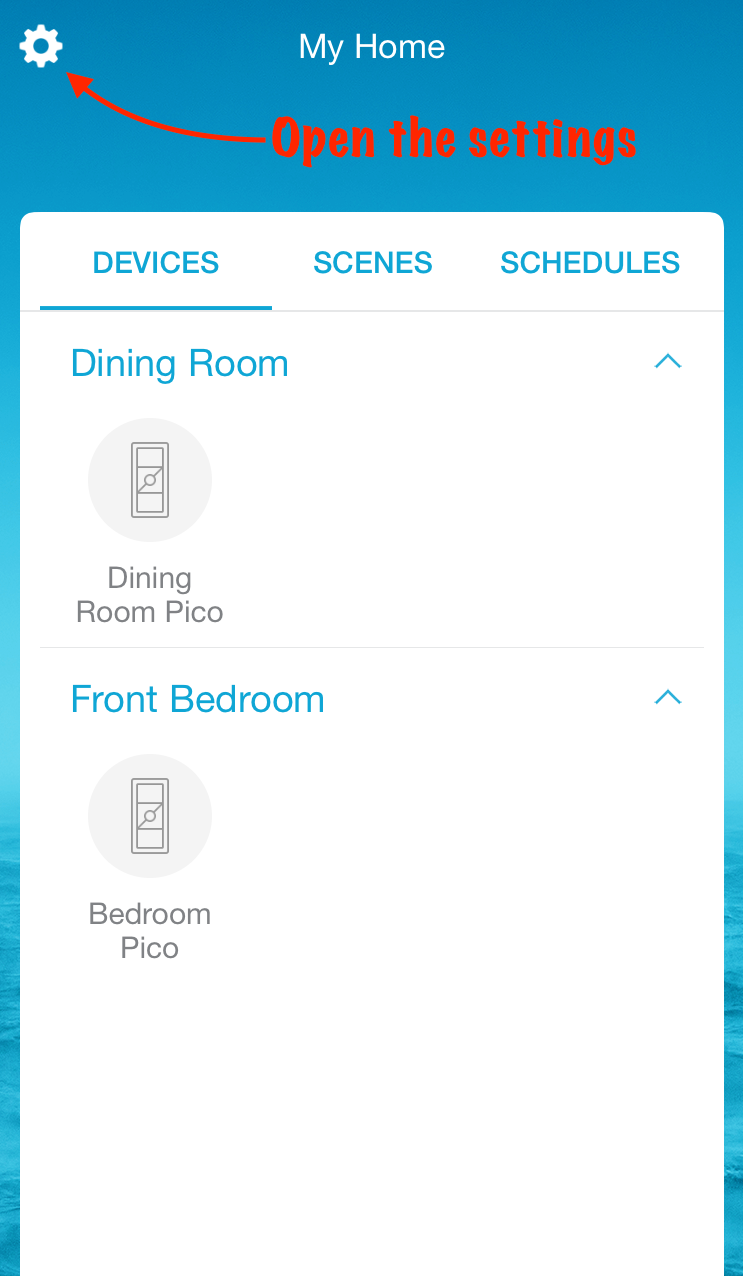
Open the Lutron app on your mobile device and tap the gear icon at the top left to open Settings.
-
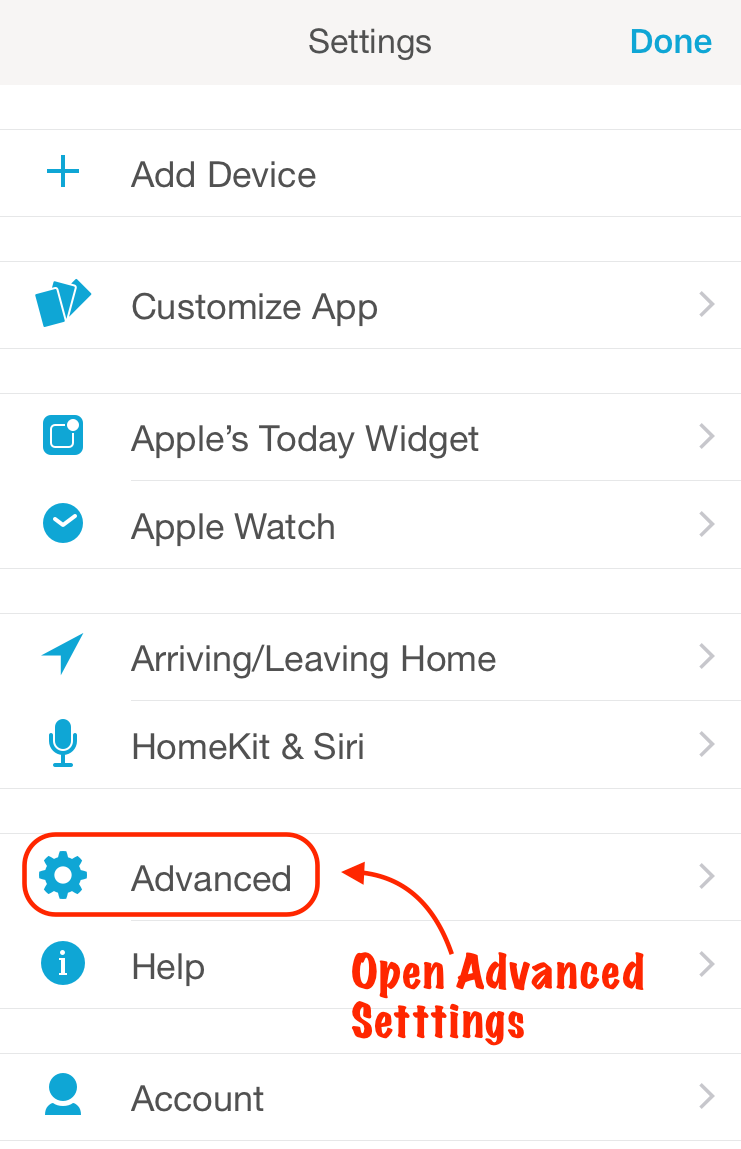
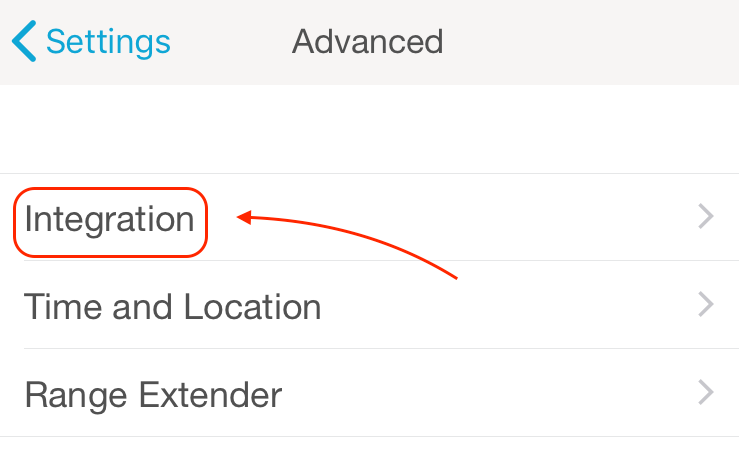
Tap Advanced to access the Advanced Settings.
-
Tap Integration.
-
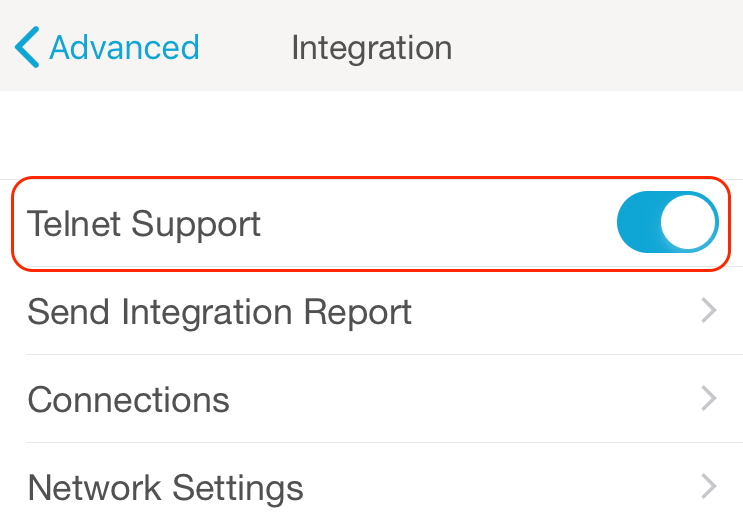
Ensure that Telnet Support is enabled.
- NOTE: Hubitat Elevation uses the speed and reliability of the telnet feature found only on the Lutron Caséta Smart Bridge Pro, Lutron RA2 Select Main Repeater, and RA2 Main Repeater. The Telnet Support option must be enabled to use Lutron devices with your Hubitat Elevation hub. The standard Lutron Caséta Smart Bridge (non-Pro) is not supported since integrations with that bridge are cloud-only.
- NOTE: Hubitat Elevation uses the speed and reliability of the telnet feature found only on the Lutron Caséta Smart Bridge Pro, Lutron RA2 Select Main Repeater, and RA2 Main Repeater. The Telnet Support option must be enabled to use Lutron devices with your Hubitat Elevation hub. The standard Lutron Caséta Smart Bridge (non-Pro) is not supported since integrations with that bridge are cloud-only.
-
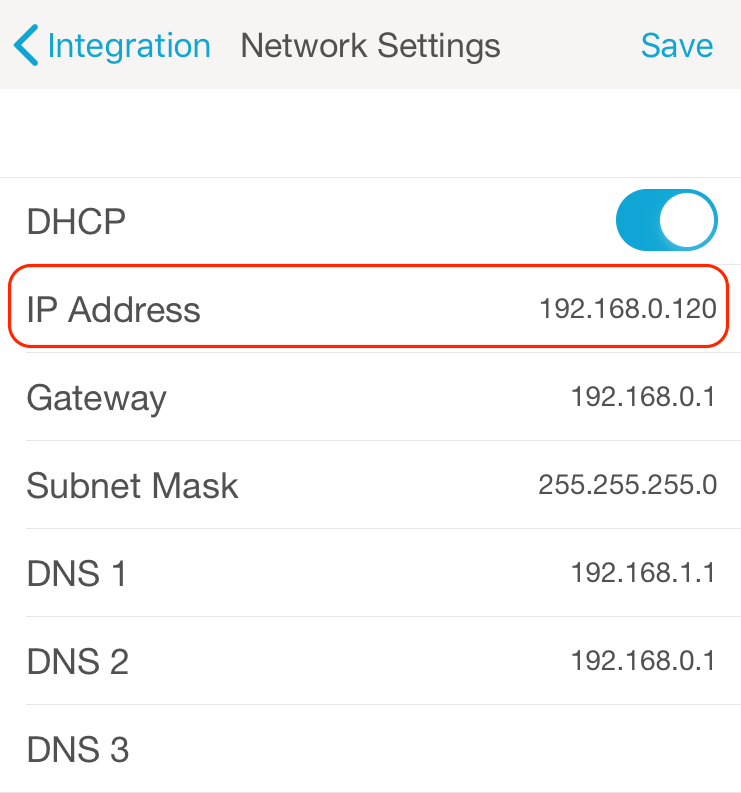
Tap Network Settings and write down the IP address of your Lutron Smart Bridge Pro, then tap < Integration at the top left to navigate back.
-
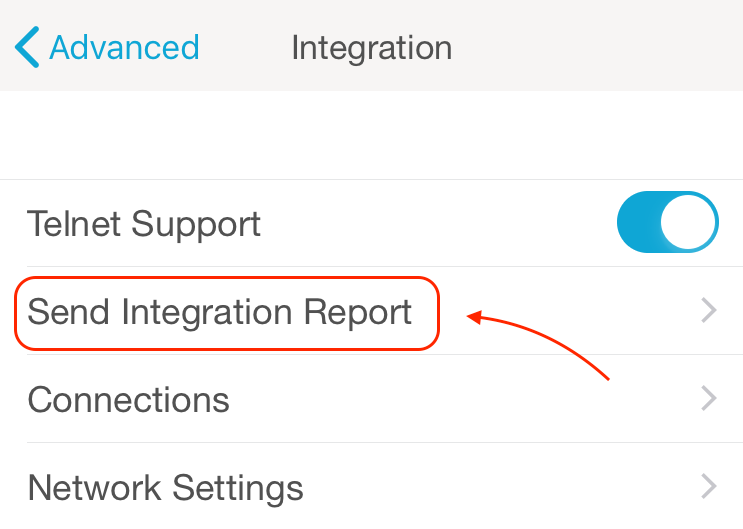
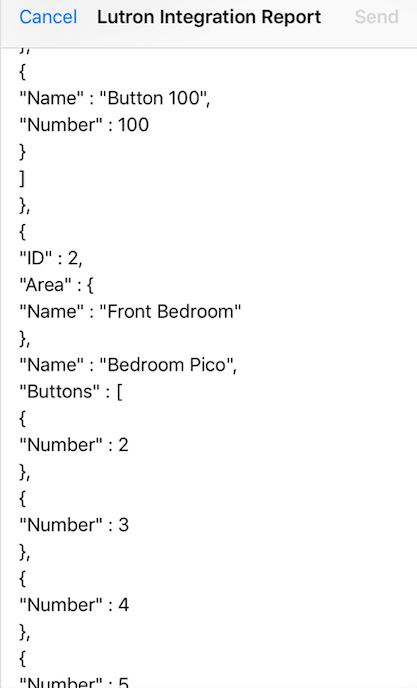
Tap Send Integration Report.
-
This is where you will find the names and Lutron Integration ID numbers for each of your attached Lutron devices. Selecting this option will create a draft email on your mobile device which you can email to yourself. If you only have a few devices, you can simply make note of their device names and Lutron Integration ID numbers, and then close the draft email without sending.
Create a New Caséta/RA2 Integration
-
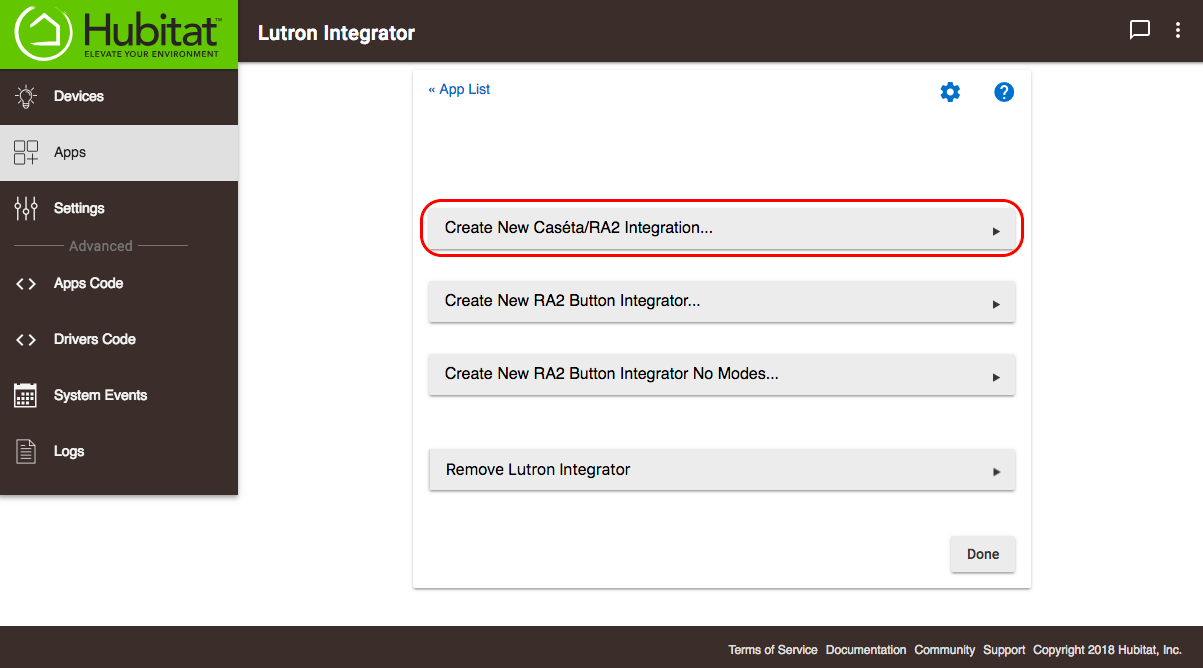
Open the Lutron Integrator app.
-
Select Create New Caseta/RA2 Integration
-
Name your Lutron integration and enter the IP address of your Lutron Smart Bridge Pro.
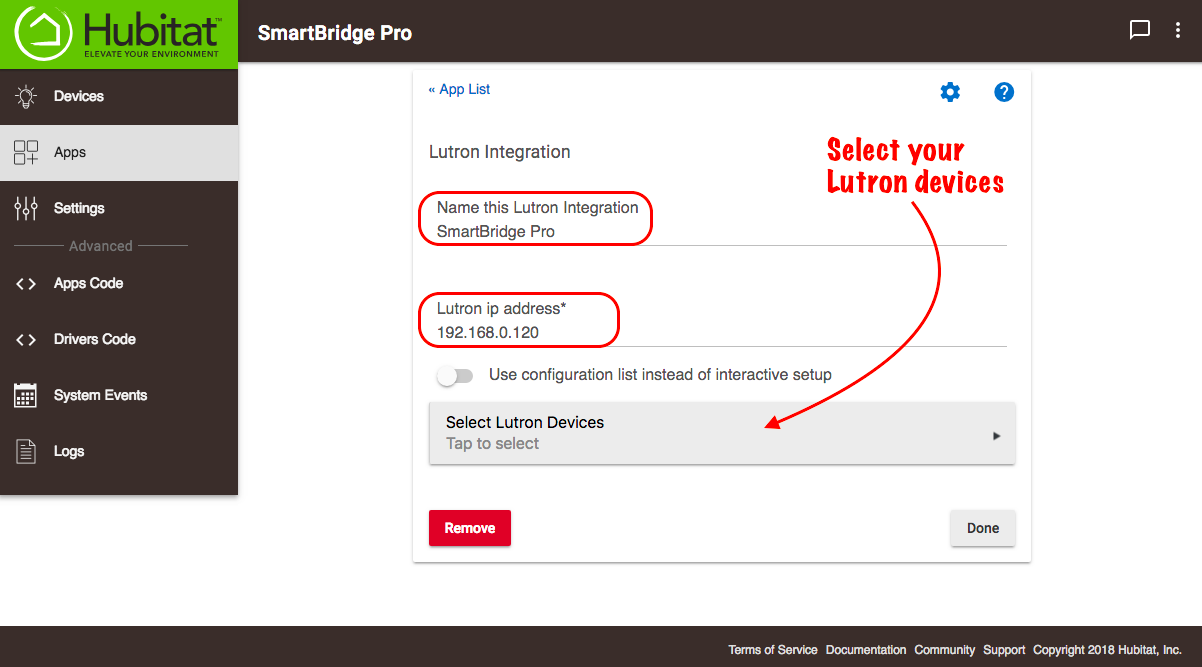
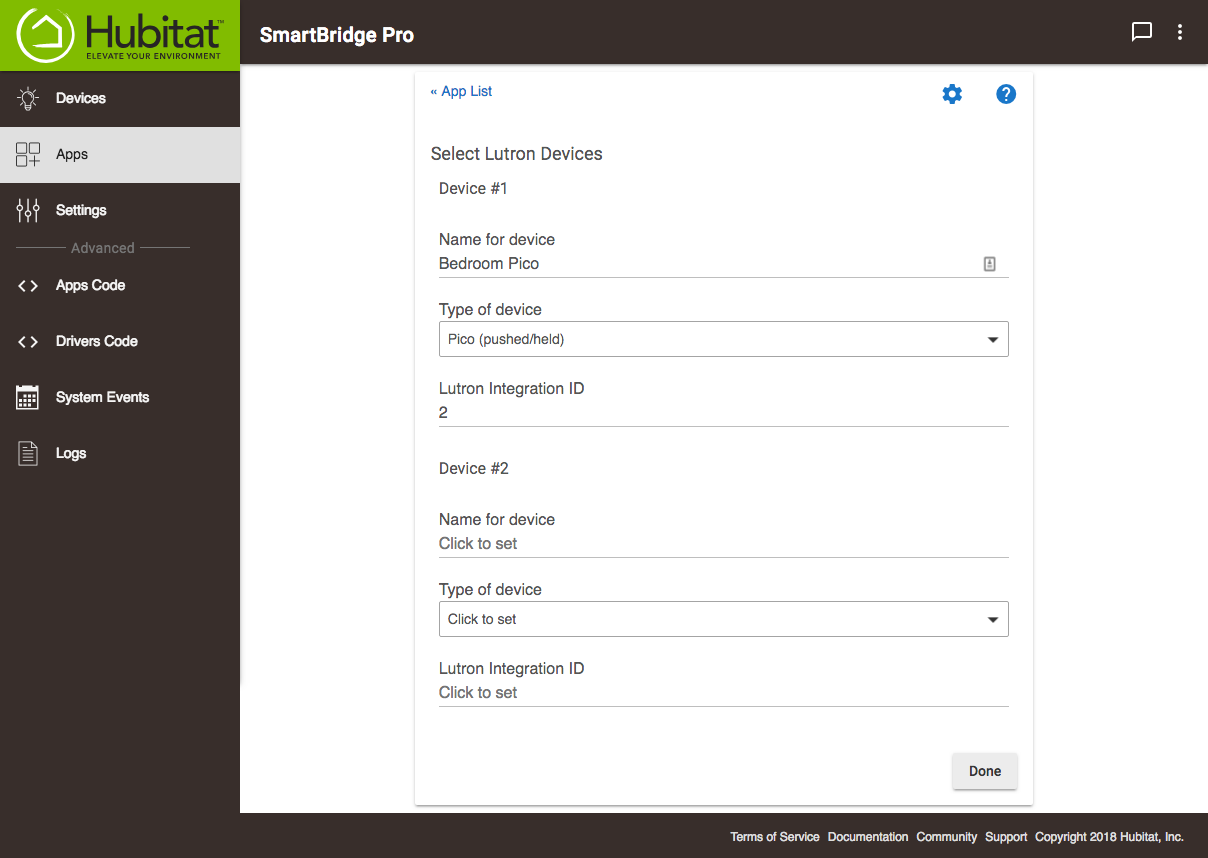
Next you will need to select all of the Lutron devices you want to connect with your Hubitat Elevation. If you only have a handful of devices, it is easiest to just select the Select Lutron Devices button.
Interactive method to add devices
- Name your device
- Select the type of device
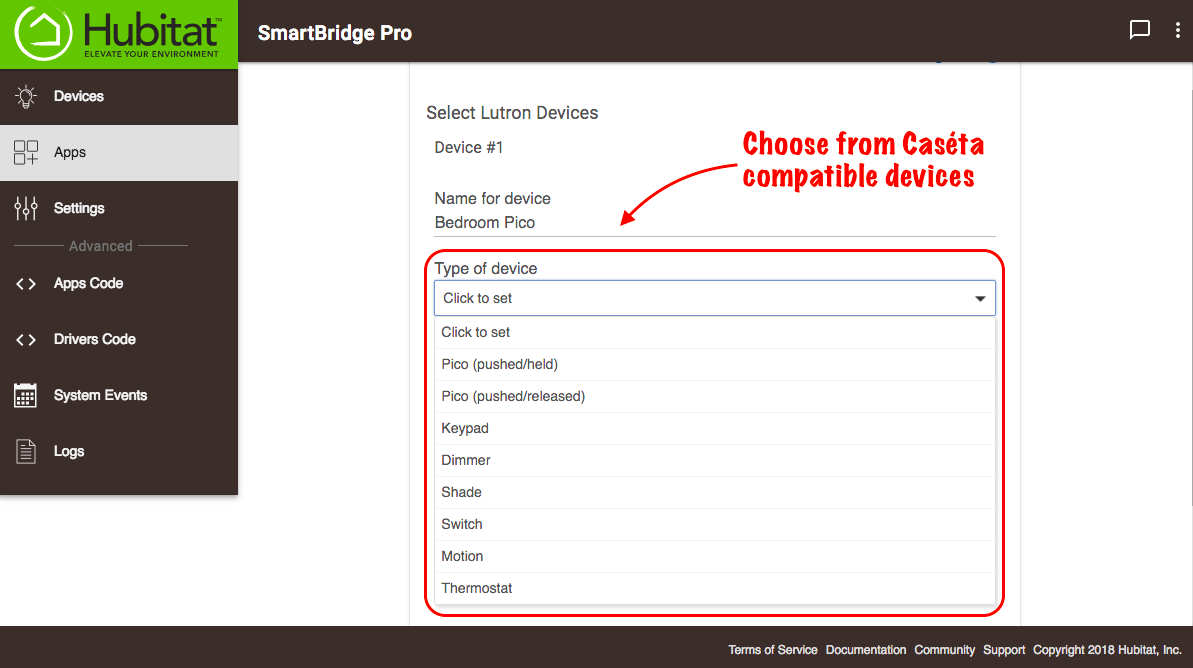
- Enter the Lutron integration ID
- Repeat for every device you want to add
Configuration list method to add devices
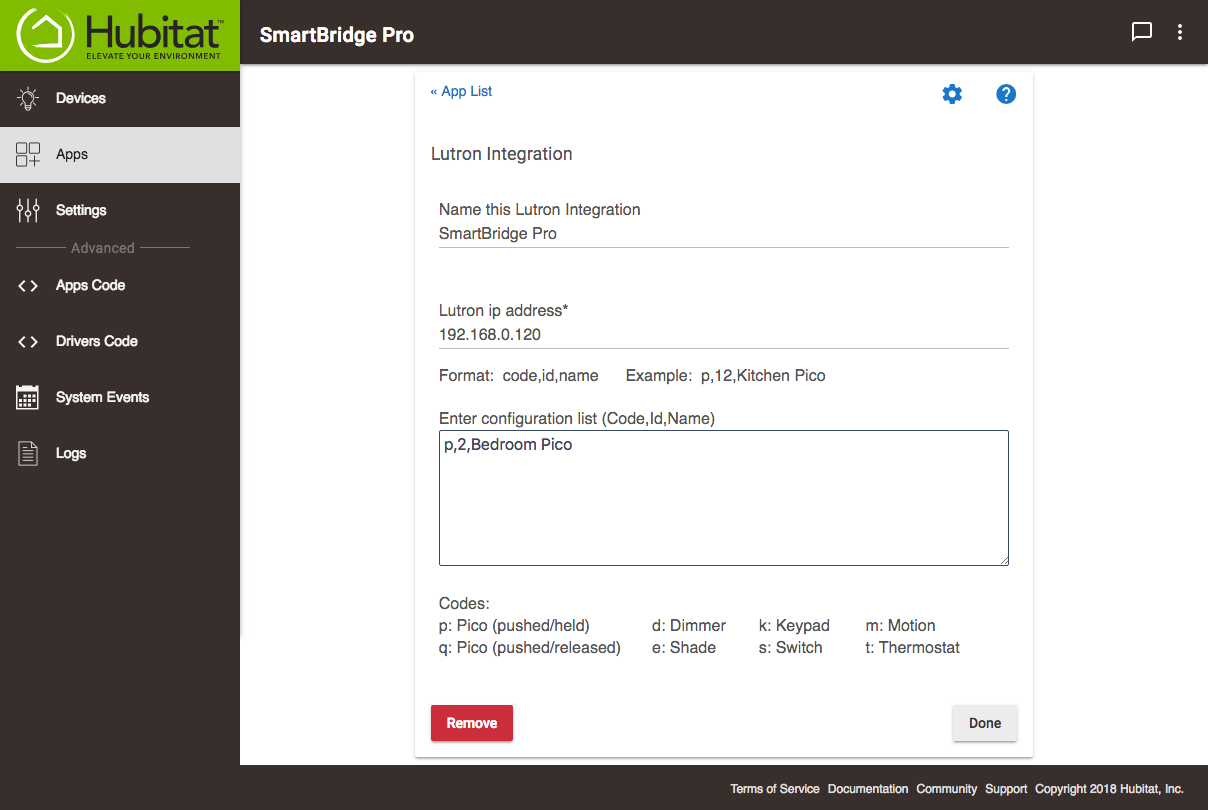
If you have dozens of devices (or simply prefer this method), it may be quicker to toggle on the Use configuration list instead of interactive setup option.
NOTE: If you have already setup your Lutron Integrator app using either the interactive device entry method, when you select Use configuration list instead of interactive setup, the Lutron Integrator app will automatically convert from the previous setup to the new configuration list. Once this has been done, you may not go back to the interactive method.
To add devices using the configuration list method:
-
Enter your devices in a list with each device on its own line in this format:
devicecode,id,name(see below for an explanation of device codes).
-
When you are finished adding devices, select Done.
Lutron device types
Whether you use the interactive or configuration list method to add devices to Hubitat, you will need to specify the Lutron device type when adding the device to Hubitat. For the most part, choosing the correct device type should be straightforward (e.g., a Lutron shade is a shade, and a thermostat is a thermostat). Certain device types deserve special notes:
- keypad: on Hubitat, this refers only to devices like the seeTouch keypad or hybrid keypad but notably not Pico remotes (which are their own device type)
- Pico (pushed/held) and Pico (pushed/released): Hubitat offers two ways to integrate Pico remotes into Hubitat, depending on what events you want to use from the Pico:
- Adding as Pico (pushed/held) allows you to use
pushed,held, anddoubleTappedevents from the Pico remote - Adding as Pico (pushed/released) allows you to use
pushedandreleasedevents from the Pico remote (thepushedevent will occur immediately on physical button press rather than release, as there is no need to wait to figure out if the event is a push or hold; you may notice the driver used for this device is called "Lutron Fast Pico" for this reason). - NOTE: Pico remotes on Hubitat assume 5 buttons by default (e.g., Lutron model numbers including "3BRL"). For other types of Pico remotes, use the "Set Pico button count" preference on the device detail page to change this number.
- Adding as Pico (pushed/held) allows you to use
- motion: this includes the category of devices Lutron refers to as "occupancy" or "vacancy" sensors. (Note that as of this writing, Lutron does not expose events from these sensors over telnet for Caséta or RA2 Select systems, so a RadioRA 2 or higher system is needed to use these devices with Hubitat Elevation.)
Using devices
You will now be able to use your connected Lutron devices in Button Controller, Rule Machine,and other apps.
When you add new Lutron devices, you will need to first add them to the Lutron Smart Bridge Pro via the Lutron app, then return to the Lutron Integrator app to add the devices to your Hubitat Elevation hub using one of the methods above.
Note for RadioRA2 Users
If using Essentials or Inclusive software version 12.2.1 or later, you must set the telnet credentials for the Main Repeater to be: username: lutron, password: integration manually.