How to use Dashboard to Manage Lock Codes
Want a built-in way to add or remove lock codes from Hubitat Dashboard, locally or remotely? Here's one way.
How to use Dashboard to Manage Lock Codes
Managing lock codes isn't a difficult task with Lock Code Manager, and Hubitat Remote Admin is easiest way to do this when you're away from home. However, if you're comfortable with creating Rule Machine rules and hub variables, it's possible to create and change lock codes with Hubitat Dashboard.
The lock drivers built-in to Hubitat Elevation define each lock code with 3 values:
- Slot Number, which is the code position in the lock.
- The Lock Code itself, which is your 4 to 6 digit PIN code.
- A name for the code.
Using Hubitat Dashboard, you can create a Dashboard tile to set each of those values for a particular lock.
WARNING! While it's possible to set the Slot, Lock Code and Name from the Dashboard with this technique, you will not be able to see what slots are occupied in the lock and by which codes. You will need to know yourself which slots are occupied. This rule will change the code and name you enter in any slot you enter for the lock, but without any feedback to the Dashboard about the status of the lock codes on the lock. For complete control and status of your lock codes, Hubitat Remote Admin service is recommended.
Part 1: Create a Global Variable
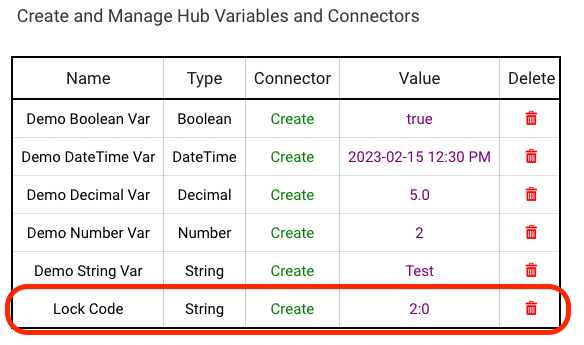
- In Settings > Hub Variables, select New Variable. Enter Lock Code for the variable name (or another name of your choosing, substituting it below as needed). Set the type to String, and enter 2:0 as the initial value (note: be sure to include the colon between 2 and 0). Click or tap outside the Set initial value for Lock Code text box when done to save your changes, and verify that your variable was added to the table:
Part 2: Create a Rule Machine rule
-
Create a new Rule Machine rule (navigate to Apps > Rule Machine, or install it first if needed, and select Create New Rule).
-
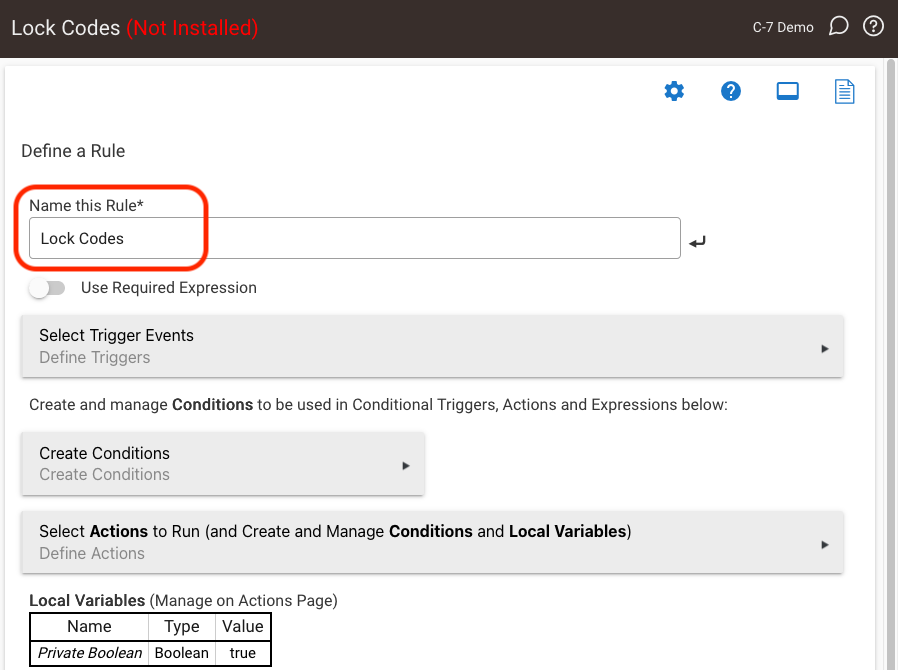
Name the rule Lock Codes.
-
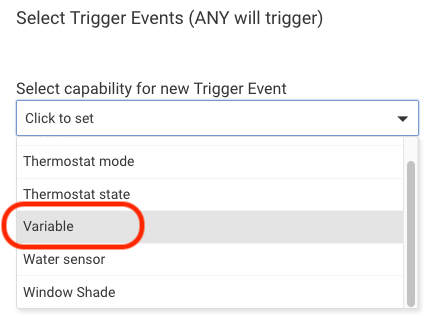
Navigate into Select Trigger Events. Under Select capability for new Trigger Event, choose Variable.
-
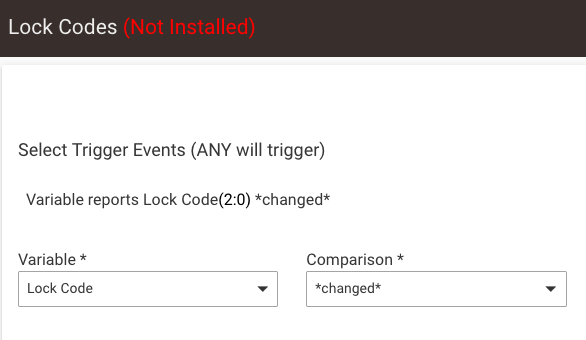
Set the Variable to the Lock Code variable you created in step 2, and set the Comparison to *changed*.
-
Select Done with this Trigger Event, and then select Done with Trigger Events.
-
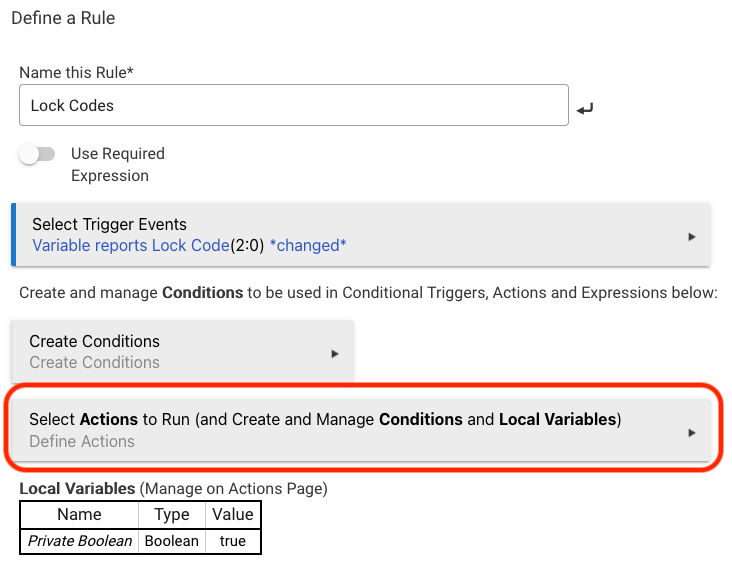
Navigate into the Select Actions to Run page.
-
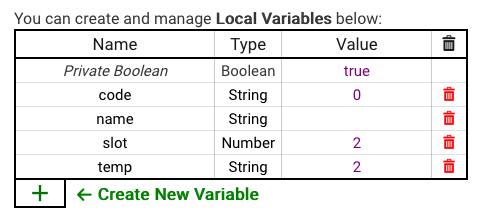
Select the Create Local Variable link underneath the local variables table (towards the bottom of this page), once each, to create each of the following variables with the following Name, Type and Value:
- Name code, type String, value 0
- Name name, type String, value (blank space -- press the spacebar once, as some value must be provided)
- Name slot, type Number, value 2
- Name temp, type String, value 2
-
Select Create New Action (under the table towards the top of the page) to add your first action to this rule. Select Set Variable, Mode or File, Run Custom Action for "Select Action Type to add," and then Set Variable for "Select Which Action."
-
Choose temp for the Variable to Set, and Token for the string operation.
-
Enable Use variable to get token from? option, then select the Lock Code from the list (under "HUB VARIABLES").
-
Enter : (colon) in the Delimiter field, and 0 in the Index field, then select Done with this action.
-
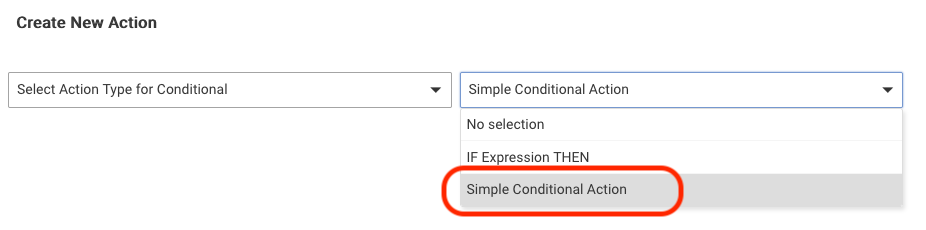
Select Create New Action again. For this action, choose Conditional Actions for the Action Type, and then select Simple Conditional Action.
-
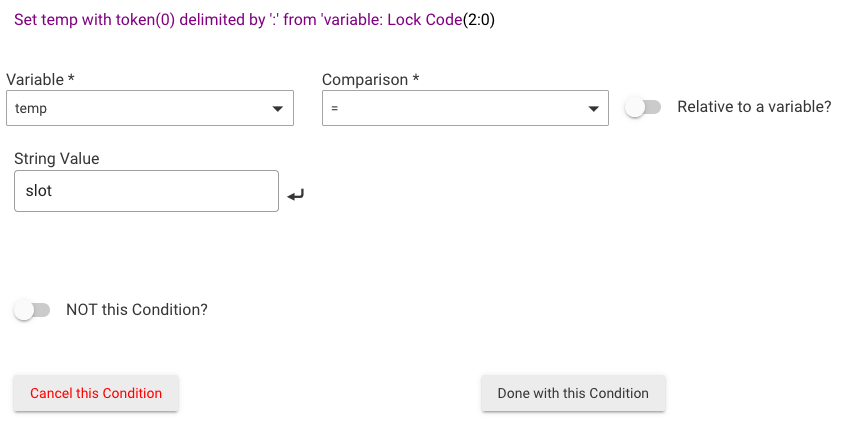
Select Variable under Select capability for Action Condition. Then, choose temp for the variable (under "LOCAL VARIABLES") and = (equals) for the Comparison, then enter slot in the String Value field. Finally, select Done with this Condition.
-
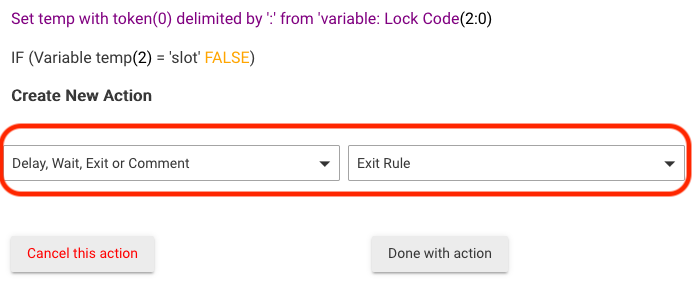
Under Select Action Type for Conditional, select Delay, Wait, Exit or Comment and then Exit Rule for the actual action. Finally, select Done with action.
-
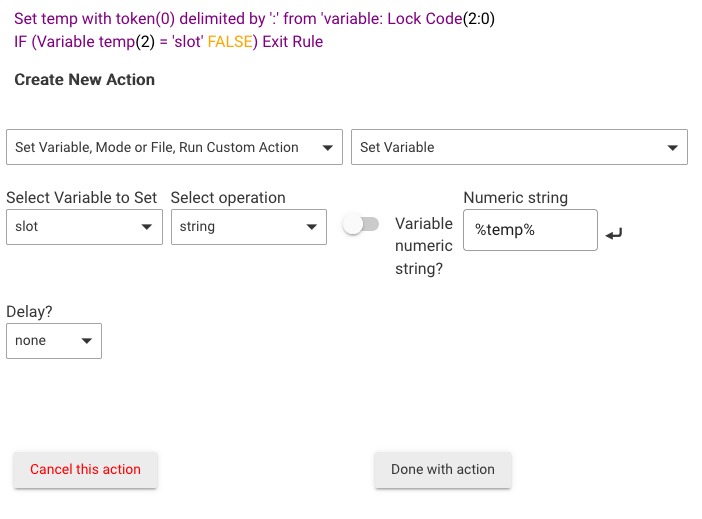
Add a third action by again selecting Create New Action. Choose Set Variable, Mode or File, Run Custom Action, then Set Variable. Select the local slot variable under Select Variable to Set, and choose string under Select Operation.
-
Enter %temp% in the "Numeric string" field, and press the Done with this action button.
-
Add a fourth action. Again, select Create New Action, then again select Set Variable, Mode or File, Run Custom Action, then Set Variable.
-
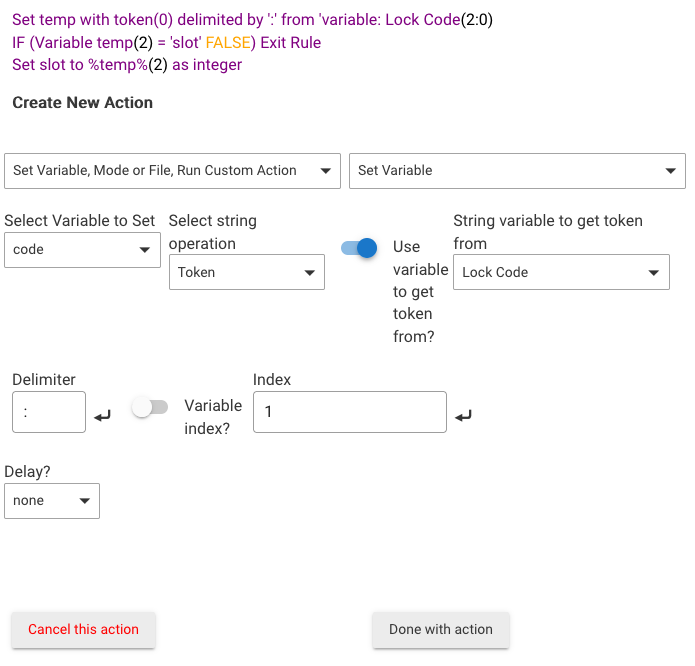
Select code for the Variable to Set, and choose Token for the string operation. Enable the Use variable to get token from? option, and choose the hub variable Lock Code as the variable.
-
Enter : (colon) in the Delimiter field, and 1 in the Index field, then select Done with action.
-
Add a fifth action. You will once again select Create New Action, then Set Variable, Mode or File, Run Custom Action, then Set Variable.
-
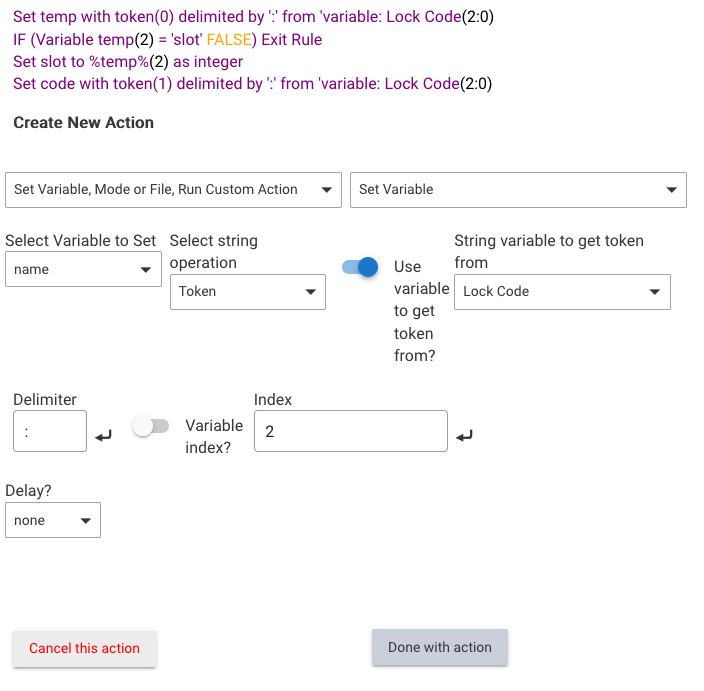
Select name for the Variable to Set, and choose Token for the string operation. Enable the Use variable to get token from? option and choose the hub variable Lock Code as the "String variable to get token from."
-
Type a : (colon) in the Delimiter field, and 2 in the Index field, then select Done with action.
-
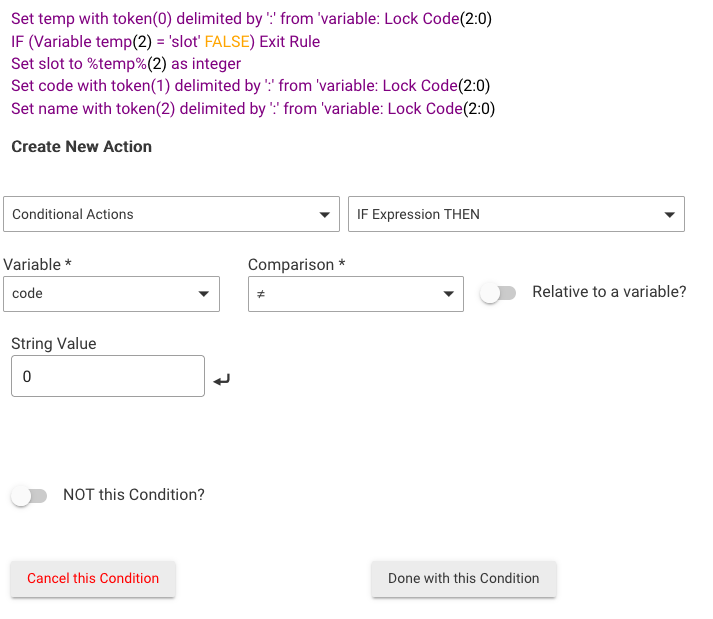
Again, select Create New Action to add a sixth action. Now, choose Conditional Actions for the Action Type, and then select IF Expression THEN for the action.
-
Under Define Expression Element, then select --> New Condition.
-
Select Variable for the Action Condition capability, code as the variable, and ≠ (not equal to) for the Comparison. Enter 0 in the String Value field. Then select Done with this Condition, followed by Done with IF Expression THEN.
-
Add a seventh action by choosing Create New Action. Select Set Variable, Mode or File, Run Custom Action and then Run Custom Action.

-
Under Select capability of action device, select Lock. Choose the desired lock under Select Locks to act on (choosing Update after selecting a new device from the list).
-
Under Select custom command, select setCode.
-
Under parameter type, choose number. Enable the Variable integer value? option, then select the local slot variable from the Variable integer value list.
-
Click/tap the Add another parameter button. Choose string for the parameter type, and enter %code% in the "string value" field. Click/tap outside the "string value" field to save your entry.
-
Add a third parameter: again, select Add another parameter. Then, choose string for the parameter type, and enter %name% in the "string value" field. Click/tap outside the field to save.
-
When all three parameters have been entered, select Done with action button.
-
Tap the ELSE box underneath the table (next to the "Create New Action" and "or add:" text) to add an ELSE line as a new action line in your rule. (If you do not see this option, you may also add a new action and select Conditional Actions for the Action Type and then select ELSE as the action.)
-
Add another action by selecting Create New Action. Again, you will be adding a custom action. Select Set Variable, Mode or File, Run Custom Action, then Run Custom Action. Select Lock for the capability of the action device, then choose your lock from the list of devices (and select Update or collapse the list to save your selection).
-
Select deleteCode for the custom command.
-
Add a parameter: under parameter type, choose number. Enable the Variable integer value? option, then select the local slot variable from the Variable integer value list. Then, select Done with action.
-
Tap the END-IF box underneath the table (next to the "Create New Action" and "or add:" text) to add an END-IF line as the last action in your rule. (If you do not see this option, you may also add a new action and select Conditional Actions for the Action Type and then select END-IF as the action.)
-
Add another action to your rule by again selecting Create New Action. Choose Set Variable, Mode or File, Run Custom Action, then Set Variable.
-
Select the Lock Code hub variable under "Select Variable to Set," and then select Set string for the operation. In the "String to set Lock Code to" field, enter slot:code:name (enter this literal text, and don't forget the colons). Click/tap outside the text box to save.
- The purpose of this action is to reset the displayed text to "slot:code:name" so the previously entered lock code will not be shown. -
Select Done with action, then the Done with Actions button, and finally the Done button (at the bottom of the page) for the rule.
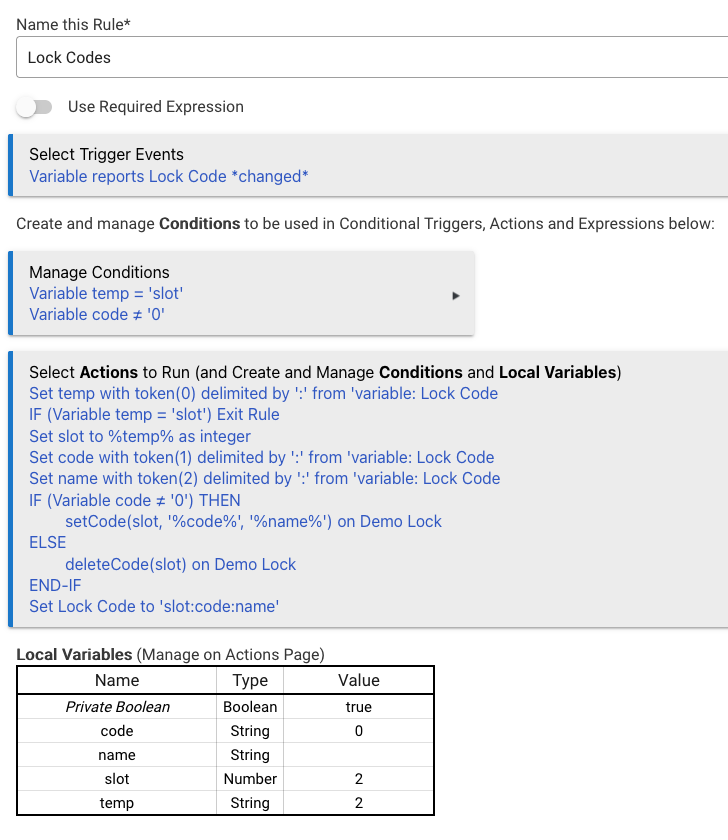
The finished rule should look like:
Part 3: Create a Dashboard Lock Code Tile
-
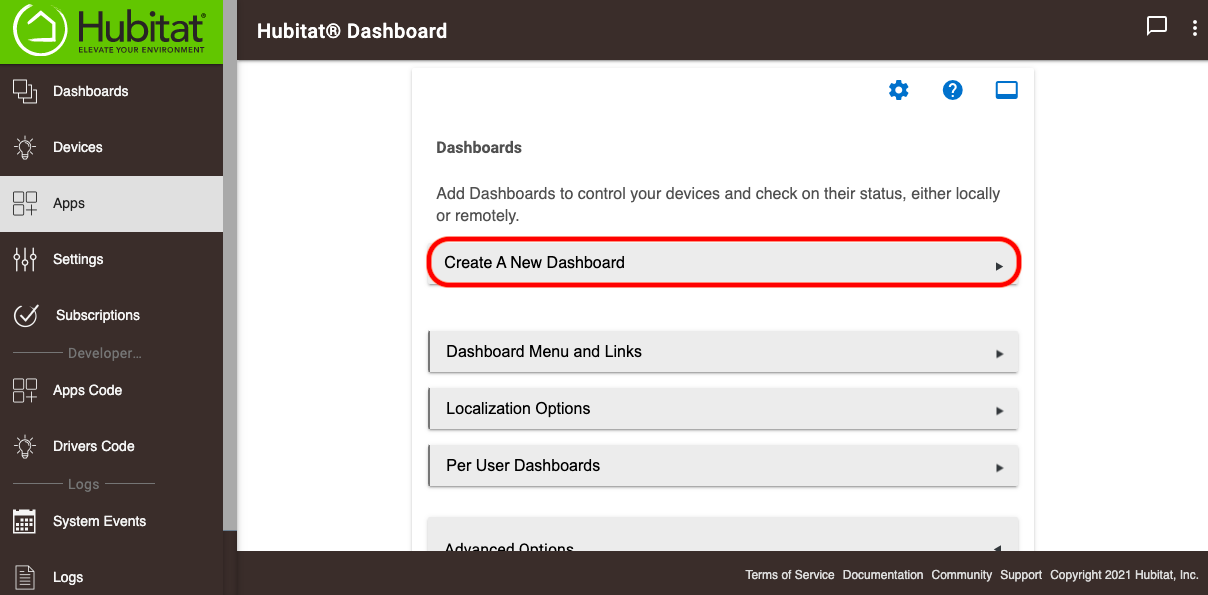
Navigate to Apps. Then, either create a new Dashboard inside the Hubitat Dashboard app itself (install it first if it does not appear in your Apps list) or any dashboard "child apps" underneath it you may have already created, depending on whether you want to crete a new Dashboard for this purpose or add this tile to an existing Dashboard.
-
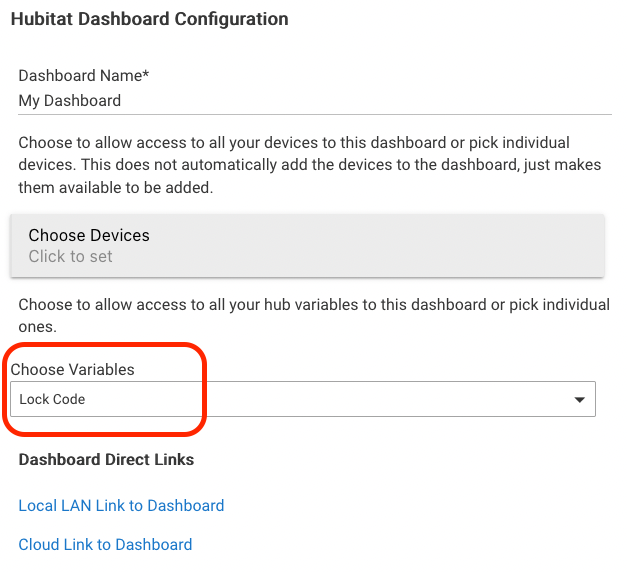
If creating a new Dashboard, type a name of your choosing under Dashboard Name on the page that will appear when creating a new Dashboard.
-
For either new or existing Dashboards, select Lock Code under the Choose Variables list to authorize this variable for use on the Dashboard. (Of course, you can also select other devices or variables you may want to use on this Dashboard for other purposes.)
-
For security, it is highly recommended to add a PIN to this Dashboard and to avoid using the "Legacy" links (instead use the regular Dashboard links, the mobile app, or per-user links). To add a PIN, Expand the Advanced heading, and provide a numeric value of your choice under Require a numerical pin to be entered before loading the Dashboard.
- Further details can be found in the Hubitat Dashboard documentation.
-
Open the dashboard itself (e.g., using the Local LAN Link to Dashboard link on this page).
-
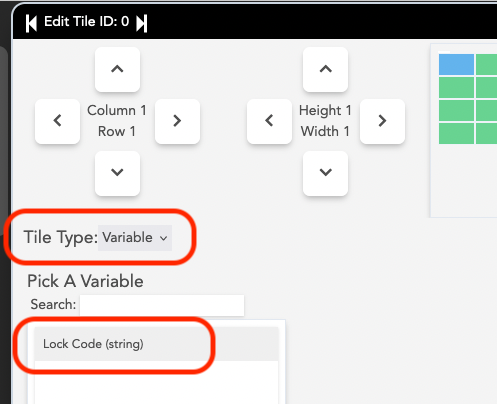
Select the + icon in the upper right to add a new tile. Under Tile Type, choose Variable, then select Lock Code as the variable.
-
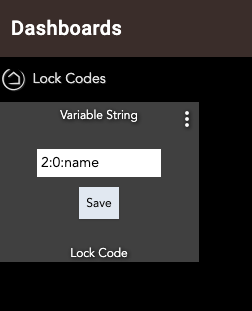
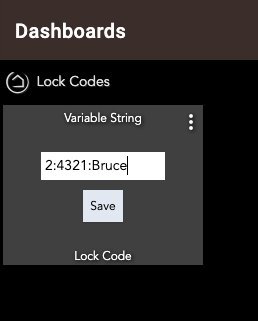
To use this tile to manage lock codes, click/tap the Dashboard tile and enter a slot number for the code to reside at, the lock code you want to add, and the name to be associated with the code. Then, select Save. This will add the code at the specified position.
-
Press Save.
-
To remove a code, entering the slot number, a colon, and a zero (the name is not required for removal; matching is done by position, not name):