Home Page
Home Page (Main Menu)
Your hub's home page is where you will land if you type your hub IP address into your browser
NOTE: You must be on the same network as the hub to access it on your local network. You can use the optional Remote Admin service to access the hub outside your own network. You do not need either of these options for monitoring or control of devices (this interface is generally necessary to access only when setting up your hub, adding or removing devices, or creating or modifying apps).
Hubitat® Dashboard is a built-in app with both local and cloud options that can be used to view and control devices, as is the "Devices" feature in the mobile app (the app can also be used to easily access configured Hubitat® Dashboards, though it is not required for this).
NOTE: It is a good idea to bookmark your hub home page for quick access (and configure a DHCP reservation in your router so it does not change IP addresses; see Registration and Setup for more).
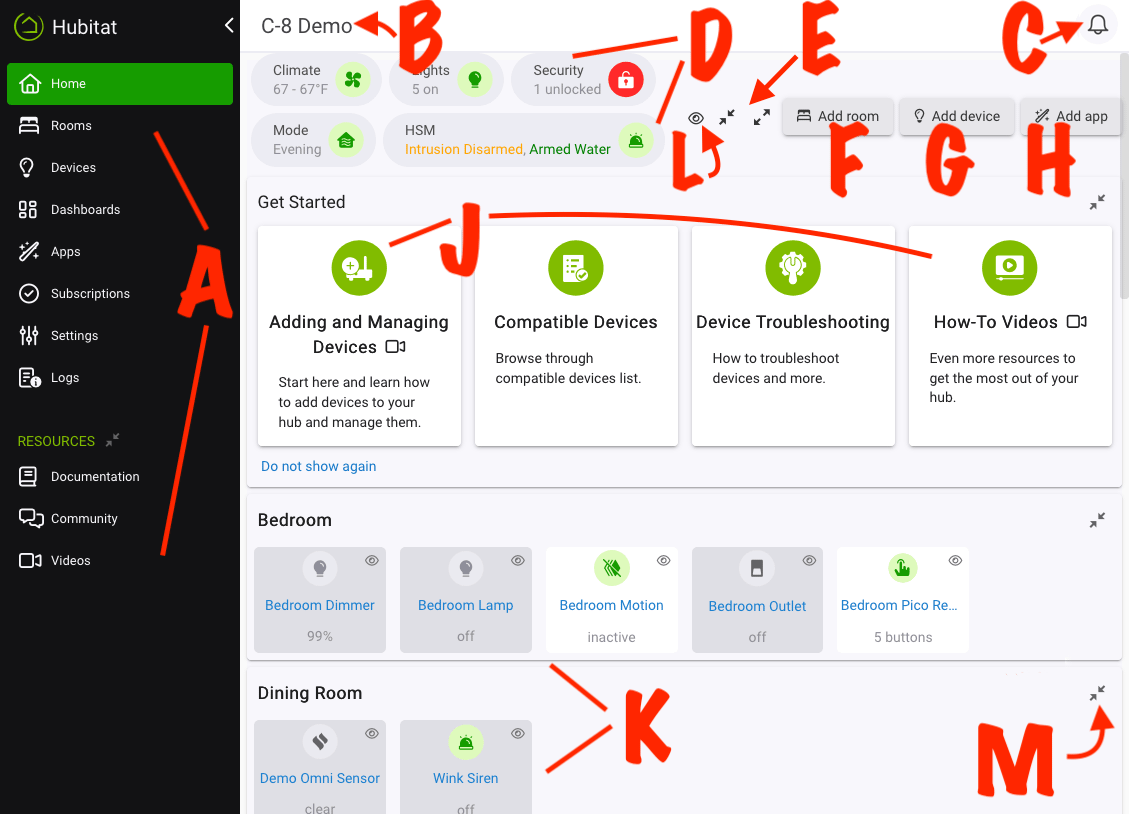
Main Menu Links (A)
- Home: Can be used to navigate back to this page from any other page in the interface
- Rooms: Create rooms to organize and sort devices for use in the web interface and the mobile app
- Devices: View and edit details of installed devices or add new devices
- Dashboards: Provides easy access to any Hubitat Dashboard and Easy Dashboard apps you have set up (will not appear if no dashboard apps installed; use "Apps" link to manage dashboards themselves)
- Apps: Install and access apps to build rules, integrate certain devices, and extend functionality
- Settings: Adjust Z-Wave and Zigbee settings, update, backup/restore, and safely shut down or reboot your hub
- Subscriptions: Manage optional hub subscriptions to Hub Protect, Cloud Backup or Remote Admin
- Logs: Open live or past logs of app, device, and system activity, or access other informational utilities.
- The Resources section contains links to the documentation (here), the Community forum, and Hubitat's YouTube channel with video documentation
- Some users may also see a For Developers section offering links to the Apps Code, Drivers Code, Libraries Code, or Bundles pages for adding custom code to your hub (see below to enable if needed)
These and quick links to other tools are also available using the “cards” on the right (F).
Developer Tools
To show/hide Apps Code, Drivers Code, and other developer and custom code tools, select the arrows icon next to the For Developers heading. If you do not see this heading at all, enable Show advanced/developer options from Settings:
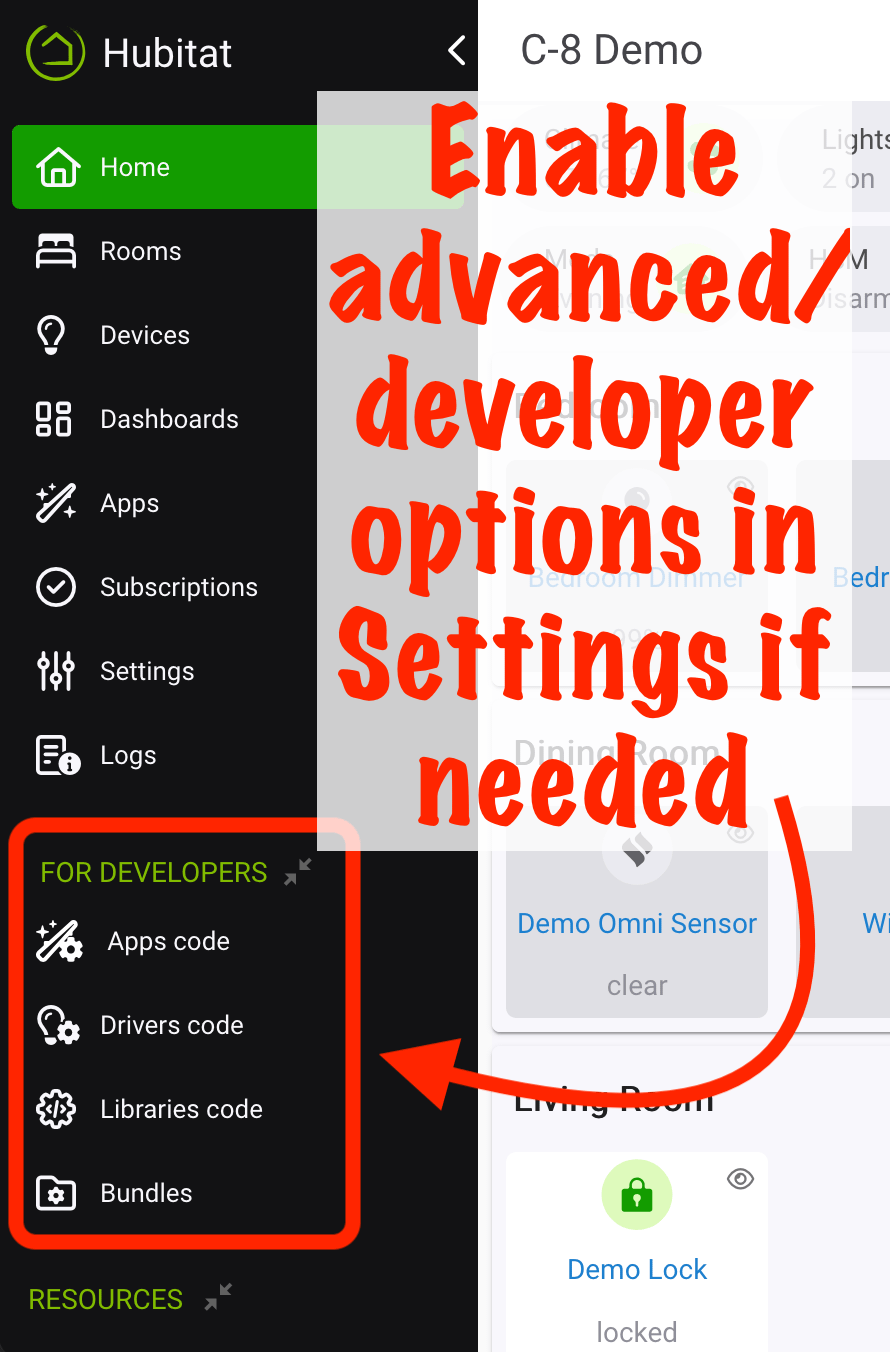
These links expose features that are necessary to add custom code to your hub as either a developer or a consumer of custom apps, drivers, or libraries. Note that support for any such code may be provided by the developer but is not officially provided by Hubitat.
- Apps Code: Load and edit user-created app code
- Drivers Code: Load and edit user-created device driver code
- Libraries Code: Load and edit user-created library code that may be shared among apps or drivers
- Bundles: Load and edit user-created "bundles" that may include app, driver, and/or library code in a single ZIP file
Like with Developer Tools, the arrows next to the Resources heading may also be used to expand/collpase (show or hide) the menu entries underneath these headings. If you see the heading but not the menu items, ensure the section is expanded.
Header (B, C)
In the top right of the header on every hub page, you will see three items:
- Hub Name (B): As configured during initial setup and can be managed in Hub Details
- Notifications (C): Alerts and notifications, like the availability of an update or high hub resource usage, will appear here. The icon will be badged to indicate this:

As you navigate to other pages, the hub name may show breadcrumbs indicating where you are, e.g., "My Hub > Devices" when you are on the Devices page. Selecting "My Hub" (or whatever your hub name is) will return you to this page, and in some cases you may also be able to select another path between the home page and your current page to navigate back to that page.
Main Content (D though M)
The main body of the page contains a quick overview of select device types on your hub; easy access to manage rooms, devices, and apps; and a view into the status of many types of devices, sorted by room (as configured in Rooms).
If you do not want to see certain devices in this view, they can be hidden using the eye icon in the top right of the device tile. By default, these will then be hidden. To show hidden devices, select the eye icon at the top of the page (L). A hidden device can be un-hidden by first enabling display of hidden devices using this option and then selecting the eye-with-slash icon in the top right of that device tile (which would now be visible) to un-hide.
The status summary (D) provides a quick overview of temperature sensors and thermostats, lights (switches, dimmers, and bulbs), security (locks), hub mode, and Hubitat Safety Monitor status. By default, all non-virtual devices of the matching category (lights/switches, locks, etc.) are included in summaries. This can be customized by keeping in mind the following:
- Virtual devices can be included or excluded by selecting the desired option from the settings icon (gear icon near E). Virtual devices are excluded from the status summary by default.
- By default, only non-hidden devices are included in summaries (this can also be changed using the settings icon). Therefore, an easy way to exclude specific devices from the status summary is to hide the devices by using the eye icon in the top right of the device tile (and don't enable the option to include hidden devices in summaries).
- Whether "hidden" tiles are displayed in the grid of tiles can be toggled using the eye icon above the grid (labeled L above). This can be useful to either:
- If you want to "hide" devices only to remove them from the summary while still showing them in the grid, keep the option to display hidden tiles enabled (i.e., with hidden devices showing).
The Add room, Add device, and Add app buttons (F, G, and H) provide a quick way to add a room, device, or built-in app to your hub. More advanced management of these features can be done on the Rooms, Devices, or Apps pages themselves.
The Get Started section (J) provides links to documentation and other information that may be helpful for new hub users, including a list of compatible devices and how to add devices. This section can be hidden by selecting the Do not show again link at the bottom of this section.
The rest of the page provides an overview of device state for common types of devices (similar to a very simple dashboard, though more customizable options such as Easy Dashboard and Hubitat Dashboard are available, more customizable, and generally simpler to access). This is is illustrated by the sections (rooms and also a section for "Favorites" from the mobile app) and tiles (devices) labeled K above. Selecting a device here (clicking or tapping on the name) will take you to the device detail page for this device, allowing you to view more information.
A section/room can be collapsed or expanded using the expand or collapse arrows for the individual room (M) or all rooms at the same time (inward and outward arrows in E). By default, all rooms are expanded and show all (non-hidden) devices underneath the room name. When collapsed, a room name is reduced to a single tile with an expand arrow that can be used to again show the devices inside that room. For common device types, the device tile will contain an icon representing one of the current states of the device (motion active/inactive, contact open/closed, switch on/off, etc.). Selecting the device name will navigate you to the Rooms page with this device highlighted; from there, you can access the device detail page page.
Footer
The footer (not pictured; this will appear at the very bottom of the page) contains helpful links:
- Documentation: Takes you to the Hubitat Documentation pages (here!)
- Community: Takes you to the Hubitat Community forum, a great place to get help from fellow users or find inspiration for new automations, etc.
- Videos: Takes you to Hubitat's YouTube channel with documentation videos and other video resources
- FAQ: Takes you to a list of frequently asked questions on the Community forum
- Terms of Service: The terms to which you must agree before using the hub